کد:
http://simonjday.wordpress.com/2009/06/12/creating-a-network-attached-storage-vmware-using-free-nas/
This Tutorial will give you a run down on how to create a VMware using the free NAS FreeBSD Distro Free NAS
FreeNAS [FreeNAS]
Create a new VMware Virtual Server
Using the create new Server wizard create a new vmware server of type Other Linux 2.4 kernel
Assign a HDD of at least 8GB
Assign at least 256MB RAM
Download the freenas distro from the freenas site
FreeNAS [FreeNAS]
Assign Networking of type bridged or host only as the NAS server should have a fixed IP address
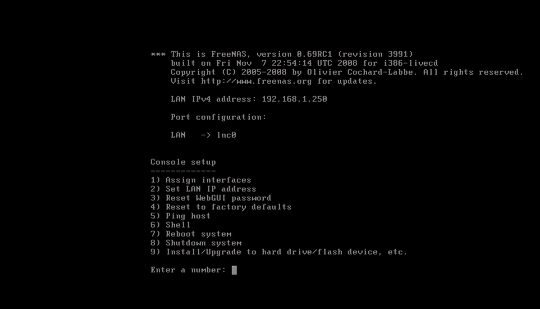
Start up the Newly created VMware Server and allow Free Nas to boot up until it reaches the Console Setup Screen (See Above Screen Shot)
 Install Free NAS on the Virtual machine

From the Console Setup Window choose option 9 Install/Upgrade to Hard Drive
Choose Option 2 Install embedded OS on HDD + Data Partition.
Click OK
Click OK
Select the CD-ROM Drive Found as the Installer source
Select the Target VMWare virtual disk as the Installer Target
Allow the Installer to continue
After it has formatted the disk Select Enter to return to the Install & Upgrade Screen
Choose Exit Option to return to the Setup Console
Assign a LAN IP Address for the Install

From the Console Setup Screen Choose Option 2 to Set the LAN IP address
Assign an IPv4 Static Address
DO NOT USE DHCP
Once the IP has been assigned shutdown the System from the Console Setup menu and remove the ISO image of Free NAS from the virtual machine and then Start up the VM again to ensure it boots from the newly installed O/S and not the CD-ROM.
Access the Free NAS Admin Web GUI
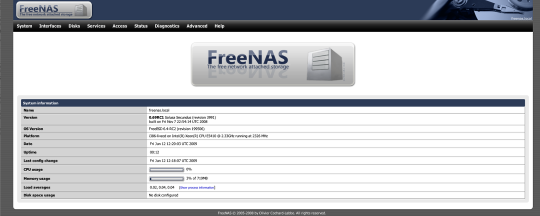
Once the Virtual Machine has restarted you should now be able to reach the Free NAS Web Admin GUI using the IP address set in the previous Step
Login with user admin and password freenas
Add The Data Portion of the Data Disk

from The Web GUI Go to the Disk Menu and Choose Management
From The Disk Drop Down Choose the Vmware HDD and Click Add
Click Apply Changes
Add the Data Portion of the HDD as a new Mount-point
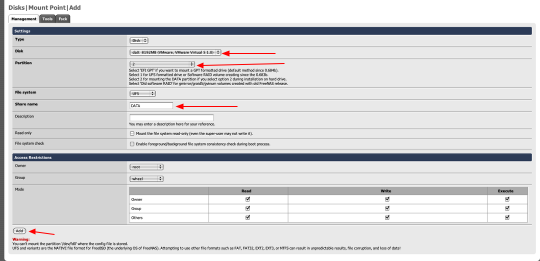
From the Web GUI Choose the Mount-point Menu Disks/Mount-point
click the Red Cross to add a Mount Point
Choose the Disk from the Drop Down created in the previous Step
Choose Partition of type 2 from the PArtition Drop Down
Input a Share Name e.g DATA
Dont Change any Other Options
Click Add
Then Click Apply Changes
Manually Adding Extents

For Each ISCSI Disk we wish to create for our NAS we must create an ISCSI Extent and Target
The Extents are based on a file in the Mount-point created in the previous step and must be created from the shell
Go back to the VMware and choose option 6 (Shell) from the Console Setup menu and this will return a standard linux Shell Prompt
Change Directory to the mount-point created earlier e.g cd /mnt/DATA
For each iSCSI Disk we require we must create an extent file
In this example I will create just one
At the shell prompt in the mount-point directory type touch QD
The name is not important.
We can now add the ISCSI Targets via the WEB GUI so can now go back to the Web GUI
Adding iSCSI Targets
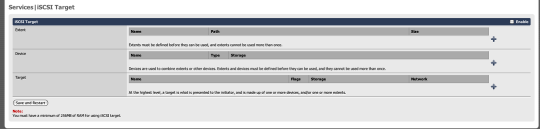
From the WEB GUI go to the Services / iSCSI Target Page
Adding the Extent to the iSCSI Target

On the iSCSI target page in the Web GUI Click the + to add a new extent
On the Add Extent Page Choose Type File and in the Path window set the path to the extent file created from the shell (Use the Radio Button at the right of the window to choose the path to the file.
Set a Size for the Extent in MB and add a comment if you wish
Click Add and the browser should return to the previous page showing the newly added extent.
Creating an iSCSi Target using the newly created extent

From the iSCSI Target Page Click the + at the right of the Target section to add a new iSCSi target.
Choose the extent created in the previous step
Choose the Authorized Network that will have access to this iSCSI Target e.g. 192.168.254.0 / 24.
Click Add to return to the next page.
Completing the iSCSi Target Creation

From the iSCSI Target Page
Select the Enable Checkbox
Then click the Apply Changes button
Then Click the Save and Restart Button to apply the Changes to the Free NAS Server.
We are now finished with the Free NAS setup.
We should now able to attach a Windows Server to this iSCSI Target using the Windows iSCSI
Initiator.
Download and Install the iSCSI Initiator

Download the Microsoft iSCSi Initiator from the Microsoft website
http://www.microsoft.com/downloads/d...displaylang=en
Once the download has finished run the installer
The Installer will place a short cut to the iSCSi configuration tool on your Desktop
Then Launch the Configuration tool in order to add an iSCSi target from our Free NAS server
In the Discovery Tab add the Free NAS server as a Target Portal
Go To the Targets Tab to see the iSCSi disks

In the iSCSI Initiator Tool go to the Targets Tab and you should see the iSCSI Targets provided by your Free NAs server
Select the relevant one and click the Logon button and then check the Automatically Restore this connection checkbox
Click OK
Click OK
The newly attached Disk should now be available in the Disk Management Admin Tool in Windows
Attach a Drive Letter and format the iSCSI disk

Open Administrative Tools Computer Management and go to Disk Management
A wizard should now run once it detects the new Disk
Assign a Drive Letter and format the Drive (NTFS)
You now have an iSCSI attached NAS disk that can be used for example to create a Windows Cluster

 LinkBack URL
 About LinkBacks

