How do I disable DES and Diffie-Hellman 768-bit MODP group 1 for L2TP/IPsec on the ISA VPN server ?
So you may have had a pen test over your VPN server(ISA 2006 SE) and they came up saying that DH 768-bit MODP Group 1 and DES are enabled for IKE MM(that's a pretty standard check). You've been assigned the task to shrink the IKE protection suites. Unfortunetely there is no simple way to do this(not one that I'm aware of).
For example for SSL and TLS, Microsoft has published a list of registry values that you can use to manage the chiper suites for TLS and to disable for example SSL 2.0, please refer to
How to Restrict the Use of Certain Cryptographic Algorithms and Protocols in Schannel.dll.
I'm not saying that this an easy way to to that(as you may want to do it from a GUI), but there is a solution. And
Jason Jones has done a full tutorial on this subject in respect with ISA, please refer to
Hardening SSL Cipher Strength and SSL Protocol Support on ISA Servers.
I'm not, for the moment, aware of such similar document(s) specifying some reg values that can be used to enable or disable DES for IKE(for the default L2TP/IPsec Windows policy).
The good news are that for Vista and Windows 2008 L2TP/IPsec connections, DES and DH 768-bit MODP Group 1 are disabled by default.
So what are we going to do ?
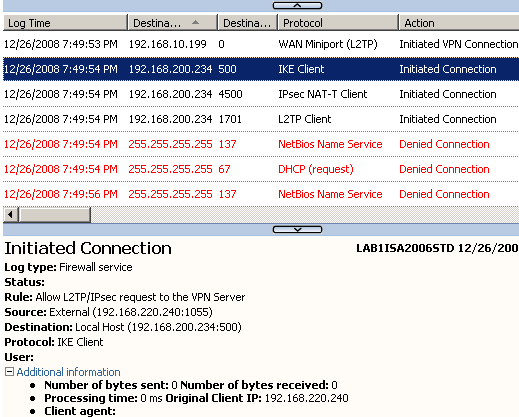
First about what are they(pen testers) talking about ?
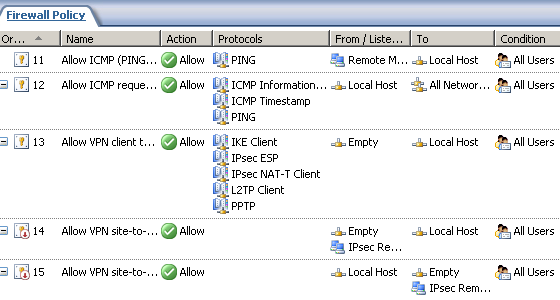
The default IPsec policy for L2TP is enabled on the VPN server(Windows 2003).
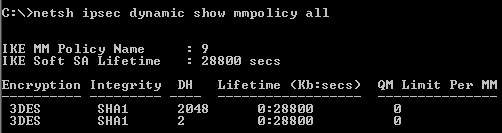
Let's analyze with netsh the available IKE MM protection suites, see
Figure62.
The encryption and hash algorithms attributes determine which algorithm will be used for message encryption and authentication, that is to protect messages 5 and 6 of MM(when the two peers authenticate each other, providing identity protection), the QM messages and any IKE Informational messages sent after IKE MM was established.
The DH group attribute specifies which DH group will be used for deriving a shared secret from which keys for the symmetric encryption algorithm(like 3DES) will be derived. 3DES will be used to encrypt the above mentioned messages. Also, if PFS is not enabled, the MM DH shared secret will be used to derive keys for the symmetric encryption algorithm(like 3DES) used by IPsec ESP to provide confidentiality and integrity for our data. So the stronger the DH group, the "better", for example DH 2048-bit MODP Group 14 matches 3DES' strength, rated at 112-bits of security. As a comparison, AES with 128-bit keys has 128-bits of security, so we cannot derive keys at "full strength" using a DH MODP Group 14 for it.
Note that the hash function plays a role in the keys derivation process.
It looks that we need to disable the last two proposals from
Figure62 (I've enabled the DH 2048-bit MODP Group 14, please refer to
KB 818043). The protection suites are processed from top to down, so the first one is preffered by the VPN server.
Note the Lifetime which specifies how long the IKE SA will last. There is no QM limit per IKE SA.
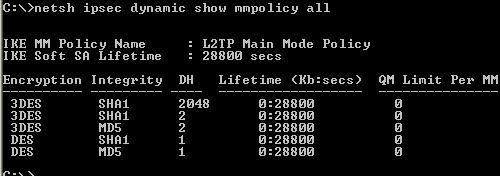 Figure62: Default L2TP Main Mode Policy
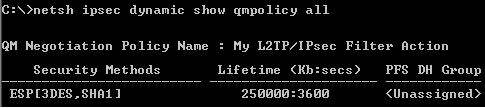
As said above, the IKE SA will be used to protect the IKE QM negotiations.
IKE QM is used to generate IPsec SAs, in our case we need to use ESP Transport Mode for protecting the L2TP tunnel, ESP will provide both confidentiality and integrity.
As seen from
Figure63, the default policy contains multiple protection suites. We don't need AH, as AH is incompatible with NAT devices(behind which typically VPN clients connect), and, as just said, ESP will provide both confidentiality and integrity.
For the best security we can afford, we will use ESP, 3DES as the symmetric encryption algorithm and SHA-1 as the hash function. We cannot enable PFS for session keys(as you see it is disabled by default) because the Windows VPN clients do not use PFS by default, if we do so we will endup being unable to complete the QM negotiations. PFS for session keys enhances the security, because a new DH shared secret is derived with each QM negotiation, so our data will be protected with keys derived from this new shared secret.
It's a good idea to disable DES here. The protection suites are processed from top to down, so the first one is preffered by the VPN server, we're going to change the prefered one, as I want to use SHA-1 instead of MD5.
Note the Lifetime which specifies how long the IPsec SA will last.
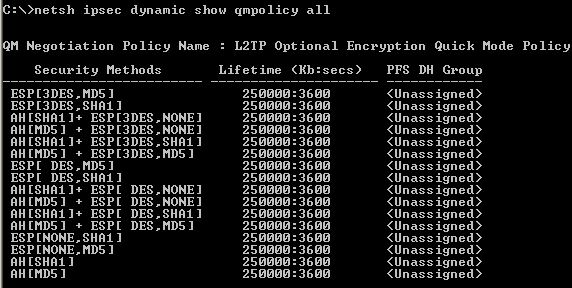 Figure63: Default L2TP Quick Mode Policy
We're not done yet, not at all. For IKE MM we need to specify an authentication method, pre-shared keys and/or certificates authentication(RSA digital signatures).
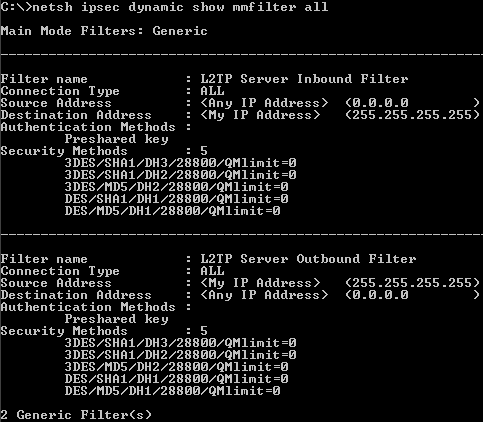
From
Figure64(showing generic filters), we can see that this ISA is using both of them(I've added on ISA a certificate that can be used for IKE authentication from an Enterprise CA).
Also, there are some MM filters that specify from/to which sources/destinations ISA will accept/start IKE negotiations using the specified authentication methods and protection suites.
There is an inbound filter, ISA being a VPN server and an answering gateway(accepting IKE negotiation from any source, as the location of the VPN clients is unknown in advanced, as they are mobile users), and an outbound filter, ISA can act as a calling gateway. ISA's IP address is not specifically configured, as you may enable the VPN server on multiple interfaces(say External and a anonynmous wireless DMZ).
So it looks like a general sort of policy. We don't need to touch these filters.
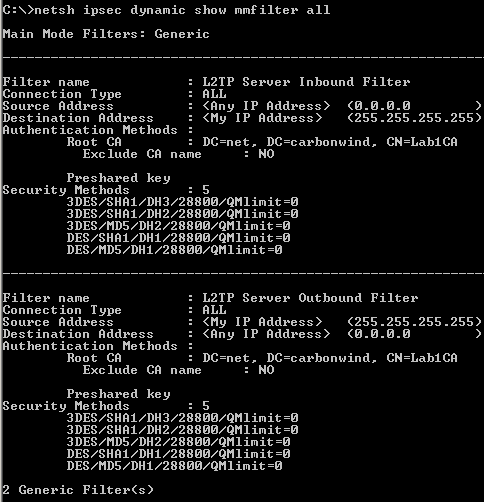 Figure64: Default L2TP Main Mode Filters
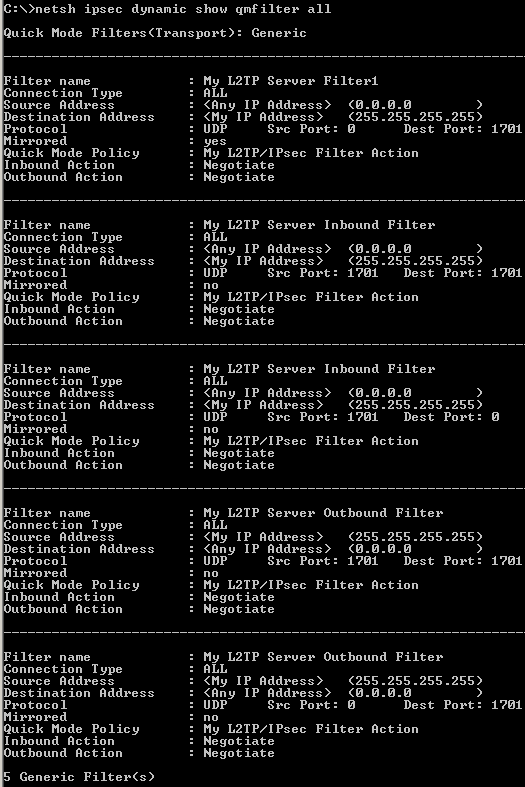
And very very important, we need to closely take a look at the QM filters, see
Figure65(showing generic filters).
These filters say which traffic, from which source and destination needs to be protected.
We need to protect the L2TP tunnel, an UDP based implementation. L2TP uses UDP port 1701. However, this aspect may vary, as specified in
RFC 3193 (see 4.2. IKE Phase 2 Negotiations section). Also this is very important from a compatibility point of view with various VPN clients, which may be kinda' restrictive.
We don't need to touch these filters.
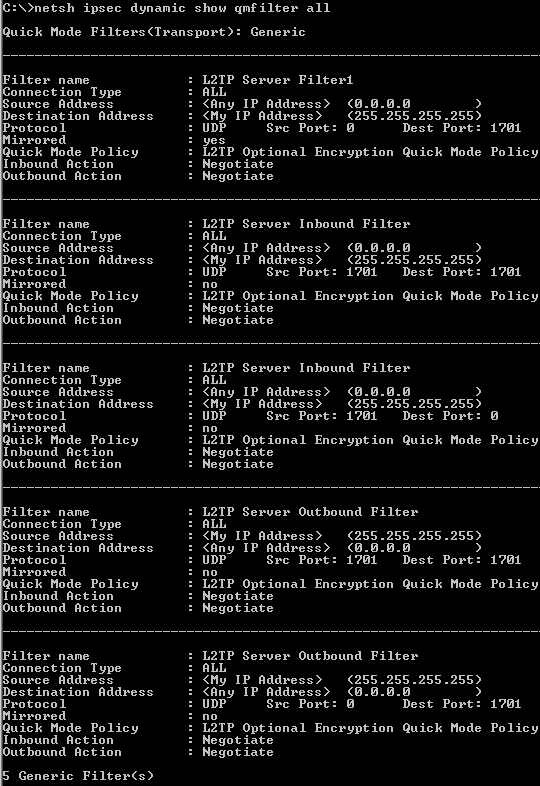 Figure65: Default L2TP Quick Mode Filters
So we need to edit some of these settings. We can use the netsh commands for this. However, our modifications will not stick, they will not be preserved through reboots for example. So we will endup with the default chipers. We might create a script to "keep an eye" on the protection suites, and "adjust" them. But this not quite "ideal", unless assuming you're good at scripting and you can accomplish this task.
Another way of doing this is to disable the default IPsec policy for L2TP and create our own IPsec policy to match the needed changes on the default policy. We know from above how the default policy looks like.
We can disable the default IPsec policy used to protect the L2TP tunnels by setting the
ProhibitIpSec registry value set to 1. After we do that and reboot ISA, the L2TP tunnels will be established in clear, that is, not protected by IPsec. You may want to make sure the VPN server is unreacheable from the external network untill you create, enable and test the custom IPsec policy.
So let's proceed(before you may like to read Microsoft's KB 240262
How to configure an L2TP/IPSec connection by using Preshared Key Authentication and maybe this old doc
Description of the IPSec policy created for L2TP/IPSec).
Do it enterly on your own risk and pleasure(I don't know what's Microsoft position on doing this on the ISA Server).
Note that this is a very sensible aspect, if you do not configure correctly the custom IPsec policy, in the best case you will block the creating of L2TP/IPsec connections or block other traffic, while in the worst case you will create security breaches by lefting certain traffic unprotected. You will need to double check and double test your final custom IPsec policy.
I've disabled the default IPsec policy used to protect the L2TP tunnels.
From the
Administrative Tools menu, launch the
Local Security Policy tool.
Right-click
IP Security Policies on Local Machine, click
Create IP Security Policy, see
Figure66.
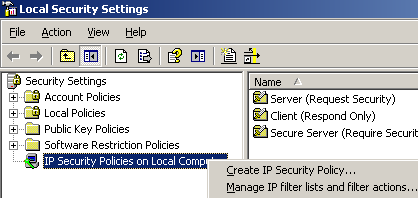 Figure66: Create A New IP Security Policy
Click
Next on the welcome screen, see
Figure67.
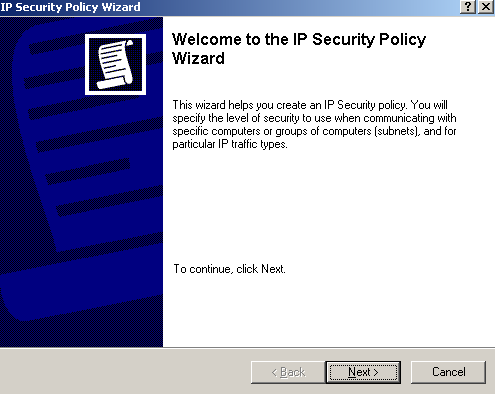 Figure67: IP Security Policy Wizard - Welcome
Enter a suggestive name on the
IP Security Policy Name window and click
Next, see
Figure68.
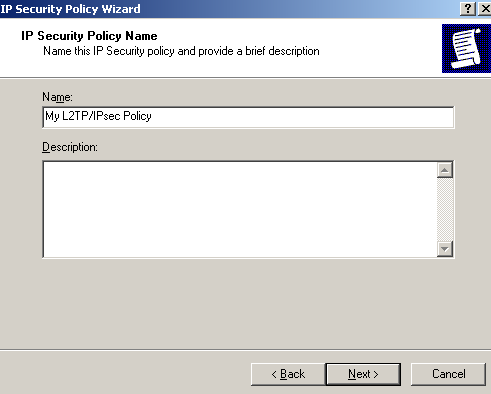 Figure68: IP Security Policy Wizard - Policy Name
On the
Requests for Secure Communication window, clear the
Activate the default response rule checkbox and click
Next, see
Figure69.
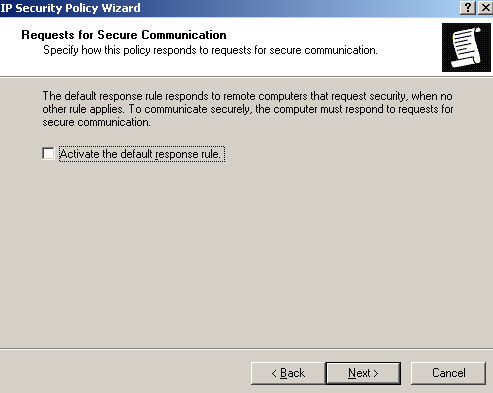 Figure69: IP Security Policy Wizard - Requests for Secure Communication
Make sure the
Edit Properties checkbox is selected on the
Completing the IP Security Policy Wizard window and click
Finish, see
Figure70.
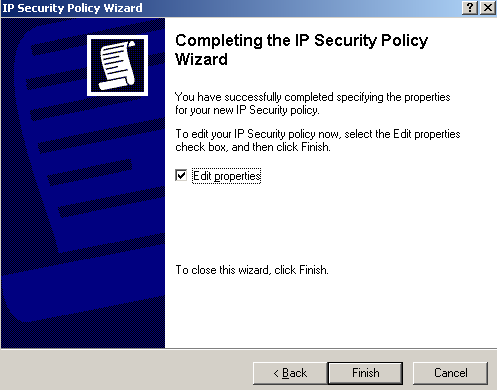 Figure70: IP Security Policy Wizard - Completing the IP Security Policy Wizard
On the new window click
Add on the
Rules tab, see
Figure71. Do not check the
Use Add Wizard checkbox.
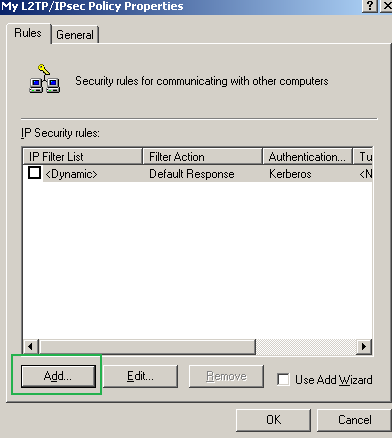 Figure71: Edit My L2TP/IPsec Policy - Add an IP Security Rule
On the
New Rule Properties window, on the
IP Filter List tab, click
Add, see
Figure72.
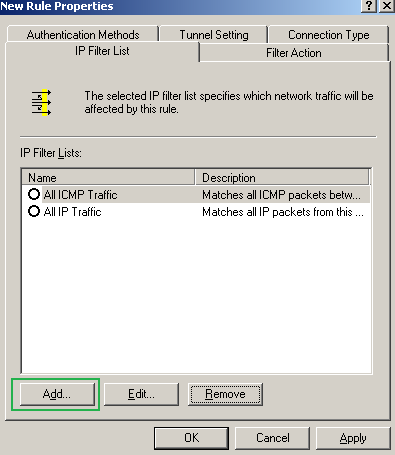 Figure72: Edit My L2TP/IPsec Policy - New Rule Properties: IP Filter tab - Add An IP Filter List
Enter a suggestive name for this
IP Filter List and click
Add, see
Figure73. Now we will add one by one the QM filters that will dictate what traffic needs to be protected by IPsec, remember from
Figure65 that there were five of them. Do not check the
Use Add Wizard checkbox.
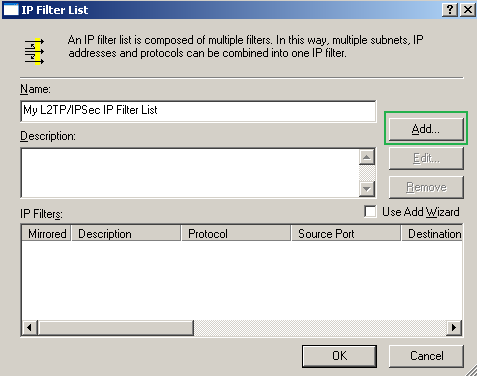 Figure73: Edit My L2TP/IPsec Policy - Add My L2TP/IPsec IP Filter List
To get the filters in the order listed by the netsh command in
Figure65, we will start adding the last filter from that printscreen, giving it a suggestive description, see
Figure74(
Addresses tab),
Figure75(
Protocol tab) and
Figure76(
Description tab).
Leave in the
Addresses tab, as ISA's address the "My IP Address" option, just as in the default policy, as if you have multiple IP addresses on ISA's external NIC or enable the VPN server on multiple interfaces you might get into troubles if you only specify one IP address, that is, only L2TP traffic to and from this IP address will be protected by IPsec(unless you firewall the other IP addresses by the trick described before in this article to drop unwanted packets).
 Figure74: Edit My L2TP/IPsec Policy - Add the first My L2TP Server Outbound Filter: Addresses
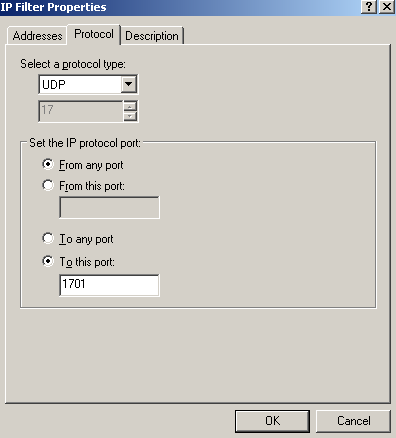 Figure75: Edit My L2TP/IPsec Policy - Add the first My L2TP Server Outbound Filter: Protocol
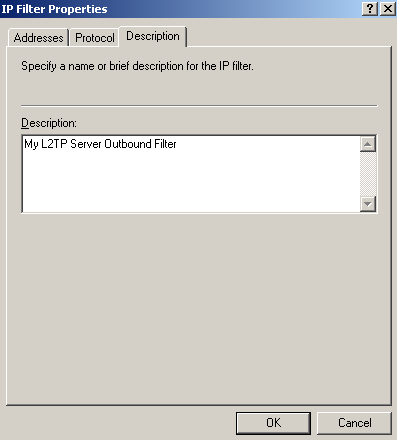 Figure76: Edit My L2TP/IPsec Policy - Add the first My L2TP Server Outbound Filter: Description
Add the second filter from down to top from
Figure65, see
Figure77(
Addresses tab),
Figure78(
Protocol tab) and
Figure79(
Description tab).
 Figure77: Edit My L2TP/IPsec Policy - Add the second My L2TP Server Outbound Filter: Addresses
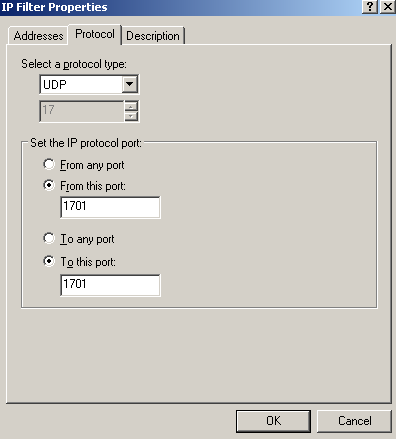 Figure78: Edit My L2TP/IPsec Policy - Add the second My L2TP Server Outbound Filter: Protocol
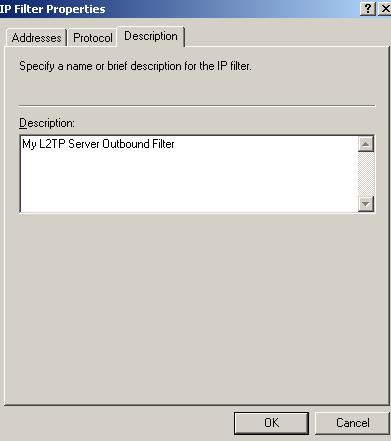 Figure79: Edit My L2TP/IPsec Policy - Add the second My L2TP Server Outbound Filter: Description
Add the third filter from down to top from
Figure65, see
Figure80(
Addresses tab),
Figure81(
Protocol tab) and
Figure82(
Description tab).
 Figure80: Edit My L2TP/IPsec Policy - Add the first My L2TP Server Inbound Filter: Addresses
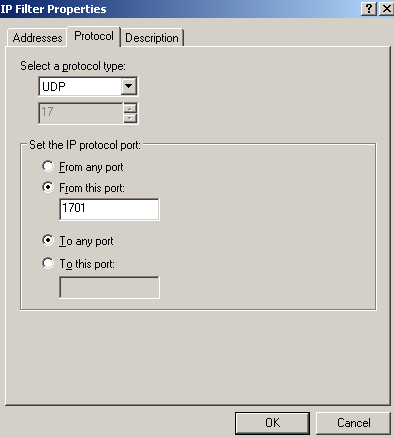 Figure81: Edit My L2TP/IPsec Policy - Add the first My L2TP Server Inbound Filter: Protocol
 Figure82: Edit My L2TP/IPsec Policy - Add the first My L2TP Server Inbound Filter: Description
Add the fourth filter from down to top from
Figure65, see
Figure83(
Addresses tab),
Figure84(
Protocol tab) and
Figure85(
Description tab).
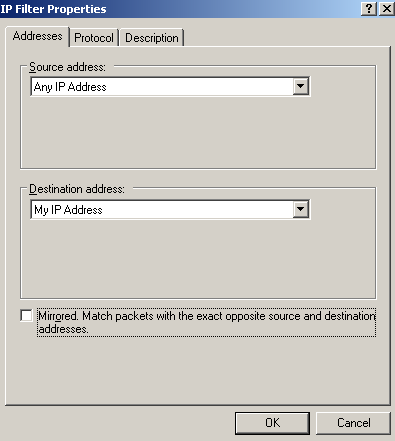 Figure83: Edit My L2TP/IPsec Policy - Add the second My L2TP Server Inbound Filter: Addresses
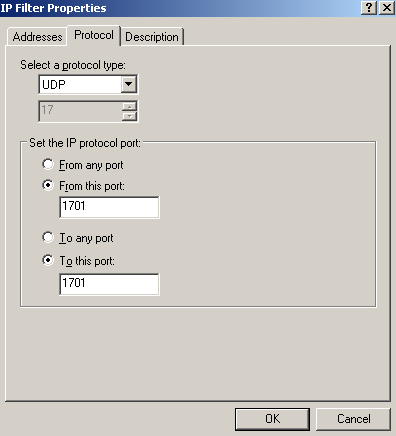 Figure84: Edit My L2TP/IPsec Policy - Add the second My L2TP Server Inbound Filter: Protocol
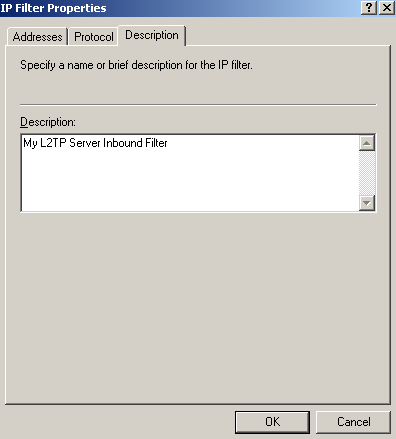 Figure85: Edit My L2TP/IPsec Policy - Add the second My L2TP Server Inbound Filter: Description
Add the last filter from down to top from
Figure65, see
Figure86(
Addresses tab),
Figure87(
Protocol tab) and
Figure88(
Description tab).
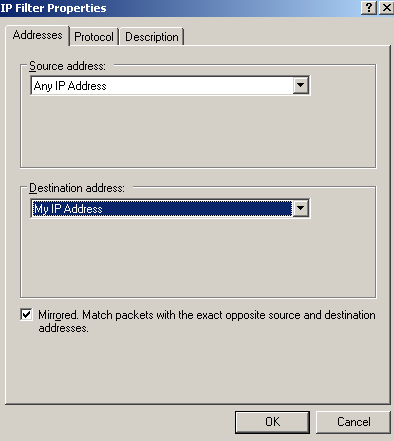 Figure86: Edit My L2TP/IPsec Policy - Add the My L2TP Server Filter1: Addresses
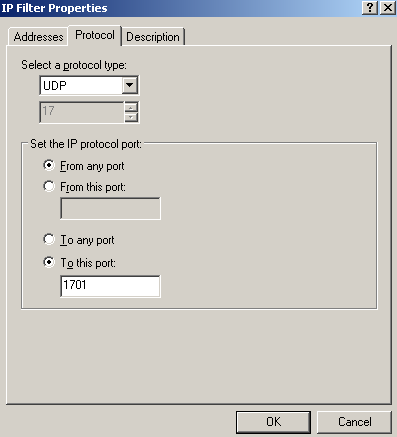 Figure87: Edit My L2TP/IPsec Policy - Add the My L2TP Server Filter1: Protocol
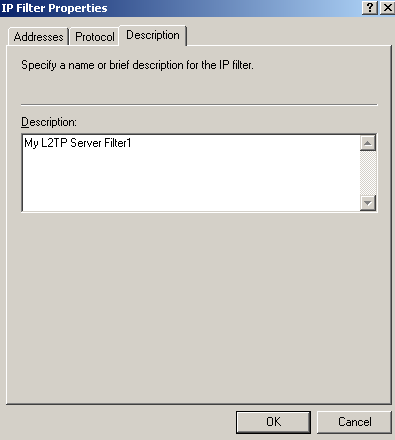 Figure88: Edit My L2TP/IPsec Policy - Add the My L2TP Server Filter1: Description
So now we're done entering all the five filters, see
Figure89. Click
OK to close this window.
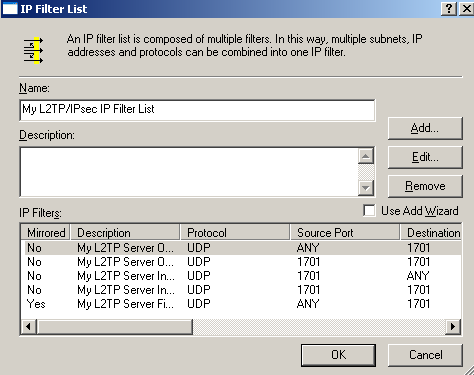 Figure89: Edit My L2TP/IPsec Policy - My L2TP/IPsec IP Filter List Completed
Coming back on the
New Rule Properties window, on the
IP Filter List tab, we will select our newly created custom IP Filter List, see
Figure90.
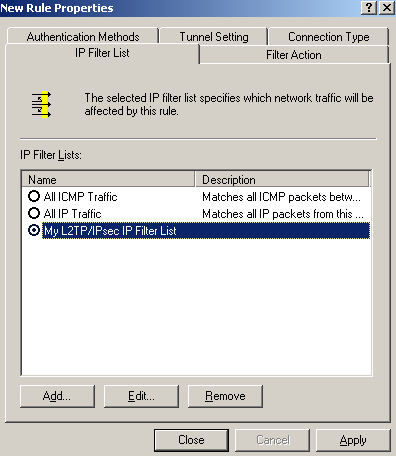 Figure90: Edit My L2TP/IPsec Policy - New Rule Properties: IP Filter List tab
On the
New Rule Properties window, click the
Filter Action tab, see
Figure91. Click the
Add buton, make sure the
Use Add Wizard checkbox is not selected.
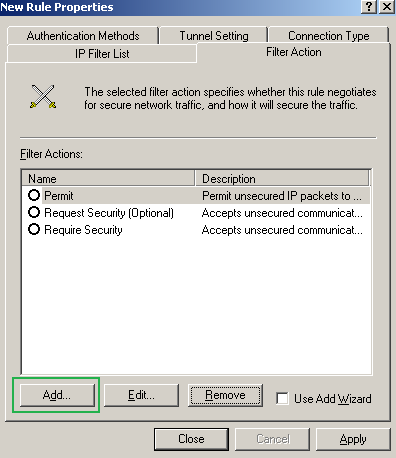 Figure91: Edit My L2TP/IPsec Policy - New Rule Properties: Filter Action tab
On the
New Filter Action Properties window, on the
Security Methods tab, select
Negotiate Security, remove any
Security Methods(if any) and click the
Add button, see
Figure92.
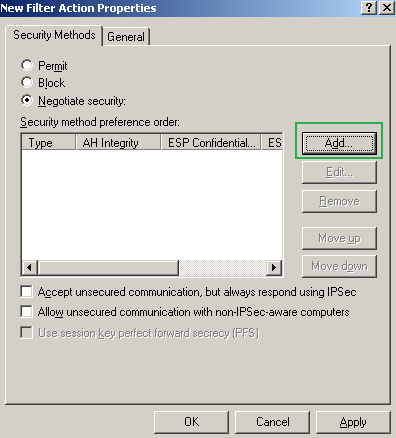 Figure92: Edit My L2TP/IPsec Policy - New Filter Action Properties: Security Methods tab
On the
New Security Method window select
Custom and click the
Settings... button.
Put a checkmark into the
Data integrity and encryption(ESP) checkbox -remember that we wanted this type of protection for our L2TP tunnels-, select SHA-1, 3DES.
In the
Session key settings area, check the
Generate a new key every checkboxes and enter
250000 Kbytes and
3600 seconds, see
Figure93.
As you have noted we've defined the protection suite to be negotiated during IKE QM for our L2TP tunnels. Click OK to add this custom security method.
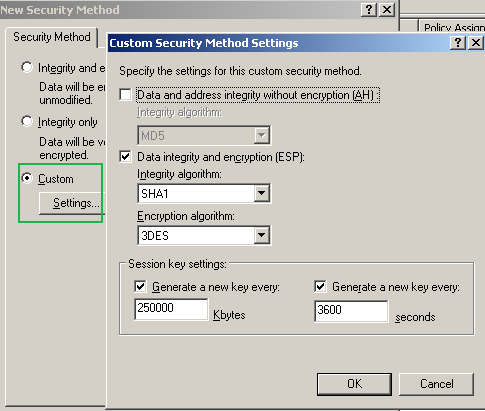 Figure93: Edit My L2TP/IPsec Policy - New Security Method: Add a Custom Security Method
On the
New Filter Action Properties window, on the
Security Methods tab we can see the custom security method we've added,
Figure94. Leave unchecked the three checkboxes found in the lower section of the
New Filter Action Properties window.
Note the PFS options for session keys. Remember, as tempted as may be, we cannot use this setting, as by default Windows VPN clients do not support it. Unless you define custom IPsec policies too on the VPN clients, do not check this checkbox.
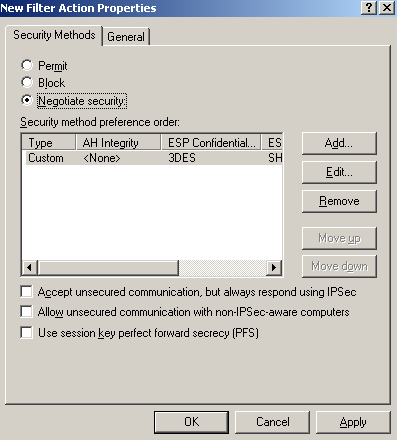 Figure94: Edit My L2TP/IPsec Policy - New Filter Action Properties: Security Methods tab - Added Custom Security Method
On the
New Filter Action Properties window, click the
General Methods tab and enter a suggestive name for the New Filter Action, see
Figure95. Click
OK to close the
New Filter Action Properties window.
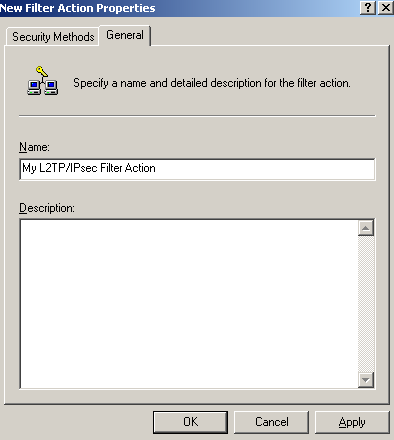 Figure95: Edit My L2TP/IPsec Policy - New Filter Action Properties: General tab - Enter A Name
On the
New Rule Properties window, on the
New Filter Action tab, select the newly created Filter Action, see
Figure96.
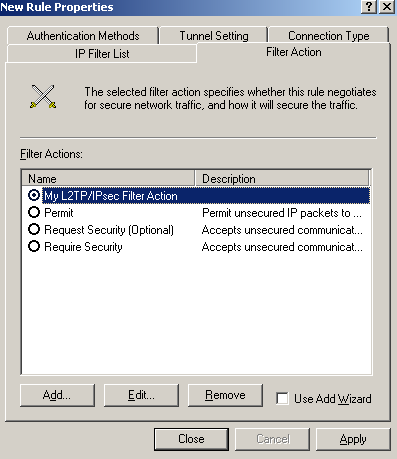 Figure96: Edit My L2TP/IPsec Policy - New Rule Properties: Filter Action tab - Newly Added Filter Action
On the
New Rule Properties window, on the
Connection Type tab, select
All network connections, see
Figure97.
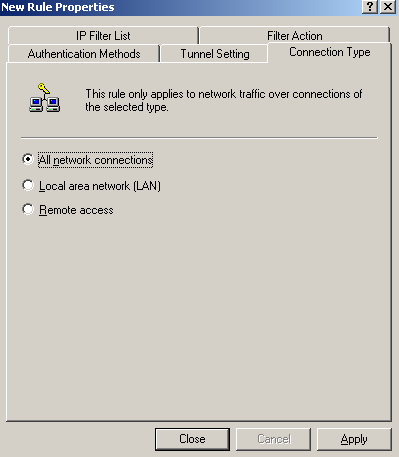 Figure97: Edit My L2TP/IPsec Policy - New Rule Properties: Connection Type tab
On the
New Rule Properties window, on the
Tunnel Settings tab, select
This rule does not specify an IPsec tunnel, as we are not using IPsec tunnel mode, see
Figure98.
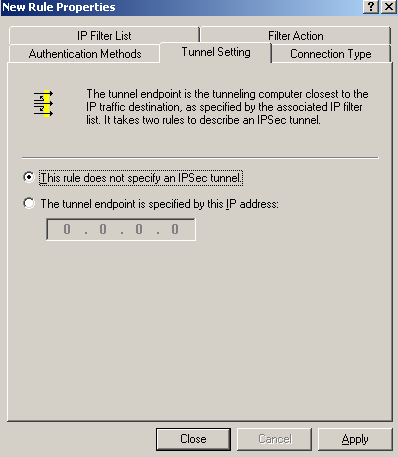 Figure98: Edit My L2TP/IPsec Policy - New Rule Properties: Tunnel Settings tab
On the
New Rule Properties window, on the
Authentication Methods tab, I've added two authentication methods for IKE MM, with certificates and with a pre-shared key, see
Figure99.
Use the pre-shared key only for testing. If you do not need it, remove it from this policy. Remember that the pre-shared key entered on ISA's GUI for the VPN clients does not matter anymore, if you want to use a pre-shared key, you need to enter it here.
For the IKE authentication with certificates I've specified that a certificate from my Enterprise CA to be used, see
Figure100. It appears that the Windows 2003 API or so is unable to be manually configured(from GUI or CLI) to use a specific certificate for IKE authentication. Please refer to this Microsoft article
Public Key Certificate, section
IKE certificate selection process.
The authentication methods are processed from top to down, so the authentication method with certificates is prefered.
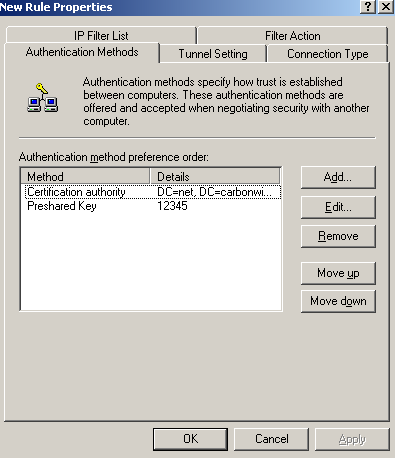 Figure99: Edit My L2TP/IPsec Policy - New Rule Properties: Authentication Methods tab - Two Authentication Methods Added
Note from
Figure100 that there is an option,
Exclude the CA name from the certificate request, this option is disabled on the default policy. The VPN server requests a certificate from the client during IKE authentication with certificates, and specifies which CA has issued this certificate. By default on ISA, if multiple certificates from different CAs can be used for IKE authentication, ISA will ask the client to provide a cerytificate issued by one of this CAs. Some may feel, that if a private CA is used, certain information may leak, so they may enable the
Exclude the CA name from the certificate request option. Doing that indeed they may enhance security, however, they may also introduce certain issues, for example the VPN client may have multiple certificates from different CAs that can be used for IKE authentication(say if the VPN client belongs to one of your business partners, as they may have their own private CA) and this L2TP/IPsec VPN client cannot be configured with which certificate to use when connecting to a certain L2TP/IPsec server(the case of the Windows L2TP/IPsec VPN clients) or some L2TP/IPsec VPN clients might not respond to a certificate request that does not include a CA name(Windows L2TP/IPsec VPN clients do respond to such a request).
Click
OK to close the
Edit Authentication Method Property window.
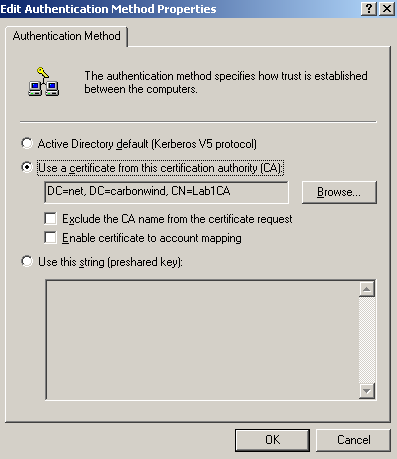 Figure100: Edit My L2TP/IPsec Policy - New Rule Properties: Authentication Methods tab - Add an Authentication Method: Use a certificate from this CA
Click
OK to close the
New Rule Properties window, and on the
Rules tab select the newly created rule, see
Figure101.
 Figure101: Edit My L2TP/IPsec Policy - Rules tab: Newly Added Rule
We're not done yet. We need to enter the protection suites for IKE MM.
On the
My L2TP/IPsec Policy Properties window, select the
General tab, and click the
Settings... button, see
Figure102.
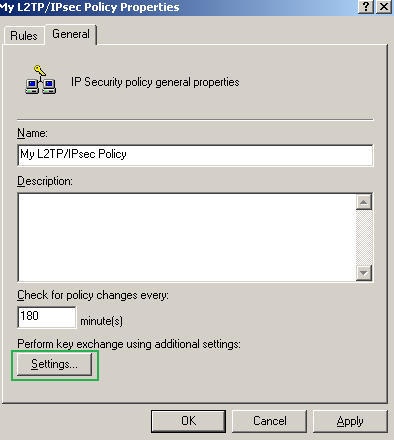 Figure102: Edit My L2TP/IPsec Policy - General tab
The
Key Exchange Settings window appears, see
Figure103.
Leave unchecked the
Master key perfect forward secrecy (PFS) checkbox.
The
Authenticate and generate a new key after every text boxes are correct, 480 minutes equals 28800 seconds(the IKE SA lifetime from the default MM policy).
Click the
Methods... button.
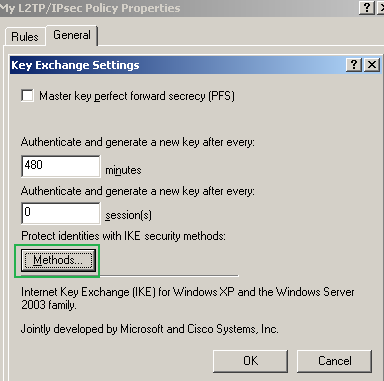 Figure103: Edit My L2TP/IPsec Policy - General tab: Key Exchange Settings
On the
Key Exchange Security Methods window, remove the default Security Methods(if any) and click the
Add button, then add the two security methods specified in
Figure104 and
Figure105.
The first method specifies a high security protection suite, due to the stronger DH group. For example Windows Vista L2TP/IPsec VPN clients by default can use this stronger group. For compatibility reasons I've added the second security method(for example I did not notice that the Mac OS X L2TP/IPsec VPN client is capable of using this group), if you don't need it, as you are really sure that all of your L2TP/IPsec VPN clients or VPN gateways are capable of using the stronger DH group, you may remove the second security method.
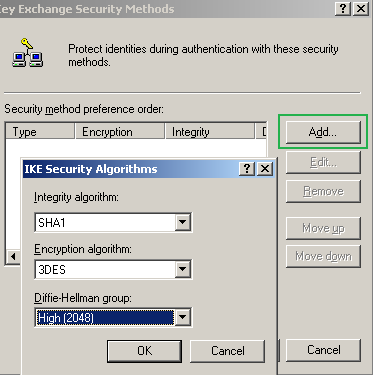 Figure104: Edit My L2TP/IPsec Policy - Key Exchange Security Methods - Add the first Security Method
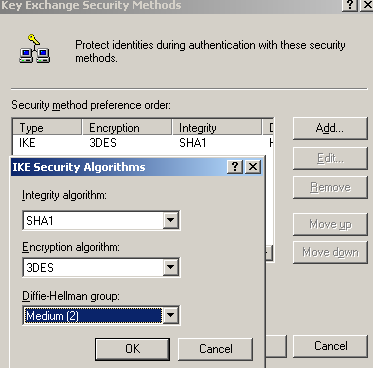 Figure105: Edit My L2TP/IPsec Policy - Key Exchange Security Methods - Add the second Security Method
Figure106
Figure105: Edit My L2TP/IPsec Policy - Key Exchange Security Methods - Add the second Security Method
Figure106 shows the added security methods. They are processed from top to down, so the stronger suite(the one with DH 2048) is prefered.
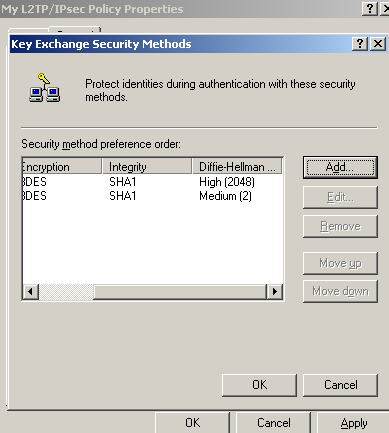 Figure106: Edit My L2TP/IPsec Policy - Key Exchange Security Methods - Added Key Security Methods
Click
OK to close the
Key Exchange Security Methods window.
Click
OK to close the
My L2TP/IPsec Policy Properties window.
And we've created our custom IPsec policy to protect the L2TP tunnels.
Time to assign this custom IPsec policy. Right-click it and click
Assign, see
Figure107.
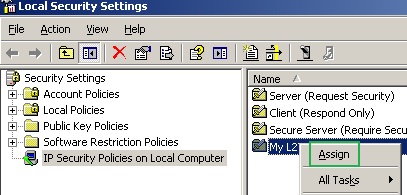 Figure107: Local Security Settings - Assign The Newly Created IPsec Policy
Once it was assigned, see
Figure108, we can use the netsh commands to analyze it and compare it with the default one.
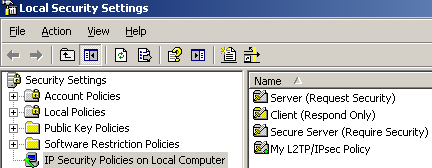 Figure108: Local Security Settings - The Newly Created IPsec Policy Was Assigned

 LinkBack URL
 About LinkBacks