نمایش نتایج: از شماره 1 تا 2 از مجموع 2

موضوع: Using CMAK to Configure ISA Server VPN Clients

  
  1. #1
    نام حقيقي: 1234

    مدیر بازنشسته
    تاریخ عضویت
    Jul 2009
    محل سکونت
    5678
    نوشته
    5,634
    سپاسگزاری شده
    2513
    سپاسگزاری کرده
    272

    Using CMAK to Configure ISA Server VPN Clients

    کد:
    http://blog.msfirewall.org.uk/2008/06/using-cmak-to-configure-isa-server-vpn.html

    Part 1: Creating the CMAK Profile


    Amongst the many benefits of using ISA Server as your VPN gateway, a key attribute is the fact that the VPN client software is built into Windows which negates the need to install any third-party VPN client. The VPN connection can easily be configured within Windows using the New Connection Wizard, however I have always preferred the more elegant solution of using the Connection Manager Administration Kit (CMAK). This is a free tool included with Windows Server 2003 which can be used to create a CMAK profile (connectoid) that contains all of the the VPN connection properties, including a whole heap of customisation to make life easier and more intuitive for for users.

    This blog entry is the first of a two part series which provides a walkthrough of creating a CMAK profile which can be used for connecting to an ISA Server VPN gateway. Once the CMAK profile has been created, part two of the series will look at customising the profile to add some useful features, cater for a better user experience and improve security. The blog entry assumes that the VPN feature of ISA Server has already been enabled and the L2TP/IPSec protocol has been enabled.
    CMAK can be installed using the Add or Remove Programs control panel applet and is included under the Add/Remove Windows Components, Management and Monitoring Tools component.
    Please Note: I have omitted wizard steps that can remain at their default settings to reduce the number of screenshots. Steps that are not included below can simply be accepted using the Next button.

    Once opened, the wizard begins as shown below:

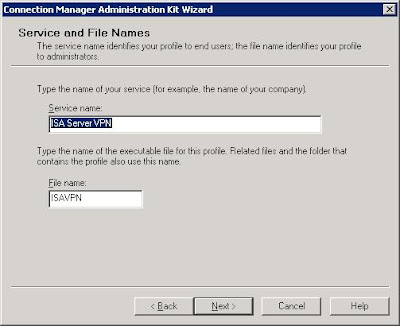
    On the Service and File Names page, enter the desired Service Name and File name (this is also called the Short Service Name):


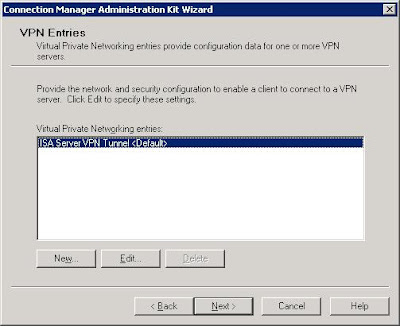
    On the VPN Entries page, click the Edit button:


    Select the Security tab on the Edit Virtual Private Networking Entry window and then change the Security Settings drop down selection to Use advanced security settings:


    Once selected, click Configure next to the Advanced security settings text.

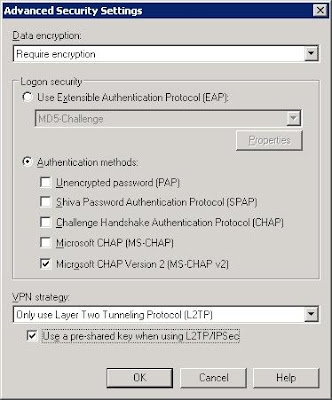
    If you are planning on using a simple authentication method comprising of a Windows user name and password, configure the Advanced Security Settings options as shown below.


    These settings represent a baseline level of security for the VPN connection, but does not represent a high security or recommended deployment. In terms of authentication, many organisations require that VPN connections are subject to some form of two-factor authentication to mitigate the risks of static user names and passwords. In addition, although it is possible to choose the Only use Point to Point Tunneling Protocol (PPTP) option, I would no longer recommend using this method as many security/penetration tests now highlight PPTP as a poor VPN solution in terms of security. As we are using simple authentication, we are unlikely to be able to provide certificates for L2TP, so we need to use enable the Use a pre-shared key when using L2TP/IPSec option in this scenario.

    If you are lucky enough to be able to provision certificates (due to the use of an internal Public Key Infrastructure (PKI) deployment perhaps) then the following Advanced Security Settings options are recommended as a more secure alternative to the above:


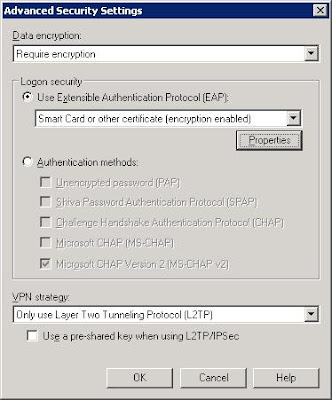
    In this scenario, we are using certificates to enable user and machine authentication for the VPN connection, as this provides a much higher level of security. It is outside the scope of this entry to provide specific details of the necessary PKI infrastructure and certificates that are required, but if you would like to see these details, please leave comments and I will try and add more detail in future blog entries.

    Please Note: In addition to these two options, it is also possible to integrate third-party authentication solution into CMAK. From personal experience, I have also used RSA SecurID which integrates well (after a little work!) to provide a seamless solution. More information on this option can be found here.

    If you have chosen to define a pre-share key for L2TP/IPSec then the Pre-shared Key page will be displayed. Enter the required pre-share key into the Enter key field. In order to protect the key and ensure it is encrypted in the CMAK profile files, is it recommended to choose the Encrypt the pre-share key with a PIN option. Once enabled, this PIN will need to be entered by any user that wishes to install the CMAK profile (example of this later).


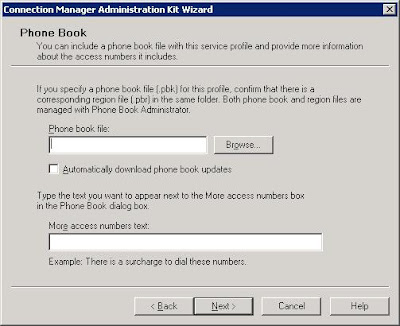
    On the Phone Book page, deselect the Automatically download phone book updates as this is not required.


    This final step of the completed wizard is shown below:


    With the wizard completed, it is simply a matter of distributing the CMAK self-installing executable (defined in the path above) to users.

    Once users receive the file, they can simply run the executable to receive the following prompt shown below. Click Yes to install the CMAK profile.

    If you chose the Encrypt the pre-share key with a PIN option during the wizard, you will be asked to enter the PIN. Entering an incorrect PIN will cause the installation to terminate.


    On the next step, I would recommend selecting the My use only option.

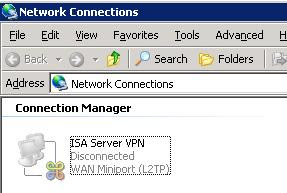
    Once installed, a new Connection Manager pane will be shown within Network Connections (example shown below from Windows XP) which contains the new 'ISA Server VPN' VPN connectoid.


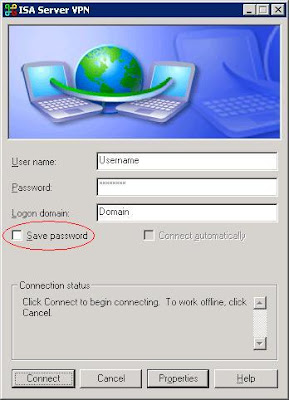
    After successful installation, the VPN connection will also be initiated/connected and you will be presented with the following connection:


    You will notice that the Save password option is enabled by default. For obvious reasons, this
    represents a security risk which we will cover in the next blog entry.

    So, we now have a basic CMAK profile defined and the VPN connectoid has been installed which provides a good platform for part two of this blog series. In part two, we will look at customising the CMAK profile to include some advanced features, add support for ISA Server VPN gateways behind NAT devices and improve security by disabling features like the Save password option shown above...
    Additional information on the Connection Manager Administration Kit (CMAK) can be found here.


    موضوعات مشابه:

  2. #2
    نام حقيقي: 1234

    مدیر بازنشسته
    تاریخ عضویت
    Jul 2009
    محل سکونت
    5678
    نوشته
    5,634
    سپاسگزاری شده
    2513
    سپاسگزاری کرده
    272
    کد:
    http://blog.msfirewall.org.uk/2008/06/using-cmak-to-configure-isa-server-vpn_10.html
    Part 2: Customising the CMAK Profile


    Following on from Using CMAK to Configure ISA Server VPN Clients - Part 1: Creating the CMAK Profle this blog entry is part two of the series and will look at customising the profile to add some useful features, cater for a better user experience and improve security. This blog entry assumes that Part 1 has already been followed and the CMAK profile has been created.

    In this entry I am going to discsuss the following CMAK profile customisations:


    • Modify the intial connection screen to hide unwanted and insecure elements.
    • Modify the support information to add a CMAK build number to aid versioning and troubleshooting.
    • Modify the Windows client to add support for NAT traversal (NAT-T) and facilitate ISA Server VPN gateways behind NAT devices.
    • Include custom login and logout scripts to provide VPN users with mapped drives whilst the VPN connection is active.

    Although it is possible to use the CMAK wizard to make many different customisations, like adding graphics etc., these are pretty standard options and avaibale as part of the normal wizard driven process. The customisations defined in this blog entry are slightly more advanced, and in my opinion greatly improve the experience for frequent VPN users.

    Modify the intial connection screen to hide unwanted and insecure elements

    The connection screen can be modified by editing the [ShortSvcName].cms file located by default in the C:\Program Files\cmak\Profiles\[ShortSvcName] folder, where [ShortSVCName] is the File name parameter defined in part one of this blog series (ISAVPN in the screenshot examples).

    Using our CMAK profile from Part one as an example, we need to edit the ISAVPN.cms file, as shown below:


    For the scenario where we are using a simple Windows user name and passord, we will need to leave the default username, password and domain fields. However, it seems sensible to remove the Save password option to ensure that the user cannot select this feature. This is achieved by adding a HideRememberPassword=1 entry to the [Connection Manager] section of the ISAVPN.cms file as shown below:


    Once these changes have been made, it is necessary to re-run the CMAK wizard without making any changes. This will re-read the manually modified ISAVPN.cms file and add the modifications to the self-extracting executable ISAVPN.exe. Once the updated connectoid has been installed, the connections screen result is shown below without the Save password option.


    For the scenario where we are using certificates, we will no longer need to display the default username and domain fields as this information is stored within the Univeral Principal Name (UPN) of the certificate. In addition, the Save password option is not relevant in this particular scenario. These modifications are achieved by adding/editing the following entries in the [Connection Manager] section of the ISAVPN.cms file, as shown below:
    HideDomain=1
    HidePassword=1
    HideInternetPassword=1
    HideUserName=1
    HideInternetUsername=1


    Once these changes have been made, it is necessary to re-run the CMAK wizard without making any changes. This will re-read the manually modified ISAVPN.cms file and add the modifications to the self-extracting executable ISAVPN.exe. Once the updated connectoid has been installed, the connections screen result is shown below without the unnecessary fields.


    Althouth not strictly necessary, in addition to the changes above, I also recommend modifying the default value for the ConnectionType entry in the [Connection Manager] section of the ISAVPN.cms file from 0 to 1 as shown below. This modification ensures that the connectoid will default to I am already connected to the Internet as oppsoed to Dial a phone number to connect option; which for a majority of cases is the correct option.


    Modify the support information to add a CMAK build number to aid versioning and troubleshooting
    This is a simple, yet effective, modification that allows you to determine the exact version of connectoid installed on a client machine. Over time, it is possible that the CMAK profile will be mofidied, or extended, to include new features, reflect infrastructure changes or simply fix problems. However, it is not always possible to ensure that all users are using the latest version of the CMAK profile, which can lead to inconsistent results between users. Consequently, by adding a CMAK build number to the Support Information field, this will allow users to provide this information, or assess whether they are running the latest profile themselves. I tend to use a build number that is a representation of the creation date e.g. 100508 would indicate a profile created on the 10th May 2008. An example of this modification is shown below using the Support Information page as part of the CMAK wizard.


    Modify the Windows client to add support for NAT-T and facilitate ISA Server VPN gateways behind NAT devices
    If your ISA VPN Server is located behind a NAT device, you may experience problems connecting the VPN as discussed in the following Microsoft KB articles:
    L2TP/IPsec NAT-T update for Windows XP and Windows 2000 (KB926179)
    How to configure an L2TP/IPsec server behind a NAT-T device in Windows Vista and in Windows Server 2008 (KB818043)
    The common solution to both of these problems is to add a specific registry entry to the VPN client machine. These registry keys are:
    For Vista:
    HKEY_LOCAL_MACHINE\SYSTEM\CurrentControlSet\Servic es\PolicyAgent\AssumeUDPEncapsulationContextOnSend Rule
    For Windows XP:
    HKEY_LOCAL_MACHINE\SYSTEM\CurrentControlSet\Servic es\IPsec\AssumeUDPEncapsulationContextOnSendRule
    Normally a value of 2 would be used for this entry to ensure the higest level of compatability for both NAT hidden client and servers.
    Rather than having to add these registry entries manually, it makes much more sence to add these entries as part of the CMAK profile installation. This can be achieved by adding the following lines to the [Xnstall.AddReg.AllUsers] and [Xnstall.AddReg.Private] sections of the [ShortSvcName].inf file included as part of the profile.
    "HKLM", "SYSTEM\CurrentControlSet\Services\IPSec", "AssumeUDPEncapsulationContextOnSendRule", 0x00010001,2
    "HKLM", "SYSTEM\CurrentControlSet\Services\PolicyAgent ", "AssumeUDPEncapsulationContextOnSendRule", 0x00010001,2
    In our example, this will be ISAVPN.inf as shown below:
    [Xnstall.AddReg.AllUsers] section of ISAVPN.inf


    [Xnstall.AddReg.Private] section of ISAVPN.inf

    Please Note: In order to add these registry keys, the user will require local administration rights or will need to utilise the Run As option when you install the CMAK profile.
    As can be seen from the images above, I have added both Vista and Windows XP registry changes to the single ISAVPN.inf file, as I don't think it is possible to interpret the client OS and apply the appropriate entry automatically. This ensures that both operating system versions will have the correct registry entry, plus an unnecessary entry, which seems like an acceptable compromise to me.
    Once these changes have been made, it is necessary to re-run the CMAK wizard without making any changes. This will re-read the manually modified ISAVPN.inf file and add the modifications to the self-extracting executable ISAVPN.exe. Once the updated connectoid has been installed, it is necessary to reboot the client machine for the registry changes to take affect.
    Include custom login and logout scripts to provide VPN users with mapped drives whilst the VPN connection is active
    The final customisation, and potentially the most visible to the VPN user, is to provide a login script which dynamically map drives once the VPN connection is active and removes them upon disconnetion.

    The theory provided here can be used to run any script process and could easily be adapted to include more advanced features than mapping drives, as the concept will be the same.

    This concept is based around the Custom Actions element of the CMAK wizard and is probably one of the most powerful elements of CMAK as it can be used to perform tasks (or actions) based upon VPN conditions like Pre-connect, Post-connect, Disconnect etc.

    In my example we use the Post-connect condition to trigger a Run VPN Login Script task and the Disconnect condition to trigger a Run VPN Logout Script task, as shown below:


    If we look a little closer at these tasks we can see that the each action includes Program to run and an Action type elements. As the files will be deployed by CMAK, the program path will need to be presented as a vairable-based service profile path as shown below:
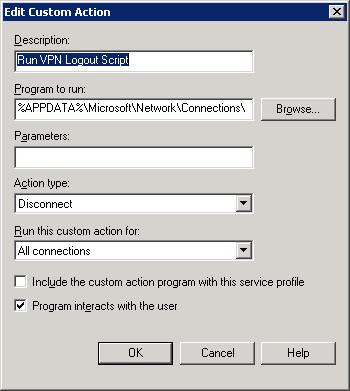
    It cannot be easily seen in the above, but the program path needs to be of the following format:
    %APPDATA%\Microsoft\Network\Connections\Cm\[ShortSvcName]\[Program Filename]
    In our ISAVPN example, this would threfore become:
    %APPDATA%\Microsoft\Network\Connections\Cm\ISAVPN\ VPNLogin.vbs
    So with the configuration shown above, the VPNLogin.vbs file will be run once the VPN has been connected.
    In a simar way for our second custom action:


    In our ISAVPN example, this would therefore become:
    %APPDATA%\Microsoft\Network\Connections\Cm\ISAVPN\ VPNLogout.vbs
    So with the configuration shown above, the VPNLogout.vbs file will be run once the VPN has been disconnected.

    Please Note: It is worth noting that server names should ideally be included as Fully Qualified Domain Names (FQDNs) within the .vbs files to force DNS name resolution and avoid the use of WINS.
    The only remaining element is to ensure that the actual VPNLogin.vbs and VPNLogout.vbs files are included within the Additional Files element of the CMAK wizard as shown below. However, this can also be achieved if you use the Include the custom action program with this service profile option in the custom actions images shown above.

    I hope you have enjoyed these two blog entries and have discovered the power of CMAK! I will probably add more CMAK customisations in the future, as I develop new ones for customers


کلمات کلیدی در جستجوها:

http:forum.persiannetworks.comf80t33486.html

cmak hide save passwordcmak for tmgcmak assumeudpencapsulationcontextonsendrulecmak password vpncmak tmgAssumeUDPEncapsulationContextOnSendRule scriptadmin kitcmak EAP windows 2008 securidcmak alternativecmak vpn file typecmak settings registryhow to create a password in cmakcmak install certificatecmak profile default to all usersvpn tmg cmakcmak put usernamehow to distribute a cmak profileassumeudpencapsulationcontextonsendrule PROXYشبکه cmak cmak proxy settings filecmak tab securitycmak installation files wrong platformpowered by myBB isa server clientcmak pptp profile

برچسب برای این موضوع

مجوز های ارسال و ویرایش

  • شما نمی توانید موضوع جدید ارسال کنید
  • شما نمی توانید به پست ها پاسخ دهید
  • شما نمی توانید فایل پیوست ضمیمه کنید
  • شما نمی توانید پست های خود را ویرایش کنید
  •