نمایش نتایج: از شماره 1 تا 3 از مجموع 3

موضوع: Preparing and Installing Windows XP Embedded Images

  
  1. #1
    نام حقيقي: 1234

    مدیر بازنشسته
    تاریخ عضویت
    Jul 2009
    محل سکونت
    5678
    نوشته
    5,634
    سپاسگزاری شده
    2513
    سپاسگزاری کرده
    272

    Preparing and Installing Windows XP Embedded Images

    کد:
    http://blog.augustoalvarez.com.ar/2009/01/07/preparing-and-installing-windows-xp-embedded-images-part-i-setting-up-the-environment/

    Part I: Setting up the Environment


    Embedded operating systems have been present among us since a long time ago. Windows XP Embedded and several others have been a part of tons of devices for various reasons:
    - Componentized version of the bigger operating system, with only the components that the user requires.
    - Small footprint: Around 40mb at minimum for Windows.
    - Secure operating systems; with selected features installed we can reduce at minimum the attack surface.
    Payphone working with Xp Embedded.

    Microsoft recently released Windows Embedded Standard 2009 that will succeed Windows XP Embedded. This version it’s not actually the embedded version of Windows Vista. That embedded operating system is still in progress (expected for 2010) with the codename “Quebec” that will contain most of the Vista features, like Aero, Bit locker encryption, Windows Defender, etc.
    Windows Embedded Standard contains basically the same kernel than XP Embedded with a few improvements: Silverlight, .Net Framework 3.5, Internet Explorer 7, NAP, among other features.
    Diskless Operating System

    These types of operating system have been designed for special cases and special type of devices (like the one shown on that payphone), most of them that need a “locked-down” operating system, the smaller and secure as possible.
    That’s why the design it’s prepared to use this operating system on diskless devices, having a Remote Boot Manager server that contains the client operating system image and the device requires the image from that server and boots it directly from RAM or an USB device. We’ll see how it works.
    Enough with the introduction, let’s start with this step-by-step guide for Windows XP Embedded.
    You can find the other two parts of this guide, here:
    Preparing and Installing Windows XP Embedded Images – Part II: Building Images
    Preparing and Installing Windows XP Embedded Images – Part III: Using Remote Boot
    Let’s start with the system requirements.

    System Requirements

    Remote boot server

    - Windows Server 2003
    o R2 and SP2 are optional but recommended
    o DHCP role must be installed
    - Windows XP Embedded Studio Tools
    o Component Data Base Manager
    o Component Designer
    o SDI Loader
    o Target Designer
    o Target Analyzer
    o Remote Boot Manager
    Hardware Requirements

    - Processor: Pentium III 800 MHz (Minimum)
    - Memory: 256mb (Minimum)
    - Hard Disk: Enough space to store XP Embedded images
    Clients

    Hardware Requirements

    - Processor: Pentium III 800 MHz (Minimum)
    - Memory: 512mb/1024mb
    It must double the XP Embedded image size, so for 450mb images there should have 1 GB of memory available on the clients

    Installing Windows XP Embedded

    Installing the Embedded Studio Tools

    We are considering using the installation of the Studio Tools with SP1 and then upgrade it SP2. This setup assumes that you are installing the tools in the computer that will act as a Remote Boot Server.
    To install Windows XP Embedded SP2 tools, please follow these steps:
    1. From the Disk 1 of the installation files, run SETUP.EXE
    2. The installation Wizard starts. Select the Tools Setup tab, and click on Next

    3. Accept the License Agreement terms, and click on Next.
    4. Enter your user name, organization name and your license key number (a trial license number can be obtained from this site). Click on Next

    5. On the Installation type select Typical. Click on Next

    6. Now you will set the Windows Embedded Server as the local computer. To do this, leave the This Computer option marked and click on Next
    Note: You can also change the default folder where the XP Embedded images will be stored when they are built.

    7. Click on Install to complete the setup wizard.
    After this installation completes, switch back to the Welcome to Windows XP Embedded installation window to install the remaining components.
    Installing the Database Engine

    To create Windows XP Embedded images, the Designer component requires that a database must be installed and set up. The current version requires that MSDE should be installed the local computer (or a remote computer). This setup assumes that you will install MSDE on a local computer.
    1. To set up the database, the first step is to install the database server. To do this, point and click on the Database Engine Setup tab

    The database engine will install without requiring user intervention.
    2. Let’s install the database. To do this, point and click on the Database Setup tab
    3. Click on Next and accept the License Agreement
    4. Enter your Product Key and click on Next
    5. Select the Typical installation option and click on Next
    6. Click on Install to begin the installation. The following message will pop up. Answer Yes

    Don’t worry; it just says that to create embedded images, a share folder will be created on the server with read-only permissions.
    Upgrading the installation to Windows XP Embedded SP2

    To complete the installation, you must access Disk 3 of the installation files and run setup from there. This will upgrade the components and tools to Service Pack 2 and will also install the Remote Boot Server from there.
    1. Let’s update the database engine with the latest updates. To do this, point and click on the Database Engine Update tab on the left.

    This process does not require user intervention.
    2. Now let’s update the Windows XP Embedded Tools to SP2. To do this, point and click on the Tools Update tab on the left.

    3. A wizard will pop up. Click on Next to proceed with the installation.
    4. Before installing the “Database Update” you must first verify that the Engine is already running on the server. If you don’t reboot the computer after installing the database engine, the service is not yet started. To start it use the services snap-in, following these steps.
    a. Click on the Start menu, select Run and type services.msc. Click OK
    b. On the services console, locate the MSSQLSERVER service
    c. Check that the Startup Type is set to Automatic
    d. Check if the service is started. If not, right click on the service and select Start

    Note: If the service is not started as it shows and if you try to update the database, this message will appear to you: "Cannot connect to the database – please check the database. Setup cannot continue"

    5. Switch back to the installation window. Point and click on the Database Update tab on the left.

    6. Before installing the update, a message will prompt with the warning that you should make a backup of the existing database before updating. This is an optional step. To continue, click the OK button.
    7. A wizard window will open. Click on Next to continue.

    8. The wizard will show the license agreement. Read and accept it, clicking on Install to continue.
    The process will take several minutes, depending on your system characteristics. When the installation finishes, a summary will appear, including the modifications it performed on the installation. Click on Finish to close the dialog.

    9. [Optional] To set up a development environment you can also use the libraries that are included to test the applications outside the run-time images: Enhance Write Filter API.


    Installing the Remote Boot Server

    The Remote Boot Server is in charge of providing remote computers the run time image of their OS. In this section you will install the associated component.
    1. From the tab list on the left, click on Remote Boot Server.

    2. An installation dialog will appear. Click on Next to continue. When the dialog prompts to accept a license agreement, read and accept it.
    3. Enter the values in User Name and Organization and click on Next.
    4. Select the Typical installation type, click on Next to advance a screen and finally click on Install to start the installation process.

    When the process completes, you’ll have your environment ready for preparing Windows XP Embedded images.
    Note: Remember that the DHCP server must be up and working on the remote boot server to actually achieve the Remote Boot with the prepared images


    موضوعات مشابه:

  2. #2
    نام حقيقي: 1234

    مدیر بازنشسته
    تاریخ عضویت
    Jul 2009
    محل سکونت
    5678
    نوشته
    5,634
    سپاسگزاری شده
    2513
    سپاسگزاری کرده
    272
    کد:
    http://blog.augustoalvarez.com.ar/2009/01/07/preparing-and-installing-windows-xp-embedded-images-part-ii-building-images/

    Part II: Building Images


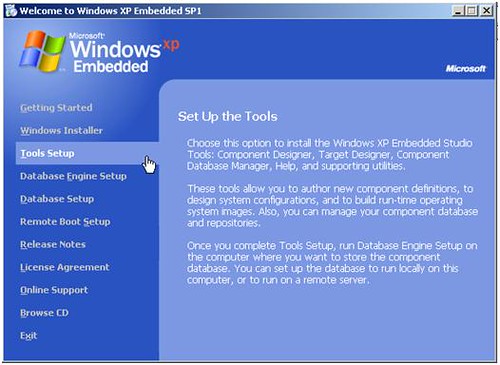
    Now that the environment is ready as we’ve seen on the first part of these posts, let’s start on creating our own Windows XP Embedded image. There are involved different kinds of tools to accomplish this, but you will see that is a simple process at the end of it.
    The big picture of this process is that the images are built on the server; using the hardware data from the clients.
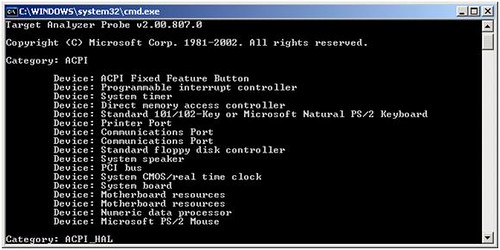
    Target Analyzer

    This is the tool that you will use to get the hardware data from the clients.
    The data represents all the drivers that the Windows XP Embedded image will include to support the hardware on the clients. When Windows XP arrived you probably noticed that a huge difference appears on the hardware detection of the operating system; it’s mainly because the XP included almost every device driver that was available on the market. With Windows XP Embedded the same thing happens, but since you are customizing images for particular clients you must first find out the hardware that it’s available on them.
    Using Target Analyzer it’s very simple:
    1. First of all you’ll need access to the client’s machine to run this tool.
    If it’s a virtualized environment where the server and clients will be using same type of host (physical machine) then there’s no need to access to a “client machine” because the hardware will be the same as in the server. If that’s the case, on your server just access to the folder:
    C:Program FilesWindows Embeddedutilities

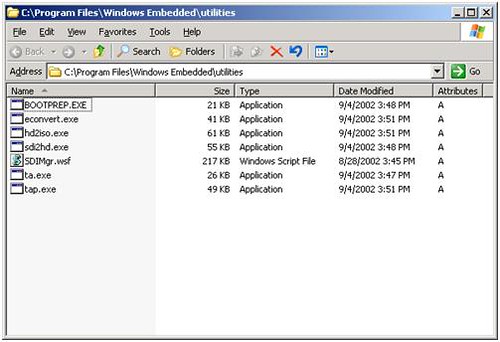
    If they are not virtual machines and they have completely different hardware, you should copy those folder files to a client machine.
    2. Double click on tap.exe (Target Analyzer Pro).

    Note: There’s also a simpler version of Target Analyzer available, named ta.exe. This tool only compiles a short list of your hardware, and is more suitable for smaller environments.
    3. The tool stored a file with all of the hardware information, named devices.pmq. You will use that file when creating the hardware image.


    Using Target Designer
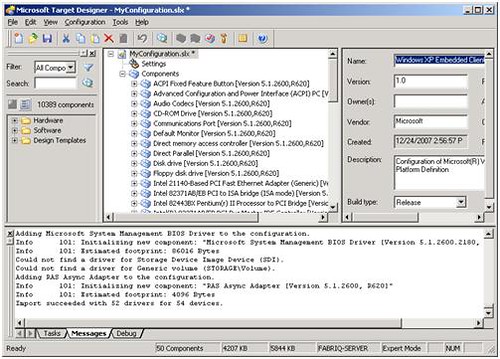
    The Target Designer is the main tool to build the images. Here you’ll add all the drivers necessary for your clients, components of Windows XP Embedded, etc.
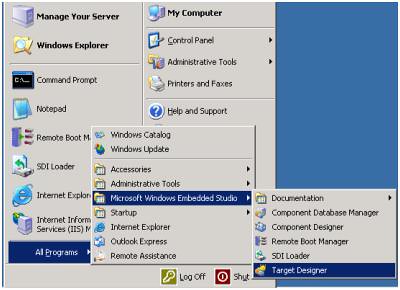
    1. From the Start menu, All Programs, Microsoft Windows Embedded Studio, open Target Designer

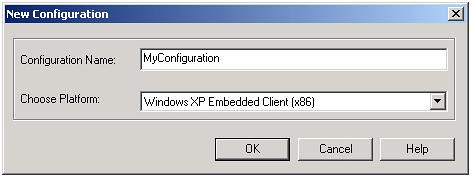
    2. Create a new profile of the image that you’ll create. To do that, click on File | New. Select a name for your configuration and click OK to close the dialog

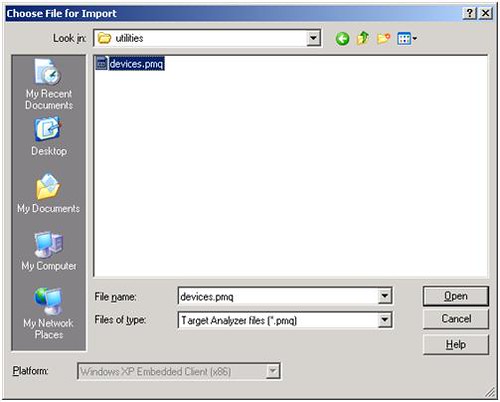
    3. The first thing to do is to import the hardware data. This way you will have more chances to succeed, avoiding the “missing drivers” problem. From the File menu click on Import
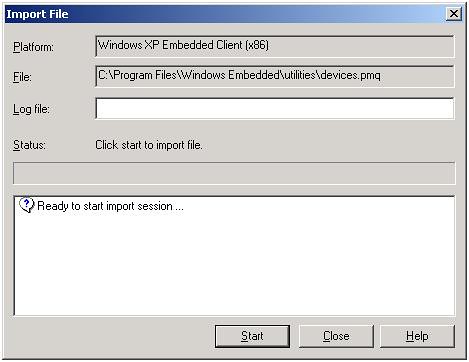
    4. Locate the file that was created with Target Analyzer: devices.pmq. That was left on the utilities folder. Click on Open

    5. The Import File dialog will open. Click on Start to begin the process

    6. After this process finishes, you’ll see on the center pane that all the hardware components were added to your new image.


    Using Design Templates

    Now that you have the hardware components added, the next step is to add the required XP operating system components.
    On the left pane there are thousands of components that can be included to the images. The Design Templates will help you on adding the right components depending on the client machine profile that you are looking for.
    Each template was built targeted at a specific scenario.

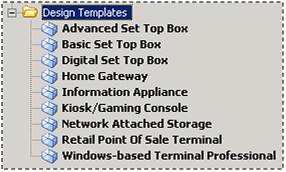
    You can check on the specific data and components included by each template by right-clicking on any template and selecting Component Help.

    To add the components within the template to the current image, you can right-click on the component and select Add, or just drag and drop the component to the image component list.
    Adding these templates will not automatically add all the components necessary for the XP Embedded image; those components will be added when the Dependency Check is run, which you will use afterwards.

    RAM Disk Driver

    When creating a Windows XP Embedded image that will boot remotely, you need to add additional drivers. To be able to remotely load a disk image and keep it on RAM, the RAM Disk Driver is needed. This component is the one that is load to support booting an XP Embedded image from RAM memory.
    You can add it simply by using the Search option on the left pane of Target Designer. Use the phrase RAM Disk Driver to find the location of the component

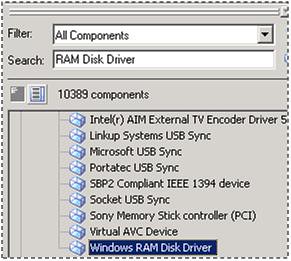
    To add the component, you can right-click on it and choose Add, or you can drag it to the center pane.
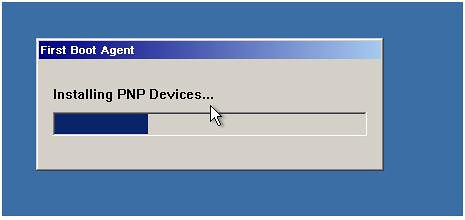
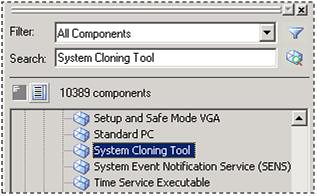
    System Cloning

    When you are deploying the environment on more than one client, it is a good idea to use the same image on each client, enabling large scale deployment. To be able to share the image, computer-specific information (such as computer name and security identifier) must be removed from the image.
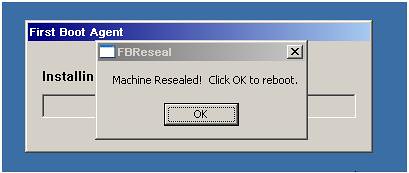
    There is a tool named fbreseal (first boot reseal) that removes this computer-specific functionality. This tool is run on the first boot on the newly installed OS, and prepares the computer for deployment on several clients. When the computer is rebooted, the computer will generate a random computer name and SID.
    To add the fbreseal tool, locate and add the System Cloning Tool component.


    Checking Dependencies

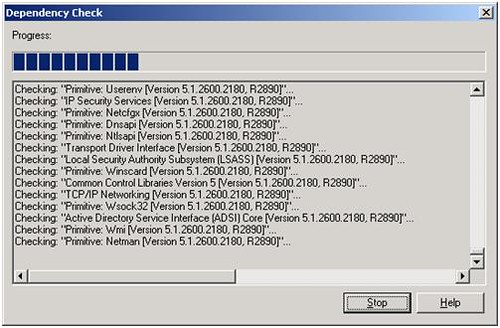
    Now that you added all of the components and design templates necessary for your environment, it is time to check that all the components have the right dependencies in place.
    This process will add the components that are missing to complete and guarantee the correct functionality of the image.
    1. From the Configuration menu, click on Check Dependencies. This process may take a few minutes depending on the amount of components it has to process. When the process finishes, click on Close to continue

    2. When you close the dialog, you’ll notice that there are some new items in the lower pane (“Tasks”). These are related to some dependencies that you need to resolve to complete the image.

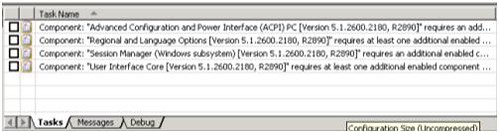
    3. Double click on each of them and you’ll see a menu of options to decide the correct component for each case. Fix each dependency until you fulfill all of the dependencies. Repeat steps 1 to 3 until you get no more dependencies unsatisfied.
    These are the most common dependencies to resolve.
    a. Regional and Language Options. To be able to boot the OS, you need to choose which language(s) the operating system will support. Simply select the language that you’ll use on the clients and click on OK

    b. 
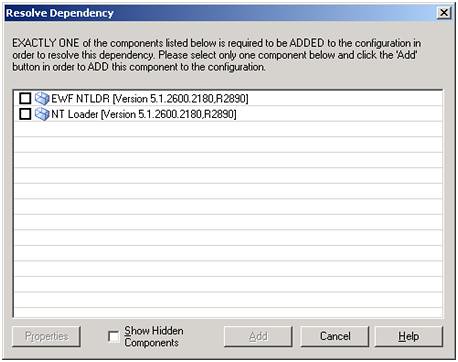
Advanced Configuration and Power Interface (ACPI). This component requires a boot loader to be specified. In this case, NT Loader is used (EWF NTLDR is used when booting from a read only media, like a CD)
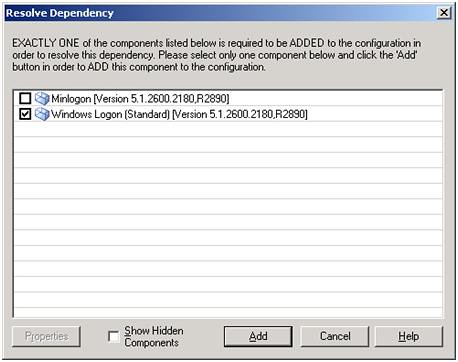
    c. Session Manager. To be able to log in, the system requires a Session Manager. Depending on your project, you will use either Minlogon or Windows Logon. Their main difference is that Minlogon is the smallest and logs in the user automatically as System, and Windows Logon takes more space on the image, but allows logging in as different users
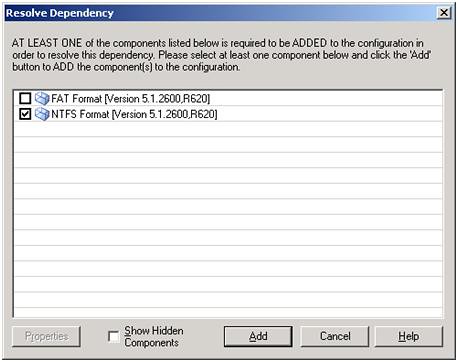
    d. User Interface Core. This component requires that the system should support a file system format, such as FAT or NTFS. Since NTFS supports permissions and compression, select it
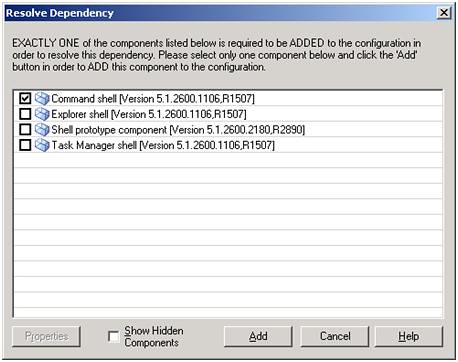
    e. Windows Logon (Standard) requires a shell to be specified. For the purposes of this image, just Command Shell is required


    Configuring Components

    When you are creating a Windows XP Embedded image, some components provide a configuration pane.

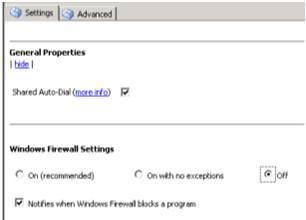
    Windows Firewall Settings

    If you are deploying the XP Embedded Image with applications that require incoming network connections, the Windows Firewall component must be added and turned off. If the Firewall component is not installed, the default action is to reject incoming connections.
    This does not affect outgoing network connections.


    Building the Image and the First Boot Agent

    After you checked that all the dependencies have been fulfilled, the next step is to build the operating system image.
    1. From the Configuration menu, click on Build Image

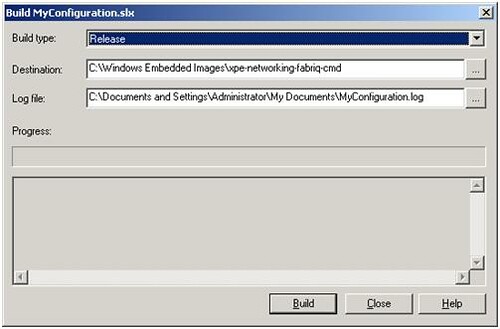
    2. Select a folder to store the files to be copied on the image. The default location is C:Windows Embedded Images
    3. Click on Build
    4. A message will appear saying that it’s recommended to run the dependency check since there were some changes from the last time that it was run. If there were no significant changes that was made that could make any difference on the dependencies, you can choose No. Otherwise choose Yes.
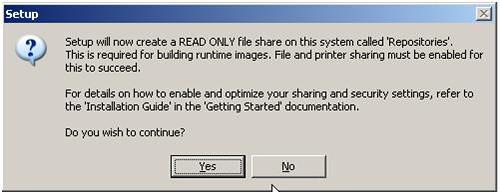
    After completing this process you can access to the folder where the files were introduce and check that the operating system files are created.
    With that you have an image ready to be used of Windows XP Embedded, please take notice of the size of this image, because if you are planning on having it with a 
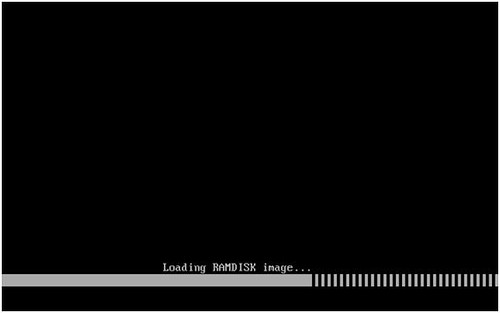
remote boot on diskless devices you’ll need twice amount of RAM or sufficient space on your USB/Flash device.
    On the next post, we’ll see how to use this image on a Remote Boot environment with diskless devices


  3. #3
    نام حقيقي: 1234

    مدیر بازنشسته
    تاریخ عضویت
    Jul 2009
    محل سکونت
    5678
    نوشته
    5,634
    سپاسگزاری شده
    2513
    سپاسگزاری کرده
    272
    کد:
    http://blog.augustoalvarez.com.ar/2009/01/07/preparing-and-installing-windows-xp-embedded-images-part-iii-using-remote-boot/

    Part III: Using Remote Boot


    After what we’ve seen on the previous posts: Setting up the environment (Part I) and building an Windows XP Embedded Image (Part II) we can complete the remote boot process with diskless devices with this last part.
    There are special hardware requirements for this procedure and could get a little tricky. In the computer you are using to prepare the image (the server), you need an additional hard disk (or virtual disk) which you will use to boot the image from.
    To prepare the image for remote booting:
    1. Add a second drive to the machine that act as server. Format the volume and set it like an “Active” partition.
    2. Copy all of the files that were created on the Windows Embedded Images subfolder you chose to a second disk (virtual disk if you are using virtual machines)

    Note: Since this disk will be used to boot an operating system image, remember that the partition within must be Active. Otherwise the operating system will not boot.
    3. After copying all of the files to the second hard disk, move it to a client machine and boot that client using the disk.

    4. After the image boots, you’ll see that several components are configured in the image, by a process named First Boot Agent. This process takes a few minutes to complete.
    If you are using the System Cloning Tool, then fbreseal is run in the first boot, as the last step of the First Boot Agent. As stated before, if the image is rebooted afterwards, the image gets a new name and SID, so the reseal process is lost. As you need to keep it for diskless computers, don’t reboot after you see the following message. Turn off the computer instead.

    5. After shutting down the computer, remove the disk and place it as the secondary disk on the computer you use for creating the image. That is the image that will be uploaded to the remote boot server and downloaded by each diskless client.

    Using SDI Loader and SDI script

    Now that you have the operating system resealed in the secondary disk, it’s time to create the SDI image. You will create two SDI files, one for storing the image as it is copied from the physical (or virtual) disk, and a second one that will store the final image that the clients will use for remote booting.
    1. Open SDI Loader from Start | All Programs | Microsoft Windows Embedded Studio

    2. Click on Add Disk
    3. As you are creating a new SDI, type the name of a new file (like xpe-partition.sdi) and select Add
    4. Since the file is new, a dialog will ask if you’d like to create the file. Answer Yes

    5. The next step is to set the image size. The image size must be:
    a. At least the size that the files on the resealed disk + some space for temporary files
    b. At most half of the total system RAM (ie, if the client has 512mb of RAM, the image limit is 256mb)
    c. There is a practical image limit of 500mb. Beyond that, it is likely that the image won’t boot.

    This SDI file represents the partition that hosts the operating system. Set the image size and click OK
    6. After the SDI file is created, a new virtual disk will be automatically added to the server. The disk needs to be partitioned, formatted and mounted. From the Control Panel | Administrative Tools open Computer Management. Select the Disk Management item from the left pane
    a. The following dialog will appear notifying of the new disk. Click on Next

    b. Make sure the disk is selected and click on Next

    c. Since you won’t use a dynamic disk, leave the disk unmarked in the following screen, and click on Next

    d. Click on Finish to close the dialog
    e. Right click on the newly created disk and choose New Partition

    f. In the wizard that opens, click on Next
    g. Choose Primary partition type and click on Next
    h. Leave the maximum partition size and click on Next
    i. Assign a letter to it (like F) and click on Next
    j. Make sure that the selected File system is NTFS and click on Next
    k. Click on Finish to format the disk.
    7. With the partition created, move the files from the disk that was used for the first boot to the virtual partition

    8. Optionally, if you need to add additional files to the disk, you can copy them in this step.
    9. The next step is to create a remote bootable disk, based on the virtual disk you completed in the previous step. To do that, you will use the SDImgr.wsf script, located in the Windows Embeddedutilities folder.
    Open a command prompt and type the following (each command in a line):
    cd “c:Program FilesWindows Embeddedutilities”
    cscript SDImgr.wsf /new c:ramdisk.sdi
    cscript SDImgr.wsf c:ramdisk.sdi /readpart:F:
    Replace F: by the unit letter in which you mounted the virtual partition.
    Note: All the explorer windows must be closed, including the Disk Management snap-in. When this procedure is running, the script tries to lock (exclusively) the partition and if some program is using it, the procedure will fail.

    10. After completing the process, you will have a working remotely-bootable disk, stored on C:ramdisk.sdi. To make it deployable by the Remote Boot Manager, copy the file to C:Program FilesWindows EmebeddedRemote Boot ManagerDownloads.
    The Remote Boot Manager requires the images to be stored on that location.


    Configuring Remote Boot Manager

    The last task to make the image remotely deployable is to configure the Remote Boot Manager to send the image to the clients whenever they request.
    1. Take note of the MAC Address (comprised of 12 hex digits) for the computers that will boot remotely. If you are using virtual machines you can easily find out the client NIC’s MAC address by taking a look to the Network Adapter options.
    2. Open the Remote Boot Manager, from Start | All Programs | Microsoft Windows Embedded Studio
    3. For each diskless computer that will boot remotely, add a new row to the grid, using the following values
    a. Type down the MAC Address of the NIC you are configuring
    b. Since the Boot Server is the local machine, leave the field at 0.0.0.0
    c. As the Boot Program, select the startrom.n12 option. This boot program boots the client computer without asking for confirmation. Since the client computers may not have a keyboard or monitor attached, this is the preferred choice
    d. As the Image File Name type the name of the second SDI file. In this case, type ramdisk.sdi
    4. Click on Save


    Booting client machines

    Now that you have set up the DHCP server, created the image and set up the Remote Boot Server, it is time to boot the client machines.
    When configuring each client machine, verify that each machine has PXE network booting enabled.
    To verify that all of the previous steps were performed correctly, try booting a machine, verifying that it is booting from PXE. After it receives the IP from the DHCP will load the image and the configuration from the Remote Boot Server.
    Client receiving image from the server

    Client booting the image downloaded


    Well that’s pretty much for now with Windows XP Embedded. I’ll be reviewing Windows Embedded Standard 2009 on next posts.

    Hope you found it useful


کلمات کلیدی در جستجوها:

how to clone window xpe with aplication diferent hardware

Windows Embedded Standard 7 xp images

deploying windows xp embedded without ris

Acronis Snap Deploy XP Embedded

install nic windows xp embedded

windows embedded image size

xp embedded test image

acronis snap deploy 4 windows xpe

diskless remote boot in windows

windows xp embedded installieren

1

Preparing and Installing Windows XP Embedded Images

pxe Diskless Remote Boot in windows XP

how to test created windows XP embedded s image

Building the Windows XP Embedded Operating System Image

read only windows xp embedded

snap deploy 3 xpe

xp embedded without server

installing windows xpe

installing 1 gb ram on windows xpe

2

http:forum.persiannetworks.comf78t35066.html

برچسب برای این موضوع

مجوز های ارسال و ویرایش

  • شما نمی توانید موضوع جدید ارسال کنید
  • شما نمی توانید به پست ها پاسخ دهید
  • شما نمی توانید فایل پیوست ضمیمه کنید
  • شما نمی توانید پست های خود را ویرایش کنید
  •