کد:
http://www.windows-noob.com/forums/index.php?/topic/575-what-is-windows-sim-and-how-can-i-use-it/
What is it ?
Windows System Image Manager is a tool for editing XML files used in the deployment of Vista/Windows Server 2008. These XML files are sets of instructions telling Windows Setup how to proceed and install itself, in the past we would have edited such files (sysprep.inf, unattend.txt) using notepad, but now Windows has grown up and so has its' tools.
You can use Windows SIM to create an answer file (autounattend.xml or unattend.xml) that partitions and formats a disk before installing Windows, you can create an XML file for an unattended install of Vista/Server 2008, and then automate the process by copying the finished
AutoUnattend.xml file to either the root of a USB key or the root of a Windows Vista (or Server 2008) DVD. When Windows setup starts it will query these locations if present for the file and if it finds the file it will use the settings found within.
Tip:
If you create an unattend.xml file using Windows System Image Manager (SIM) and you want to allow users to install Windows Vista with no user interaction, you would need to rename the file to autounattend.xml and copy it to the root of a USB Flash Drive.
How do I get it ?
Windows SIM is part of the Windows Automated Installation Kit (WAIK) so if you want it then you'll need to install the WAIK first. Note: this guide is aimed at customising Windows Vista. If you want to use Windows SIM to customise Windows 7 deployments then you'll need The Windows® Automated Installation Kit (AIK) for Windows® 7 which you can download here.
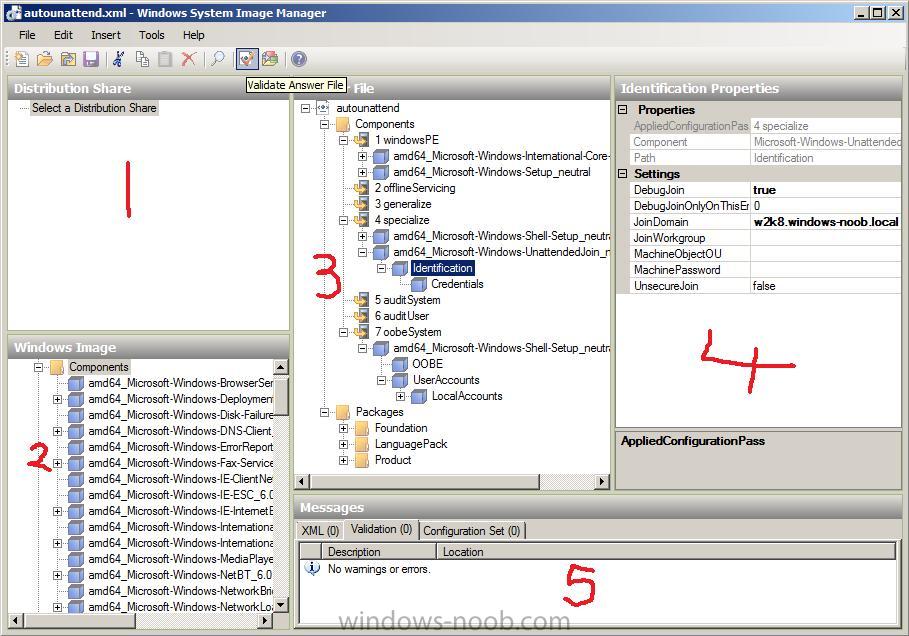
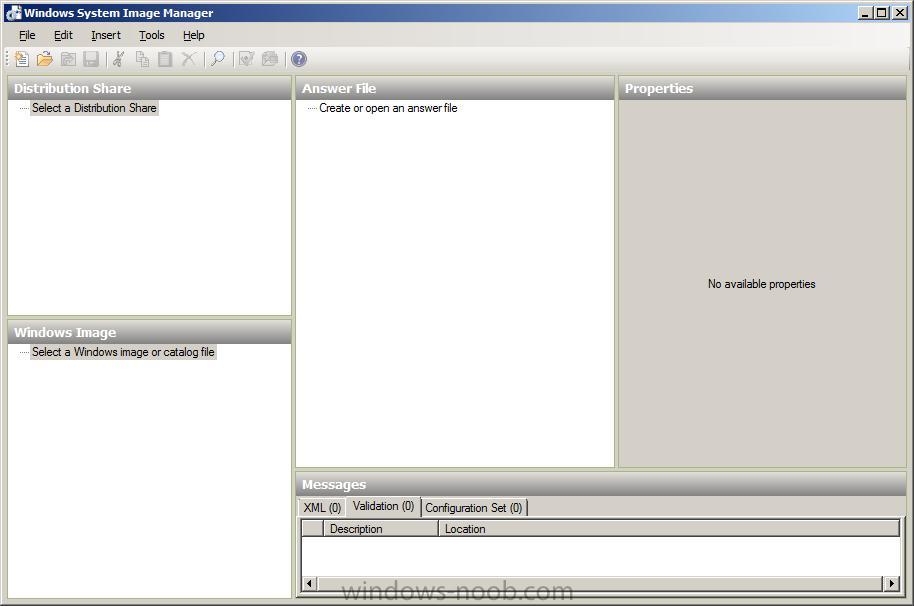
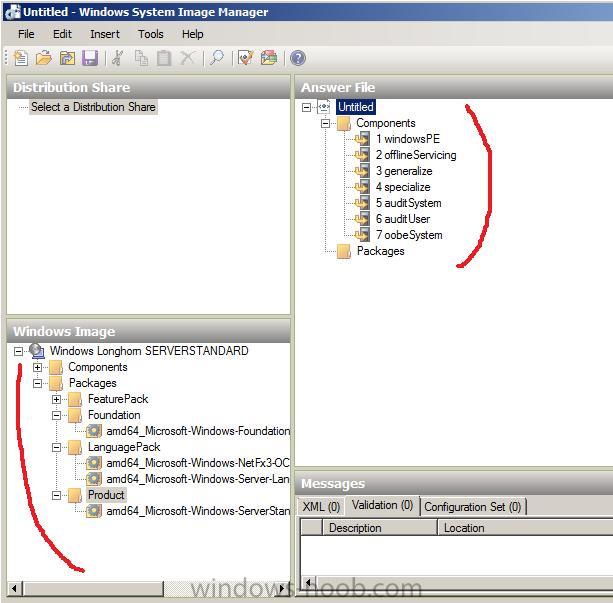
As you can see from the screenshot above, there are 5 main areas to Windows SIM, and they are as follows:
1. distribution share (may contain $OEM$ Folders, Out-of-Box Drivers or the Packages directories, requires
at least one of these dirs to be recognised as a DS)
2. windows image
3. answer file
4. properties
5. messages
When you start Windows SIM for the first time however, the above panes will all be blank as in the screenshot below
How can I use it ?
Before you can use Windows SIM you are going to need your
Windows Vista DVD or your
Windows Server 2008 DVD, so locate them and once done copy the contents of one of them to a folder locally.
eg: c:\source\w2k8dvd
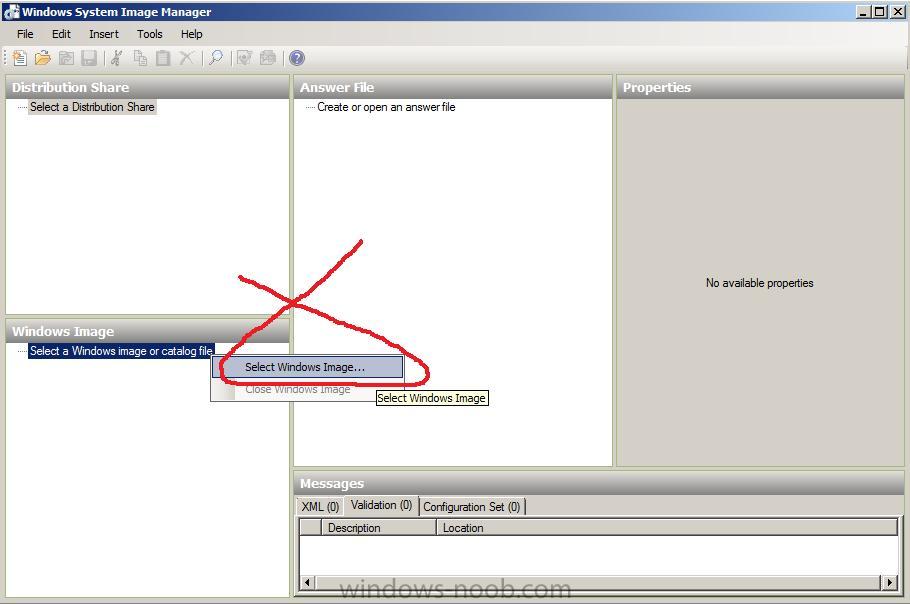
Now that you have a local copy of the DVD, you can
use that as your Windows source (we need to point number 2 above to the
install.wim file on the local source). So let's do that, right click on
Select a Windows Image and choose
Select Windows Image
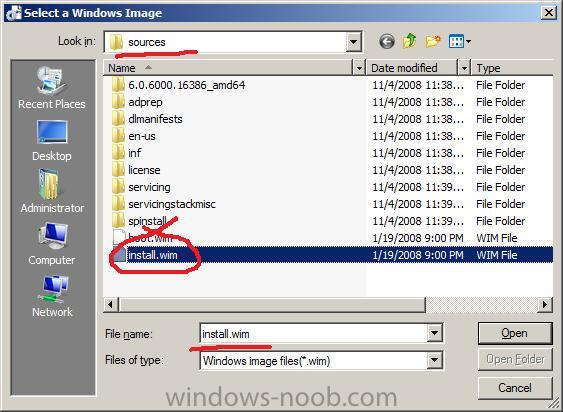
browse to the Local directory which contains a copy of your Windows DVD and choose the
sources directory within there, select the
install.wim file
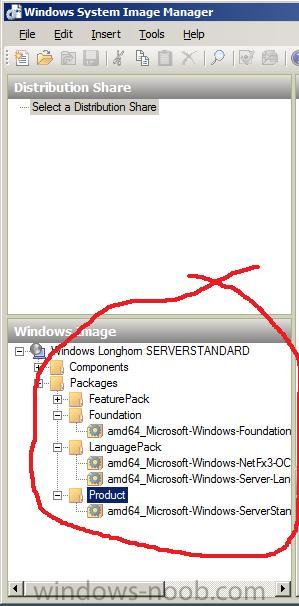
select an Image from the DVD, in my case I'm using a
Windows Server 2008 64bit source.... I select
Longhorn ServerStandard from the choices available

Once done, you may get prompted to
create a Catalog file, answer
Yes. The catalog file contains descriptions of what components and packages the image contains so may take a few minutes to generate. After the Catalog file is created, our Windows Image pane will list some new nodes called
Components and
Packages and you can expand them to see what lies within.
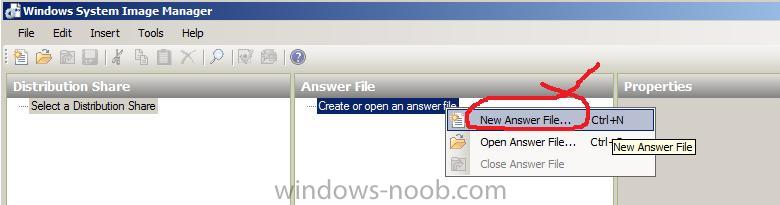
create New Answer File
Now that we have our Windows Image loaded, we will want to configure it so in the
Answer File pane, right click and choose
New Answer File
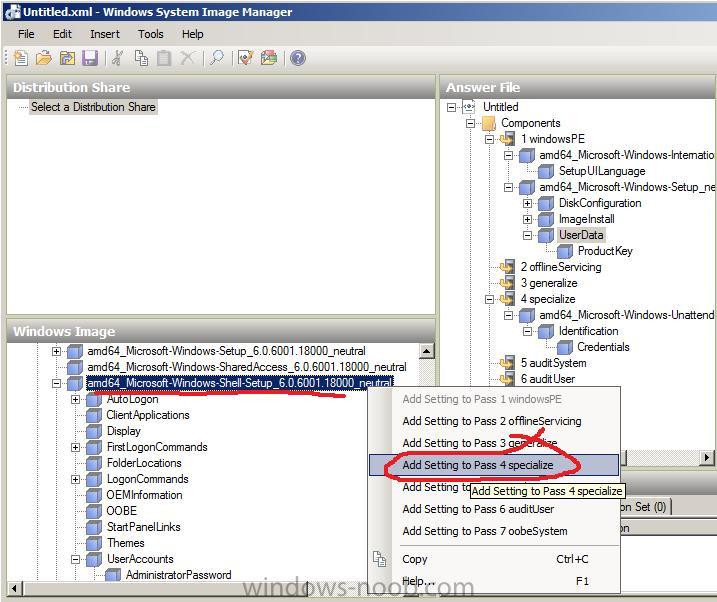
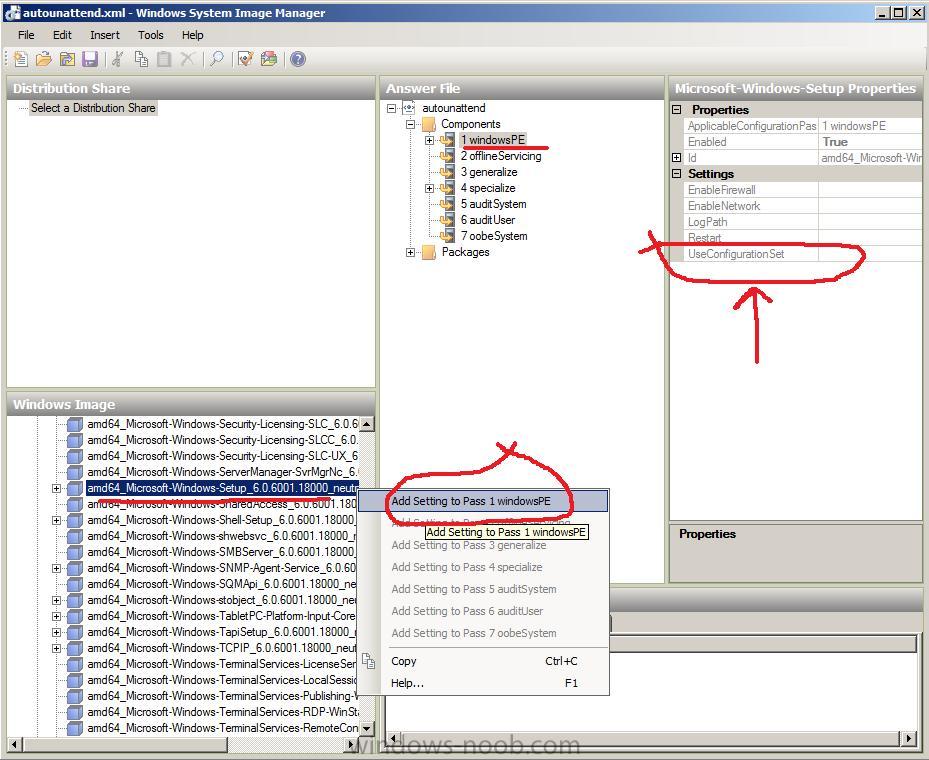
Now that we have a new answer file we can start to configure it, and to do so we need to add components or packages from the Windows Image pane to our Answer file, and then we can make changes to the options we have chosen.
Set Regional and Language options
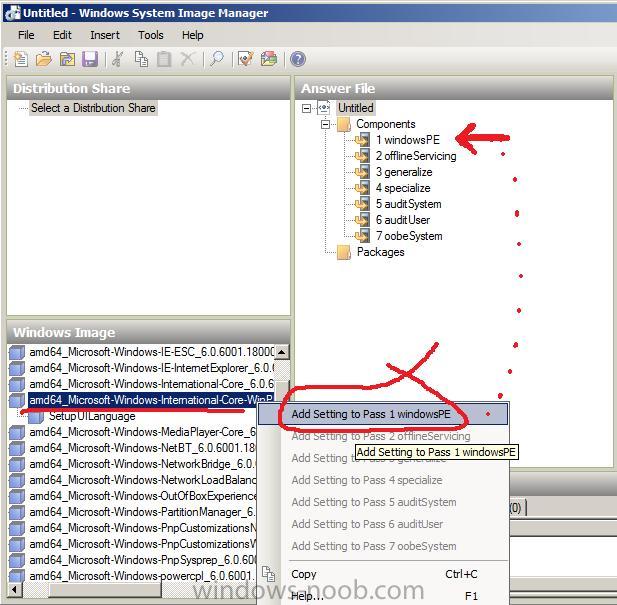
In the Windows Image pane, expand the
Components node and select
Microsoft-Windows-International-Core-WinPE, in my example I have a amd64_ infront of Microsoft-Windows-International-Core-WinPE because I am using a 64bit image. If you are using 32 bit, yours will say
X86_Microsoft-Windows-International-Core-WinPE
right click on the option and choose
Add Setting to Pass 1 Windows PE
In the
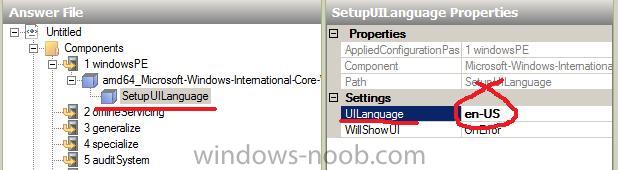
Answer File section, expand the newly added setting and enter
en-US as the value for Input Locale, System Locale,, UILanguge, UILanguageFallback and UserLocale
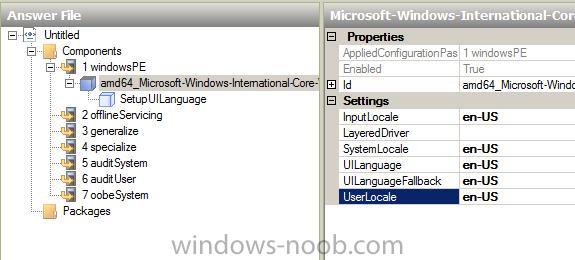
expand the
SetupUILanguage option beneath, and add the
en-US value to the
UILanguage option
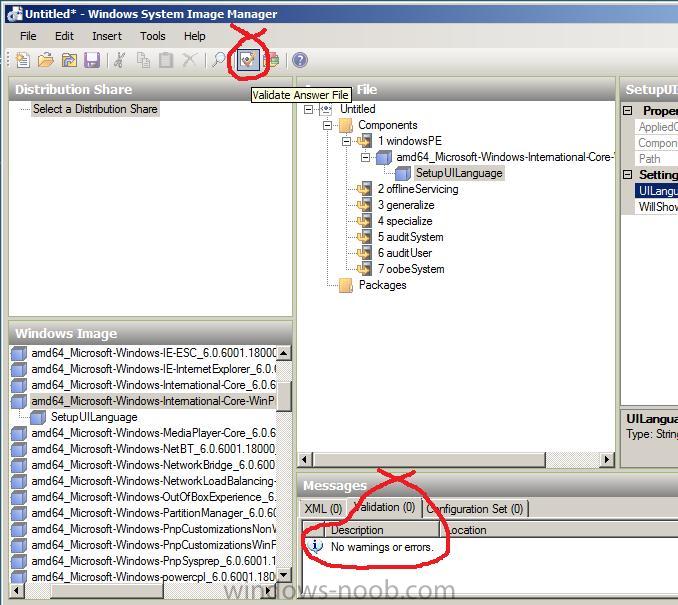
Validate our changes
We have now created an answer file and configured our language and regional options, it is important to understand that you can easily make mistakes creating an answer file, and Windows SIM has a checking tool built in to verify your changes, so to do that click on
Validate answer File and look in the
Messages pane for any messages.
In addition to the above you may want to do the following actions
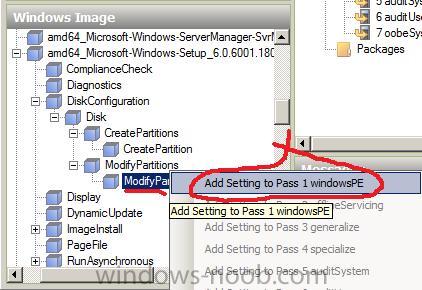
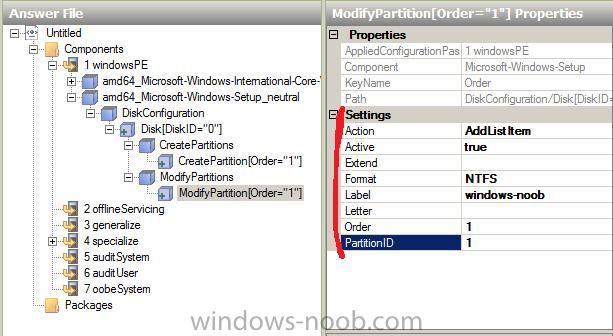
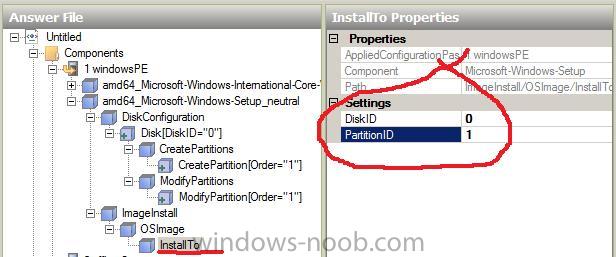
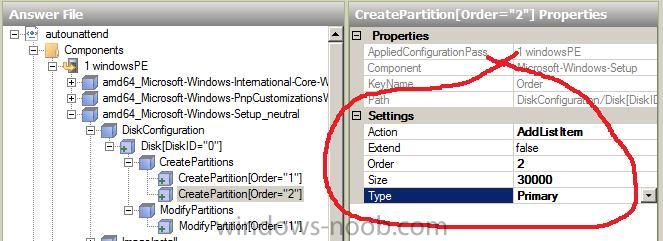
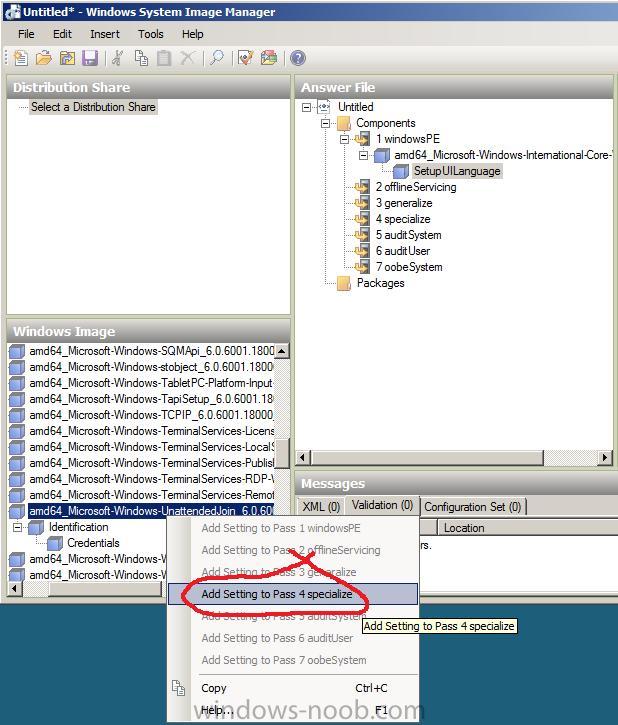
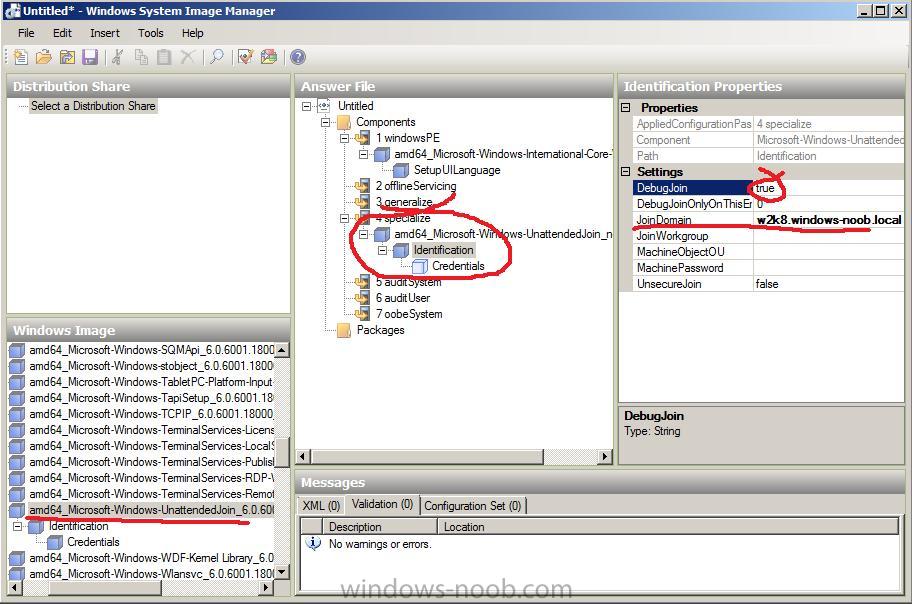
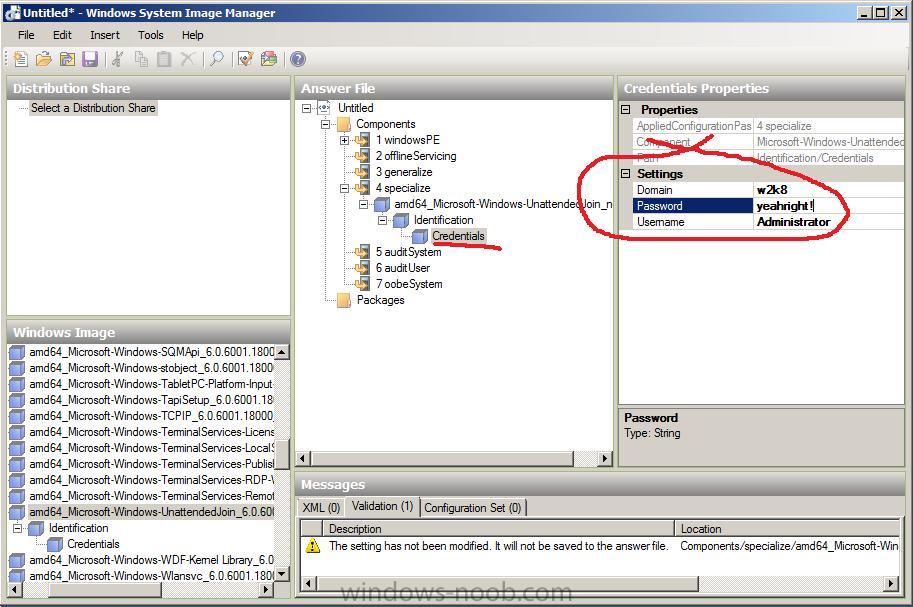
how can I join a Domain using Windows SIM
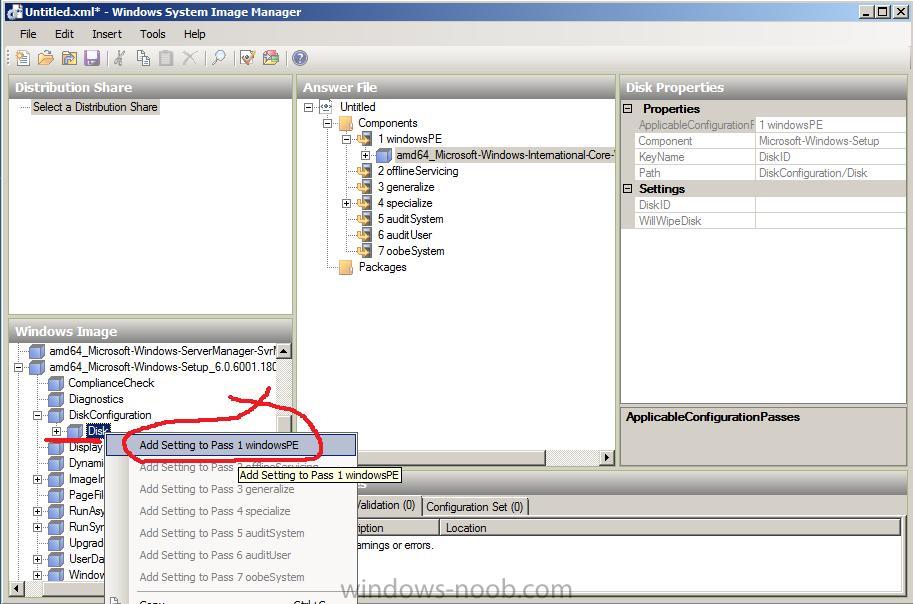
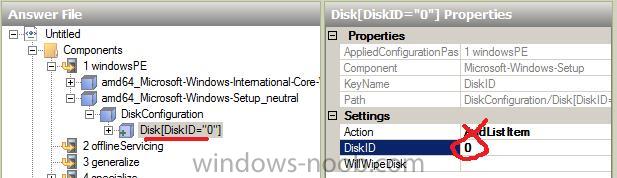
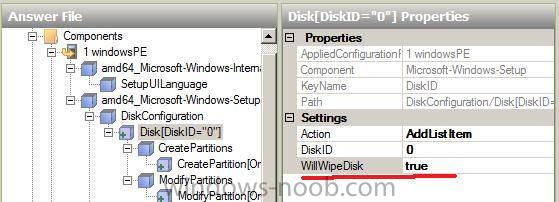
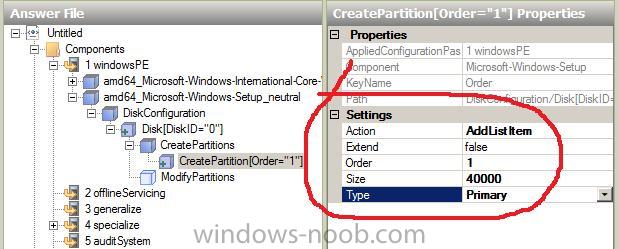
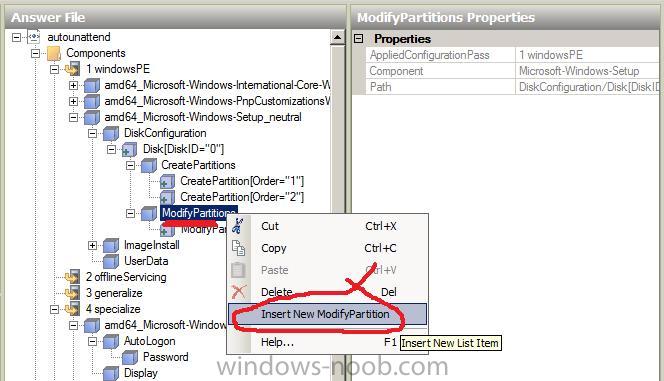
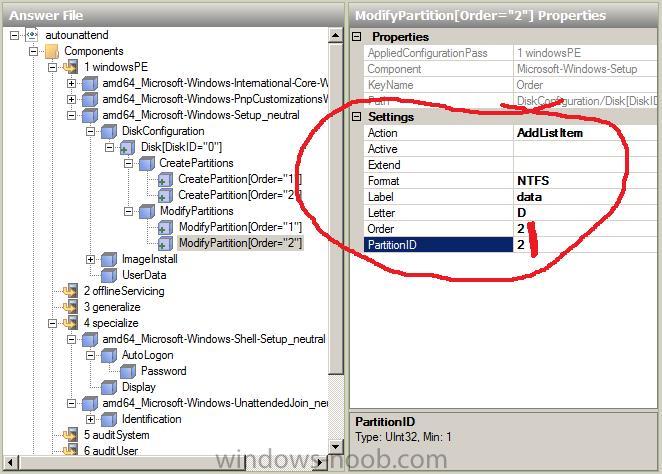
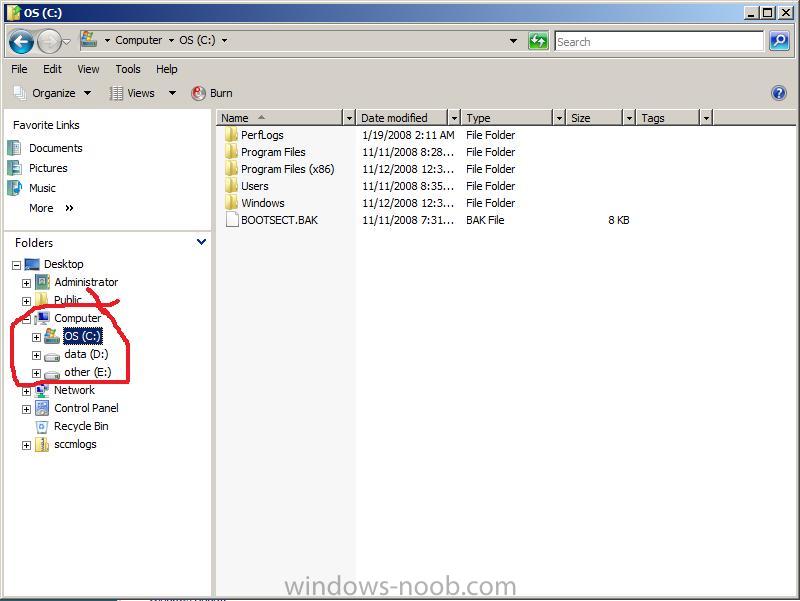
how can I configure the hard disc using Windows SIM
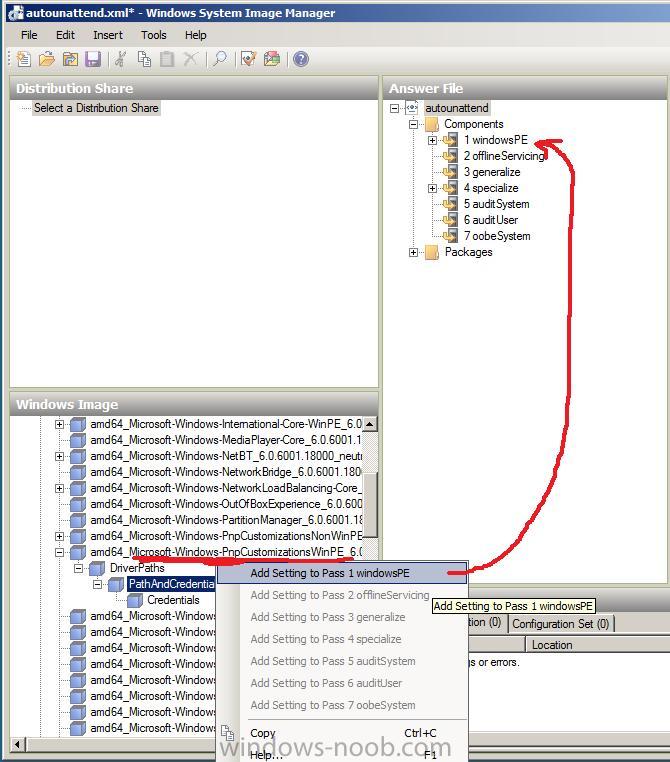
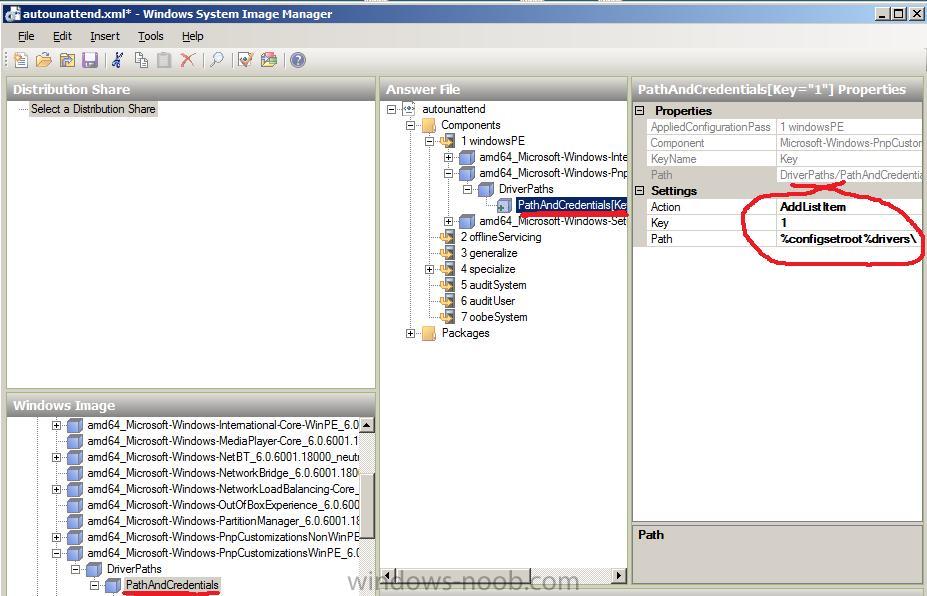
how can I install drivers using windows SIM
how can I change computername using Windows SIM
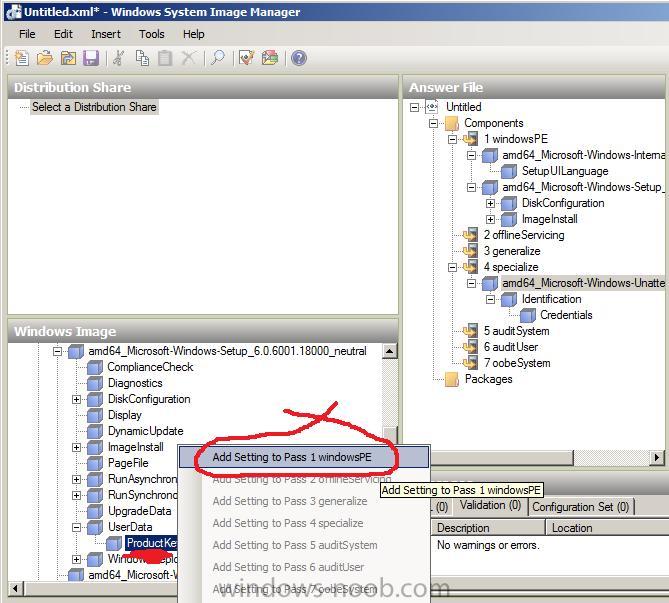
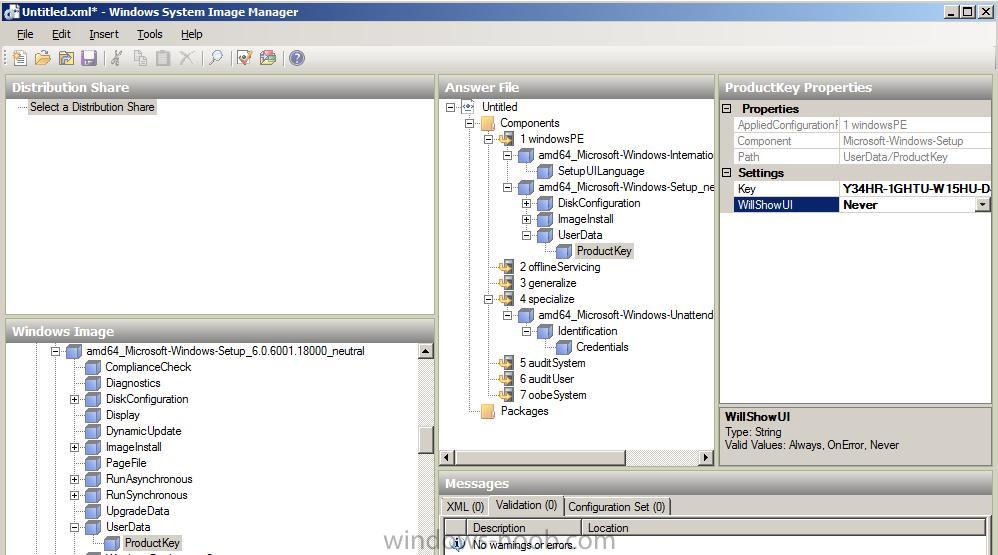
how can I add the product key using Windows SIM
how can I edit the EULA, FullName and Organization settings using Windows SIM
how can I decide which version of Windows get's installed using Windows SIM
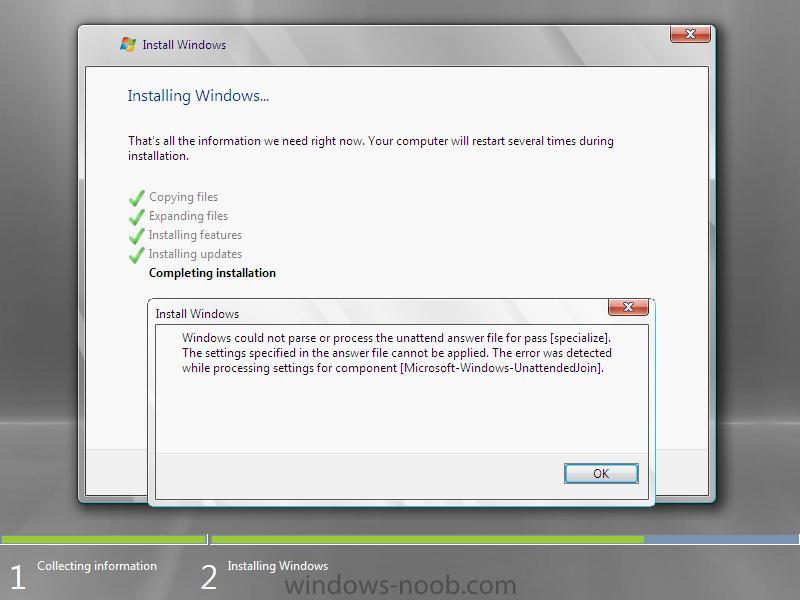
Troubleshooting
Technet Resources >
http://technet.micro...y/cc766073.aspx
if something is not going as planned, you can browse the
C:\Windows\ and
C:\Windows\Panther folders for log files, in particular the
setupact.log and
setuperr.log files
pressing left Shift and F10 together will bring up a command prompt during the Windows setup stage if you wish to view the files using
notepad.
Some errors you may encounter:
Quote
Windows setup could not install one or more boot-critical drivers
this will happen at boot time and may occur after you have added new drivers to your USB key or DVD (or network share..), verify that the drivers are not causing a problem with network connectivity, for example if you've added a 3G modem driver and the error occurs, then you'll have to add that driver at a later stage of the installation

 LinkBack URL
 About LinkBacks