صفحه 2 از 2 اولیناولین 1 2
نمایش نتایج: از شماره 16 تا 22 از مجموع 22

موضوع: Zero Touch/ZTI, Lite Touch/LTi

  
  1. #16
    نام حقيقي: 1234

    مدیر بازنشسته
    تاریخ عضویت
    Jul 2009
    محل سکونت
    5678
    نوشته
    5,634
    سپاسگزاری شده
    2513
    سپاسگزاری کرده
    272
    Step 16

    This guide assumes that you have first completed the following 15 steps in the order listed below.

    Create an OSD capture CD and then captured a Vista image (wim). Next you should have imported that captured Vista image into BDD, and then updated BDD with your Windows PE and XP OS files. You should then have created a new build in BDD for the captured WIM image. You should then have created and updated the BDD Deployment point (OSD/ZTI) and then updated Windows PE to support WMI. In addition, you must have imported the captured Vista WIM file into SMS and then created an OS Deploy Program. Update the SMS distribution points and then Copy driver resources for SMS packaging. Next you need to create a package in SMS from the drivers resources, and add the driver resources to a SMS distribution point and then Update the SMS distribution point. Edit the customsettings.ini and bootstrap.ini files.

    Define BDD ZTI actions.

    Open the SMS administrator console, select Image Packages, expand it, and highlight Windows Vista Enterprise. In the results pane, double click on Programs you should now see VistaRefresh listed. Right-click on VistaRefresh and choose properties then click on advanced.


    Ensure that Validation is selected in the Phase dropdown and click Add. Ensure that (Custom) is selected and click OK.

    Type the following custom action values:

    Name: ZTI-Validation
    Command line: ZeroTouchInstallation.vbs /debug:true

    Click Add and in the Files of type dropdown, select All files (*.*).


    In the File name box, type \\Servername\ZTI$ and click Open, click in the list box and navigate to the build you've created in BDD 2007 (in our example it was build 2), once done press Ctrl+A to select all files. Click Open.


    In the screenshots here, the circled '2' is the build ID number in our ZTI share, the build ID number is found in our BDD 2007 workbench under the builds listed.

    Click Add again, in the File name box, type \\Servername\SMS_site\OSD and click Open (replace servername with your servername and replace SMS_site with the share name of your default SMS folder). Press Ctrl_a and add all files in that folder.


    For the remaining Zero Touch phases, we do NOT have to mark and copy the files above, all we have to do is add the VBS script

    State Capture
    Preinstall
    Postinstall
    State Restore


    so for example for PostInstall

    click Add, choose (Custom), enter ZTI-PostInstall as the name and paste the script in the command line

    ZeroTouchInstallation.vbs /debug:true


    repeat this action (changing the name obviously) for the remaining states:-

    State Capture


    Preinstall


    and State Restore


    To finish this step, click Apply and then Ok, a notice will tell us that we have to update the SMS distribution points.


    Updating the SMS distribution Points.


    Right click our Windows Vista Enterprise package, and choose All Tasks, select Update Distribution Points and then click yes to the notice.


  2. #17
    نام حقيقي: 1234

    مدیر بازنشسته
    تاریخ عضویت
    Jul 2009
    محل سکونت
    5678
    نوشته
    5,634
    سپاسگزاری شده
    2513
    سپاسگزاری کرده
    272
    Step 17

    This guide assumes that you have first completed the following 16 steps in the order listed below.

    Create an OSD capture CD and then captured a Vista image (wim). Next you should have imported that captured Vista image into BDD, and then updated BDD with your Windows PE and XP OS files. You should then have created a new build in BDD for the captured WIM image. You should then have created and updated the BDD Deployment point (OSD/ZTI) and then updated Windows PE to support WMI. In addition, you must have imported the captured Vista WIM file into SMS and then created an OS Deploy Program. Update the SMS distribution points and then Copy driver resources for SMS packaging. Next you need to create a package in SMS from the drivers resources, and add the driver resources to a SMS distribution point and then Update the SMS distribution point. Edit the customsettings.ini and bootstrap.ini files. Update each OSD phase with BDD ZTI scripts and files.


    Locate your SMS OSD installation folder, and in there we'll find two files osdshell.exe and osdshell.lab.exe. We'll rename osdshell.exe to osdshell.original and take a copy of the osdshell.lab.exe and rename that to osdshell.exe


    This osdshell.exe will give us the option of pressing F8 in the development environment to give us an extra command prompt which helps in troubleshooting


  3. #18
    نام حقيقي: 1234

    مدیر بازنشسته
    تاریخ عضویت
    Jul 2009
    محل سکونت
    5678
    نوشته
    5,634
    سپاسگزاری شده
    2513
    سپاسگزاری کرده
    272
    Step 18

    This guide assumes that you have first completed the following 17 steps in the order listed below.

    Create an OSD capture CD and then captured a Vista image (wim). Next you should have imported that captured Vista image into BDD, and then updated BDD with your Windows PE and XP OS files. You should then have created a new build in BDD for the captured WIM image. You should then have created and updated the BDD Deployment point (OSD/ZTI) and then updated Windows PE to support WMI. In addition, you must have imported the captured Vista WIM file into SMS and then created an OS Deploy Program. Update the SMS distribution points and then Copy driver resources for SMS packaging. Next you need to create a package in SMS from the drivers resources, and add the driver resources to a SMS distribution point and then Update the SMS distribution point. Edit the customsettings.ini and bootstrap.ini files. Update each OSD phase with BDD ZTI scripts and files. Copy osdshell.lab.exe to osdshell.exe.


    In the SMS administrator console, select Image packages in the left pane, and right click it, choose all tasks and select Create Operating System Image Installation CD.


    This will start the Operating System Image Installation CD Wizard.


    When you get the installation settings screen, you might want to remove the tick box from

    Allow installation of Operating System Packages from a location provided by the local computer installer
    and
    Allow the local computer installer to choose the name of the new computer.

    In addition, please select automatically choose the operating system package to install by running a custom program or script


    Then select the OS package (Windows Vista Enterprise) that you want the CD to support


    followed by the script location/name from your SMS package ID folder using the ZeroTouchInstallation.vbs script with the /debug:true switch (helpful for logs)]


    Next we have the option to add drivers to the cd for Network and Storage (raid/sata/etc)


    then we give the CD a name


    and this will create an ISO file for us to burn CD's from.


    when it's done we can burn the ISO to a CD and use it to boot bare metal machines to carry out Zero Touch installations.


    And that's it, congratulations if you got this far, you have now completed my 18 Step Zero Touch Guide.

    If it didn't work as expected then I'd advise you to check and re-check everything from start to finish, particularly Step 16. If you have any questions then please post them in the Zero Touch forums @ windows-noob.com

    cheers
    anyweb


  4. #19
    نام حقيقي: 1234

    مدیر بازنشسته
    تاریخ عضویت
    Jul 2009
    محل سکونت
    5678
    نوشته
    5,634
    سپاسگزاری شده
    2513
    سپاسگزاری کرده
    272

    How can I change the computername in Zero Touch

    If you carry out a Zero Touch installation (as outlined here) the computername will remain the same as it was when you captured the original Vista image.

    One way to change the computername is via a script, to add this script to the Zero Touch installation, we need to start up Deployment Workbench and click on the Builds option in the left pane. Right click on our Zero Touch build and choose properties, then choose Task Sequence in the available tabs.


    Within the task sequencer tree, click on the + beside the Preinstall section to expand it, and then expand the New Computer Only option after that.


    Now click on Add, and from the drop down menu select Task.

    In the command line of the New Task paste in the following line

    cscript.exe "%SCRIPTROOT%\RequestComputerName.vbs"

    The actual contents of that script are located here

    Quote
    Option Explicit

    Dim numCount
    Dim strComputerName
    Dim objOSD

    Do While numCount = 0
    strComputerName = InputBox ("Please enter a name for the new computer:","New Computer Name","Vista00",10,10)
    If strComputerName = "" Then
    Wscript.Echo "You must enter a computer name."
    Else
    Set objOSD = CreateObject("OSD.Environment")
    objOSD("OSDNEWMACHINENAME") = strComputerName
    Set objOSD = Nothing
    Exit Do
    End If
    Loop


    Once done, rename the task to RequestComputerName and using the UP arrow in the Task Sequencer move the task up in the list so that it is the first command run.


    This means that the script will only run if the machine is detected to be a new computer with no operating system installed


  5. #20
    نام حقيقي: 1234

    مدیر بازنشسته
    تاریخ عضویت
    Jul 2009
    محل سکونت
    5678
    نوشته
    5,634
    سپاسگزاری شده
    2513
    سپاسگزاری کرده
    272

    The network location cannot be reached. For information about network troubleshooting

    The network location cannot be reached. For information about network troubleshooting, see Windows help. (800704CF) adding network drivers to Zero Touch WindowsPE


    I got this error when trying to do a ZTI install of Vista on a modern Intel ICH9 dekstop with the Intel gigabit nic (vpro Network:Intel 825xx Gigabit Platform LAN Network Device Driver).

    SMS Operating System Deployment

    Quote
    The operating system installation failed. Please contact your system administrator for assistance.

    Could not connect to the installation package on \\servername\SMSPKGD$\RIS0000D. The network location cannot be reached. For information about network troubleshooting, see Windows help. (800704CF)

    This message will automatically close in 30 minutes.

    [OK]


    It turns out that when I created the OS package in SMS, I didn't bother specifying any special network drivers, and thus, Windows PE couldnt communicate over the network to this computer.

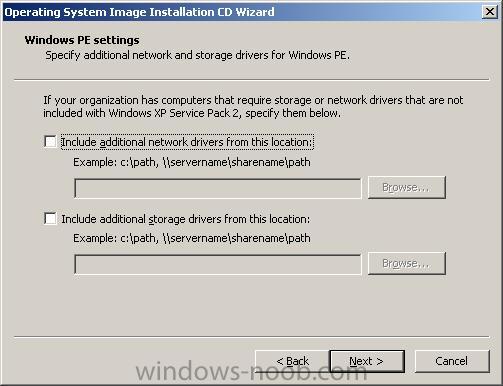
    to resolve this I first added the NIC (network) drivers to my deployment point in Deployment Workbench by clicking on Distribution share in the left pane and then selecting Out-Of-Box Drivers. I right clicked here, and selected New, and then used the wizard to point to the local path of the Intel Gigabit XP drivers. Once done I right clicked on my Deployment point and chose Update.

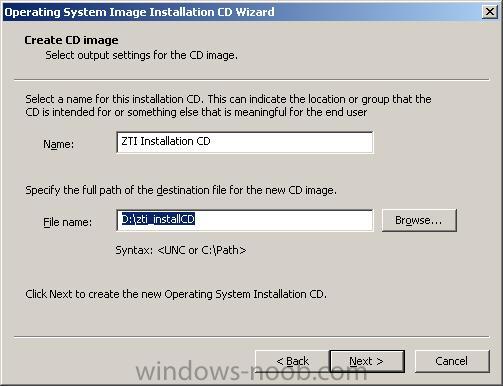
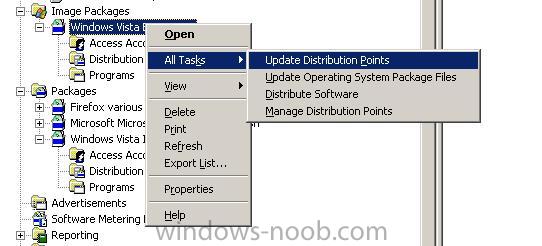
    I then went back into SMS, clicked on Image Packages, then selected my vista image (Windows Vista Enterprise), right clicked on it and chose properties. I then clicked on the Drivers tab and entered the \\servername\sharename\path path to my newly added network drivers on the Distribution$ share.


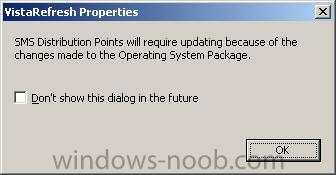
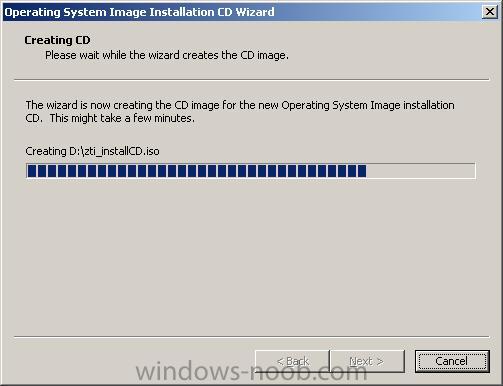
    I then clicked ok and it copied the files over, once done it informed me that the SMS distribuition points required updating, so I did that.


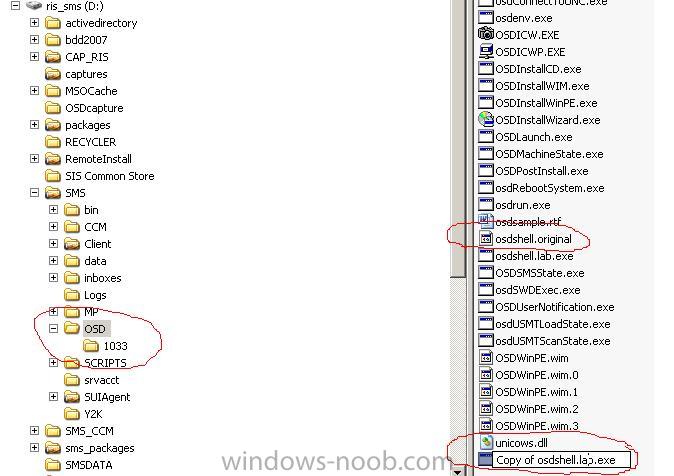
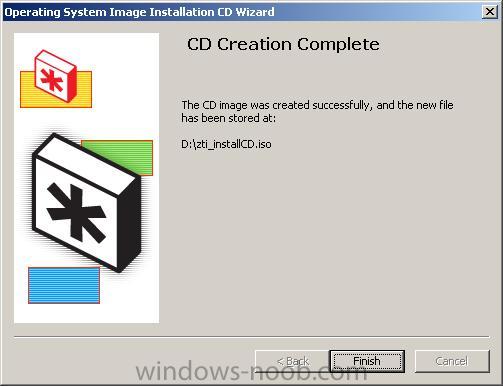
    once done your Windows Vista ZTI package will have a new folder added to it called CustomWinPE

    eg:-


    D:\SMSPKGD$\RIS0000D\CustomWinPE


    obviously in this example, SMSPKGD$ is an SMS sharing directory and RIS0000D is the Package ID of the package within that share.

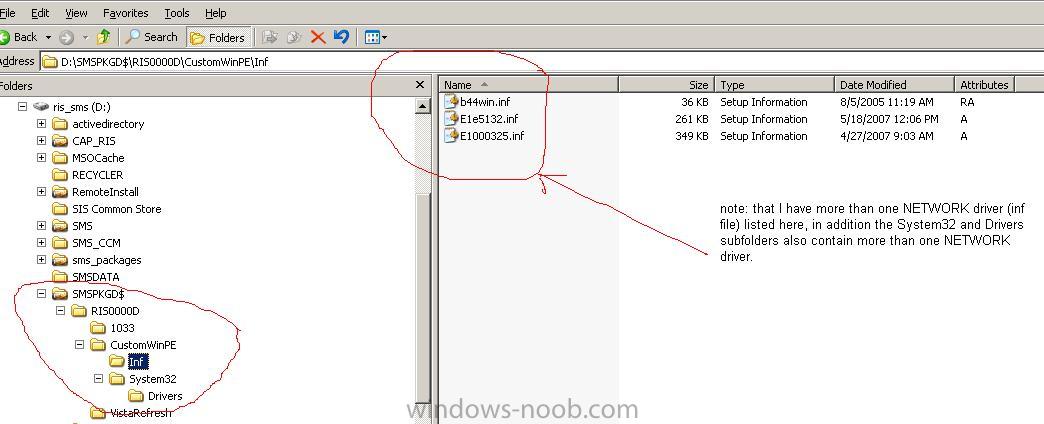
    If you browse the CustomWinPE folder, you will see there are INF and System32 subfolders which contain the network drivers you just added.

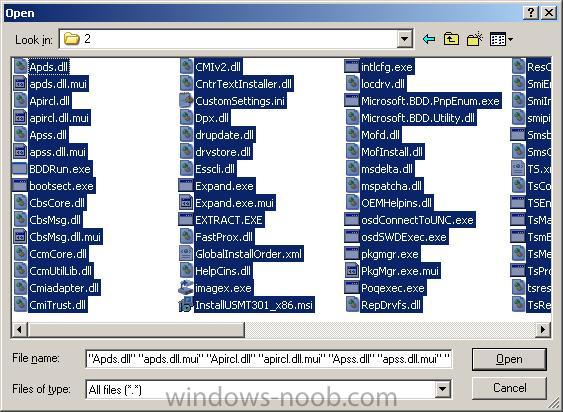
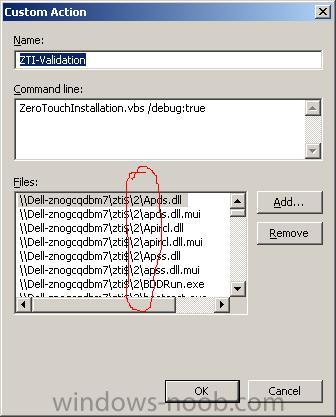
    Please note that the above works nicely if you are adding only ONE new network driver, if you are adding more than one then it's a good idea to copy the contents of the newly created CustomWinPE folder to somewhere else, and manually copy in the CAT/SYS/INF and EXE files as appropriate (easy to figure out), then once done, copy the contents of that back to the original SMS package share as in the screenshot.


    In addition, once you have made the changes you will need to either completely re-deploy an os (eg: XP) on the client computer, and then rerun the ZTI advertisement to the client, OR you can manually boot the system using a WindowsPE usb key/cd and copy over the contents of the files within CustomWinPE to the c:\MININT folder (eg: all files in INF must be copied to C:\MININT\INF and so on), then once done, power down, and reboot and the ZTI process will continue correctly without the original error


    for some more info on the subject read here > http://www.windowsit...7539/47539.html

    cheers
    anyweb


  6. #21
    نام حقيقي: 1234

    مدیر بازنشسته
    تاریخ عضویت
    Jul 2009
    محل سکونت
    5678
    نوشته
    5,634
    سپاسگزاری شده
    2513
    سپاسگزاری کرده
    272

    how can I setup Zero Touch Installation

    How can I setup Zero Touch Installation


    Verify that you have the correct infrastructure in place

    Zero Touch Installation (ZTI) requires the following products to be installed in your network infrastructure:-

    * Microsoft SQL Server 2000 (or later) - detailed setup guide here
    * SMS 2003 - detailed setup guide here
    * SMS 2003 OSD Feature Pack Update
    * Windows Deployment Services in Windows Server 2003


    Note: If you want a Microsoft checklist of the steps required to get ZTI working, see this page on Technet.


    Prepare the deployment environment.

    For the purpose of this article, I'm assuming that you have already installed and configured SMS 2003 and SQL. In addition this has been tested and verified to be working for Windows Vista RTM (i.e.: I have not tested it with Vista SP1 yet).


    Install BDD 2007 and then install USMT either manually by downloading the msi package or by installing it using the Components section of DeploymentWorkbench (the MMC console for BDD 2007). USMT captures desktop, and application settings, as well as user accounts and user files, and then migrates them to a new Windows installation. Next, install the SMS 2003 OSD Feature Pack. Click here to download and install the SMS 2003 OSD Feature Pack Update, once downloaded, double click the exe to extract it somewhere, I extracted it to c:\sms and then ran the OSDeployment_Setup.EXE file from within that folder to install the OSD Feature Pack. Once the feature pack is installed, it's safe to delete the setup folder (c:\sms if you did the same as me).

    Once installed, you can start up the SMS Administrator Console and you'll see a new setting in the left pane called Image Packages. You are now ready to setup Zero Touch using the 18 Step guide below.


    Zero Touch in 18 Steps

    Create an OSD capture CD.
    Capture a Vista image (wim). Note: To use separate computernames then read this post.
    Import the captured Vista WIM image into BDD.
    Import WinPE2004/2005 & required OS files into BDD.
    Create a new build in BDD for the captured WIM image.
    Create and update the BDD Deployment point (OSD/ZTI).
    Update SMS WinPE from the BDD/ZTi deployment point.
    Import the captured Vista WIM image into SMS.
    Create an OS deploy program.
    Update the distribution point for the OS deploy program.

    The following four steps in the process are not specific to Zero Touch Installation, but make the distribution of resources easier and more scalable in an enterprise environment.

    Copy driver resources for SMS packaging.
    Create a package from the driver resources.
    Add the driver resources to a distribution point.
    Update the SMS distribution point.

    Update customsettings.ini and bootstrap.ini in BDD.
    Update each OSD phase with BDD ZTI files and scripts.
    Copy osdshell.lab.exe to osdshell.exe.
    Create an install CD.

    That's it, you are done


  7. #22
    نام حقيقي: 1234

    مدیر بازنشسته
    تاریخ عضویت
    Jul 2009
    محل سکونت
    5678
    نوشته
    5,634
    سپاسگزاری شده
    2513
    سپاسگزاری کرده
    272

    BDD 2007 MSI File

    BDD2007_x86.msi
    http://www.windows-n...BDD2007_x86.msi


    Microsoft Deployment Toolkit (MDT) 2008

    Microsoft Deployment Toolkit 2008 is the next version of Business Desktop Deployment (BDD) 2007. It is the recommended process and toolset to automate desktop and server deployment. This release includes updates to support Windows Vista SP1 and Windows Server 2008 in addition to previously supported platforms.


    You can download it here


صفحه 2 از 2 اولیناولین 1 2

کلمات کلیدی در جستجوها:

moving the SMSPKGC share to SMSPKGD

Windows 7 Zero-Touch versus Lite-Touch Installations

mdt 2010 deployment share the network location cannot be reached

configurer drivers.xml et driversGroup.xml

windows 7 restore system image network location cannot be reached 800704cf

verification of zero touch deployment

The network location cannot be reached. For information about network troubleshooting see Windows help. (800704CF)

mdt 2010 the network location cannot be reached

restore user data litetouch

bdd zti-preinstall error 2147500037

windows mdt driversgroup.xml

smsdp variable usage in usmt

mdt driversgroups.xml

smsdp refresh

sccm smsdp variable

out of box drivers

zti refresh

ztilite touch not reboot

sccm boot 800704cf

در مورد ziro computer

network location reache

what is zti lti

smsdp variable not set during refresh phase of usmt

insert network drivers zerotouch boot cd

نرم افزار TrueSwitch Wizard

برچسب برای این موضوع

مجوز های ارسال و ویرایش

  • شما نمی توانید موضوع جدید ارسال کنید
  • شما نمی توانید به پست ها پاسخ دهید
  • شما نمی توانید فایل پیوست ضمیمه کنید
  • شما نمی توانید پست های خود را ویرایش کنید
  •