How to configure Group Policy to use Data Recovery Agents with “Bitlocker to Go” drives – Part 2
As I previously mentioned in Part 1 “use Group Policy to save “
How to use BitLocker to Go” recovery keys in Active Directory – Part 1” one of the cool new features in Windows 7 is the ability to encrypt removable storage devices to help prevent the loss of data within an organisation while storing a copy of the decryption key in Active Directory. Another way to encrypt the removable storage devices and still have the ability to recover a encrypted devices if the unlock key is lost is to use a Data Recovery Agent digital certificate.
Now before you begin you first need to have deployed you a PKI infrastructure in your organisation so that you can issue the data recovery certificate to your nominated recovery agents.
So lets get started
How to configured Group Policy to use a Data Recovery Agent with “BitLocker to Go” drives
Issuing the EFS Data Recovery Agent
First you need to create/issue at least one account with the Data Recovery Agent certificate that will be used for when encrypting all the Bitlocker to Go drives.
Step 1. Click
Start, and then type
certmgr.msc to open the Certificates snap-in
Step 2. In the console tree, expand
Personal, and then click
Certificates.
Step 2. Right click on
Certificates and click on
All Tasks and then
Request New Certificate…

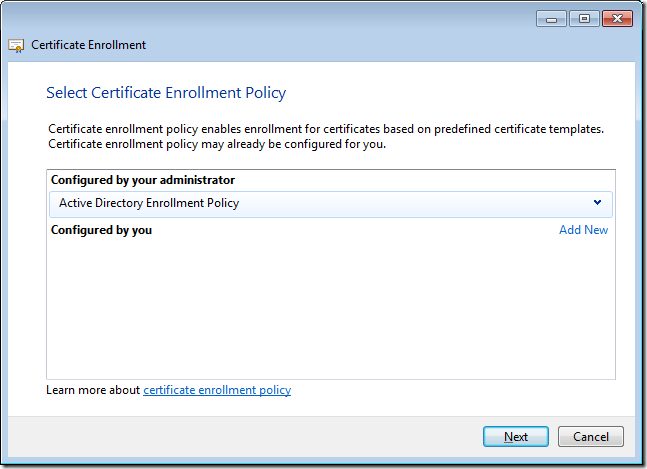
Step 3. Click
Next to the first page of the Certificate Enrollment wizard and then then click on
Active Directory Enrollment Policy and click
Next
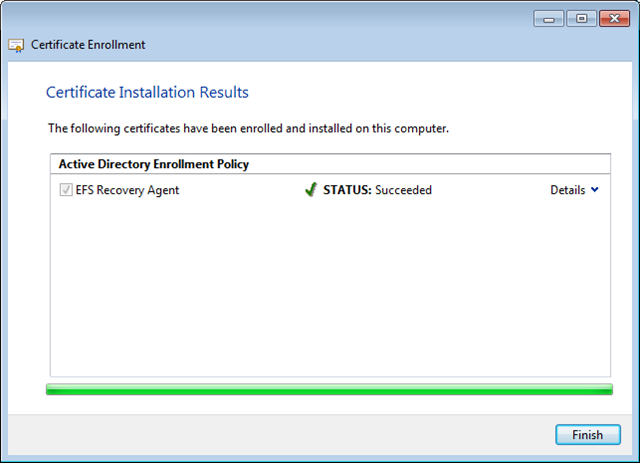
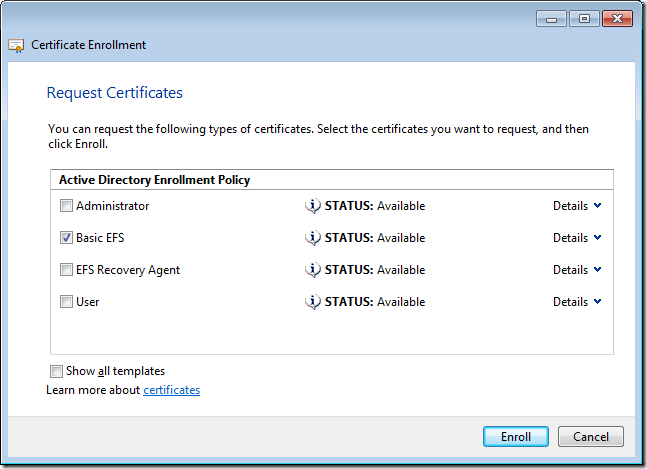
Step 4. Tick the
EFS Recovery Agent policy and then click
Enroll
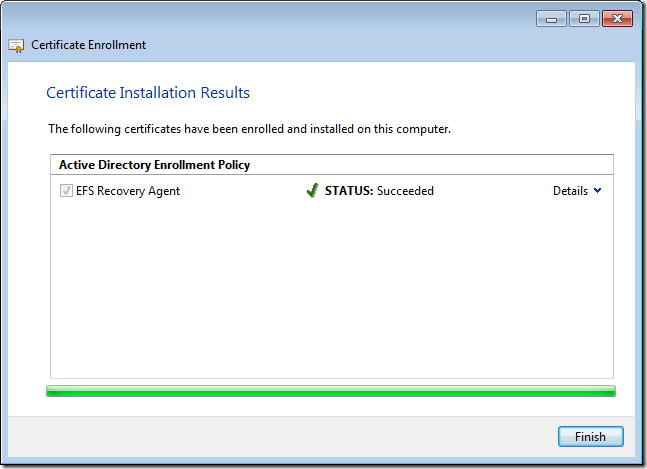
Step 5. Click
Finish once your account has enrolled as the EFS Recovery Agent certificate.
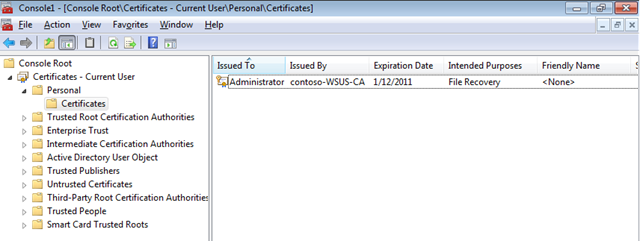
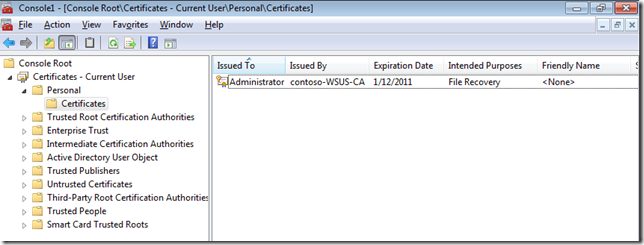
You should now see the File Recovery Certificate in you Personal Certificate store.
 Exporting the DRA Certificate
You now need to export the DRA certification information to be used in the BitLocker Drive Encryption group policy in a future step.
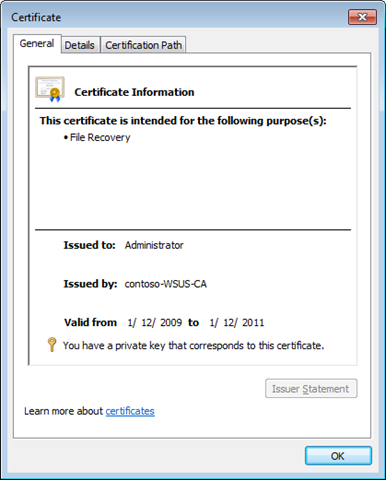
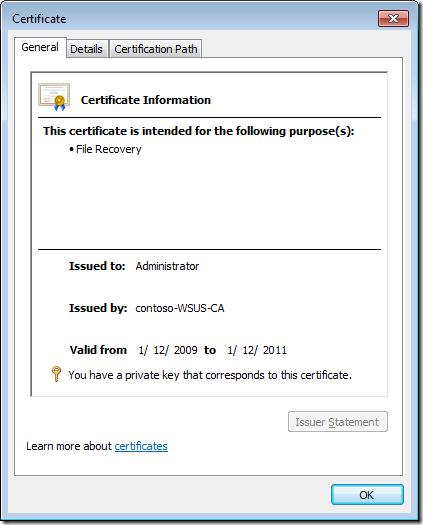
Step 1. Double-click the
BitLockerDRA certificate to display the certificate properties sheet.
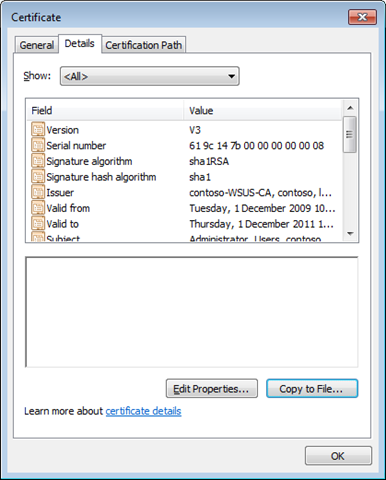
Step 2. Click the
Details tab
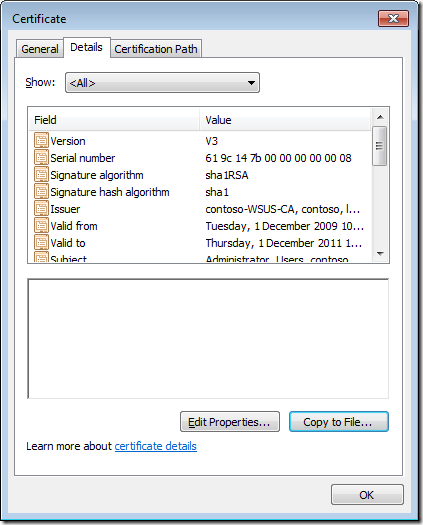
Step 3. Click
Copy to File
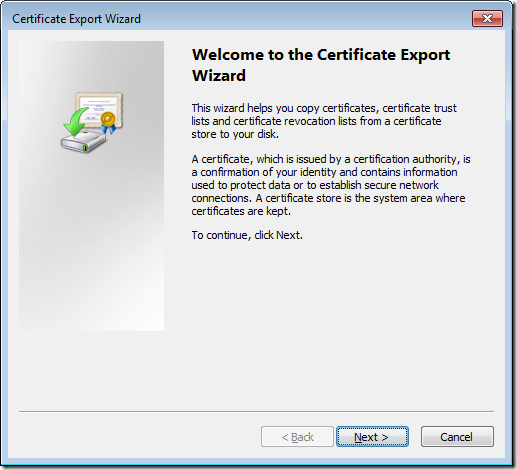
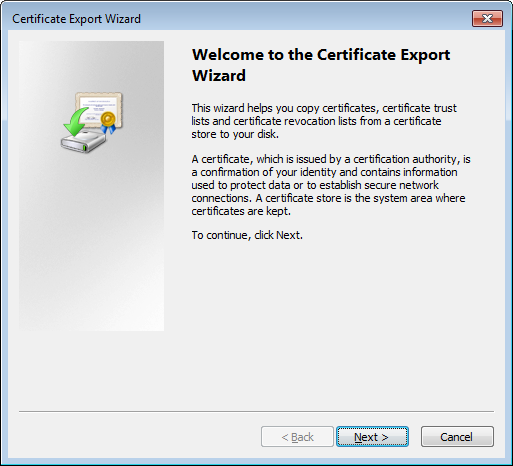
Step 4. Click
Next on the
Welcome to the Certificate Export Wizard page

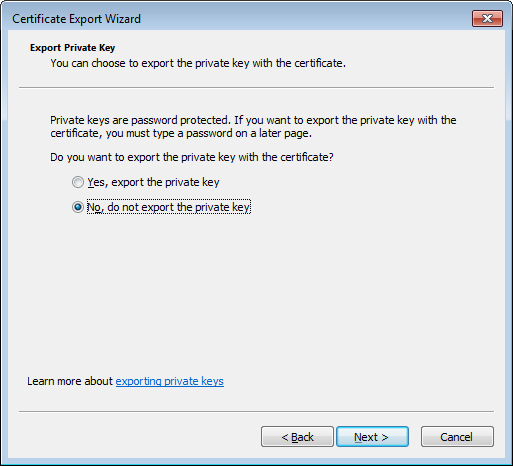
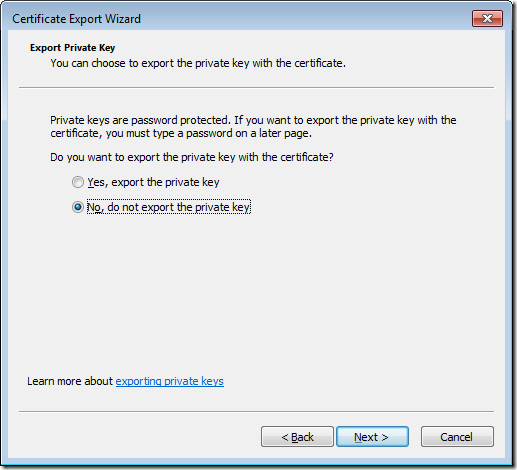
Step 5. Leave the
No, do not export the private key selected and then click
Next.
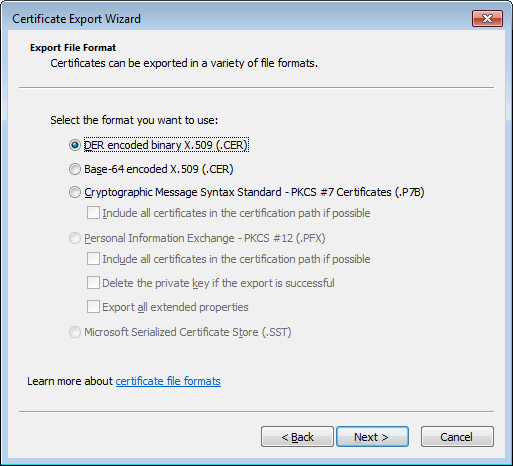
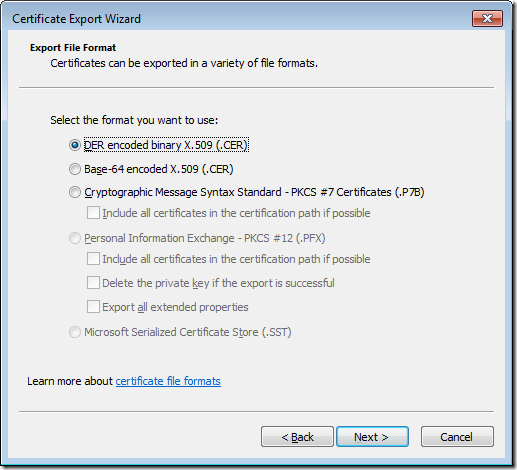
Step 6. On the
Export File Format page, verify that
DER encoded binary x.509 (.CER) is selected, and then click
Next.
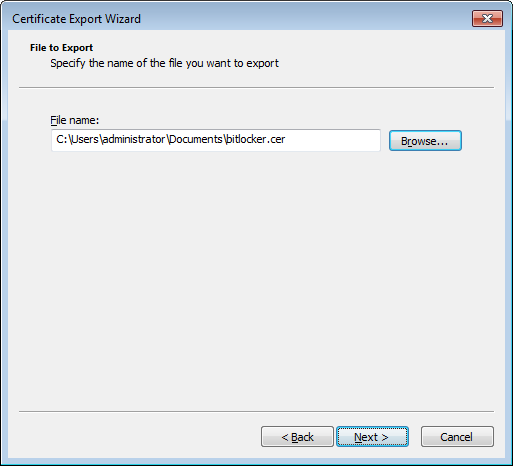
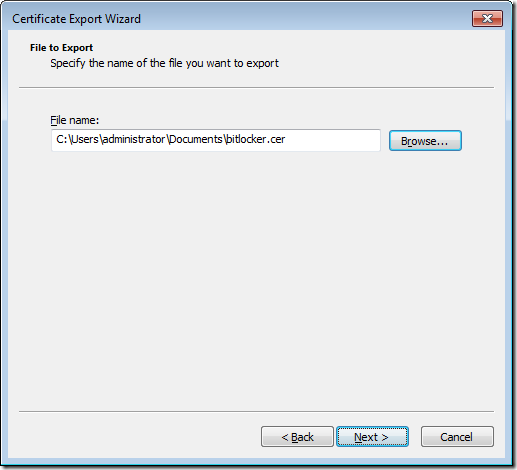
Step 7. On the
File to Export page, click
Browse to display the
Save as dialog box. In
File name, type
BitLocker. In
Save as type, verify that
DER Encoded Binary X.509 (.cer) is selected, and then click
Save to return to the
File to Export page.

Step 8. The
File name box on the wizard page should now display the path to the BitLocker.cer file in your document library. Click
Next.
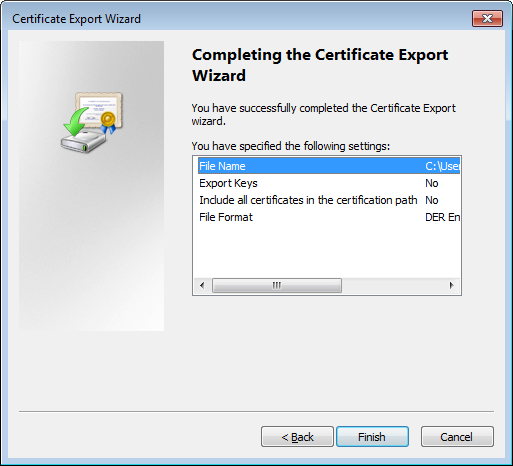
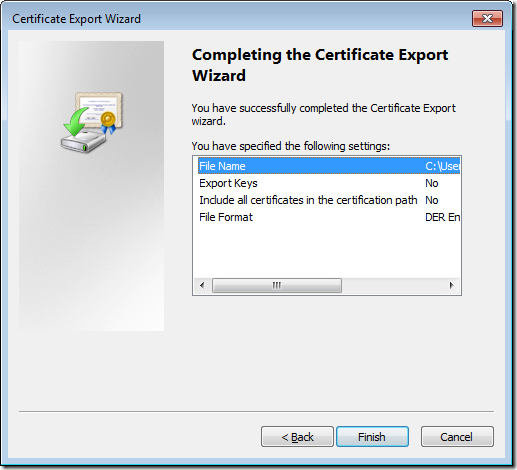
Step 9. On the
Completing the Certificate Export Wizard page, verify that the information displayed is correct, and then click
Finish.
Step 10. When the certificate has been exported, the
Certificate Export Wizard dialog box will be displayed with the message
The export was successful. Click
Close to close the dialog and the wizard.
Configuring the Bitlocker Data Recovery Agent in Group Policy
In this section we are going to take the Data Recover Agent certificate we exported above and import it into the group policy to apply to computers that will have DRA certification for encrypting Bitlocker drives. The screenshots below are from a Windows Server 2008 R2 server with the group policy management console installed but if you are on a Windows 7 computer you will need to have install the
Remote Server Admin Tools installed.
Step 1. Click
Start, type
gpedit.msc in the
Search programs and files box, and then press ENTER.
Step 2. If the
User Account Control dialog box appears, confirm that the action it displays is what you want, and then click
Yes.
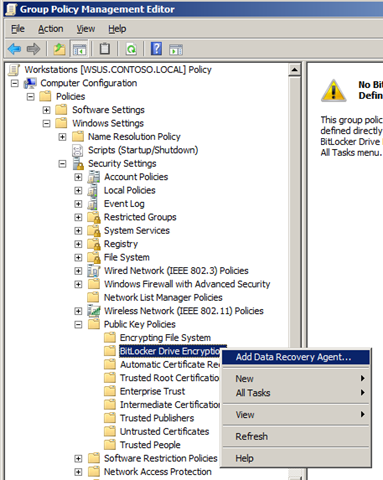
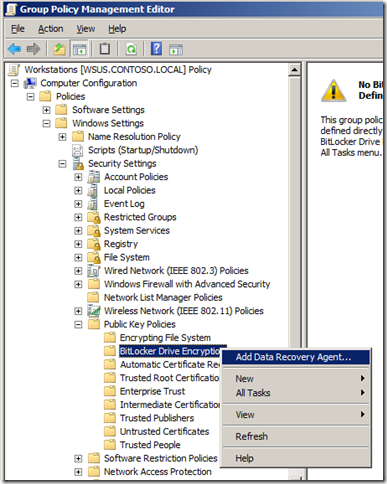
Step 3. In the console tree under
Local Computer Policy\Computer Configuration\Windows Settings\Security Settings\Public Key Policies, right-click
BitLocker Drive Encryption, and then click
Add Data Recovery Agent to start the Add Recovery Agent Wizard.
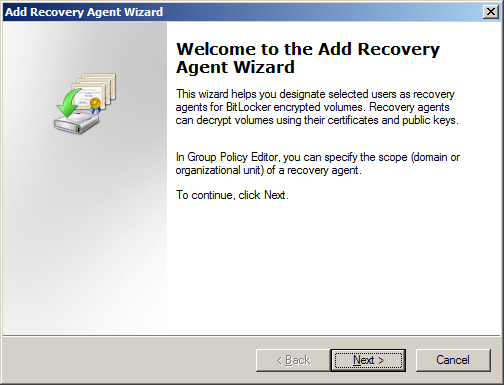
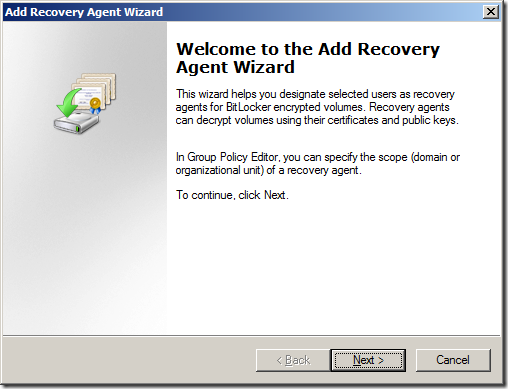
Step 4. Click
Next on the Add Recovery Agent Wizard welcome screen
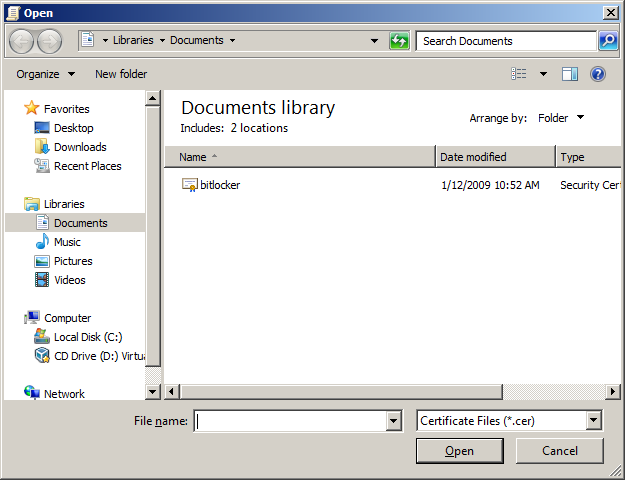
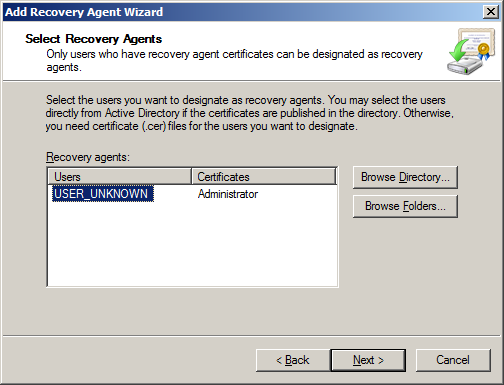
Step 5. On the
Select Recovery Agents page, click
Browse Folder
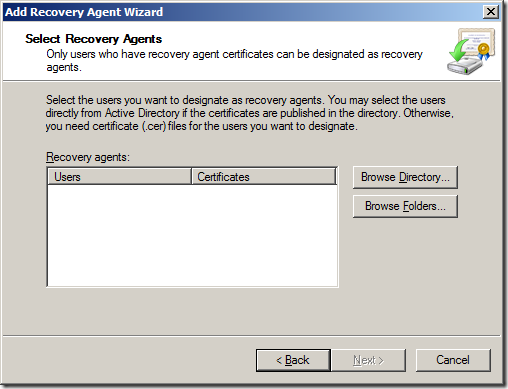
Step 6. Browse to the location you have a copy of the
BitLocker.cer file that you exported in the previous procedure select the certificate and click
Open

Step 7. Click
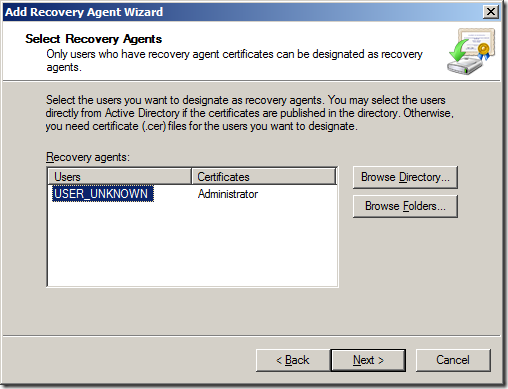 Note:
Note: You can repeat this process as necessary to add multiple data recovery agents. After all data recovery agent certificates you want to use have been specified, click
Next.
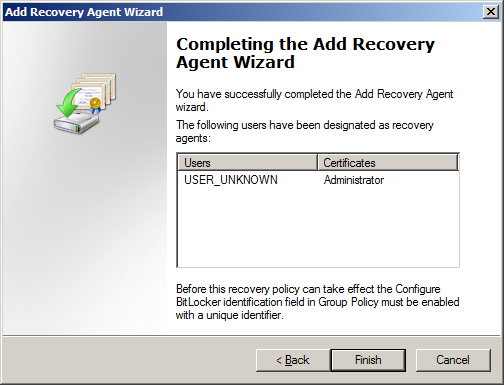
Note: The example above has USER_UNKNOWN because the DRA file was manually imported.
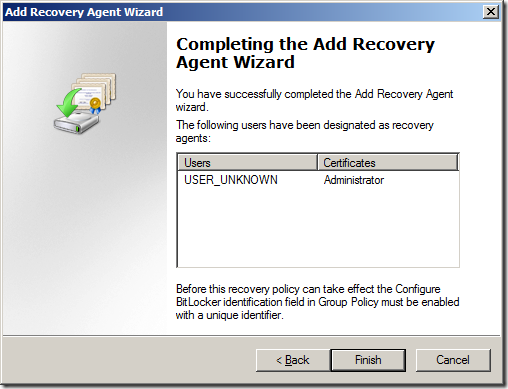
Step 8. On the
Completing the Recovery Agent Wizard page, click
Finish to add the data recovery agent
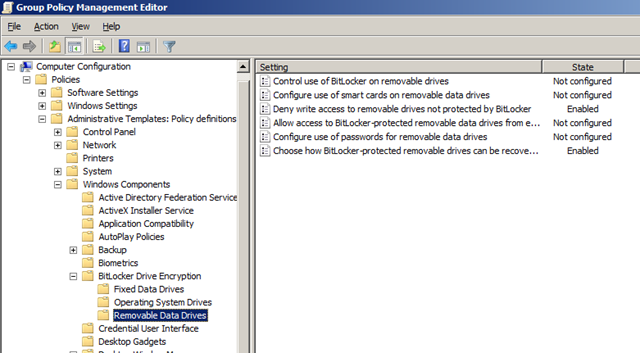
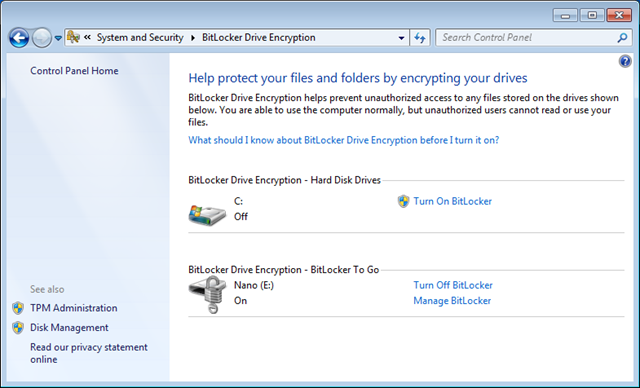
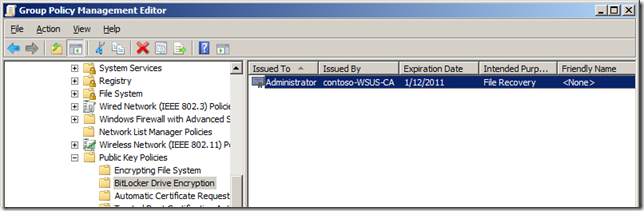
Below is the BitLocker Drive Encryption setup with a DRA installed.
 Additional Group Policy Configuration
BitLocker Identification Field
Additional Group Policy Configuration
BitLocker Identification Field
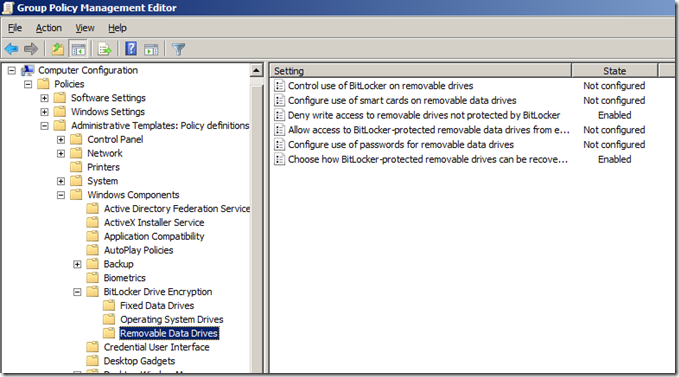
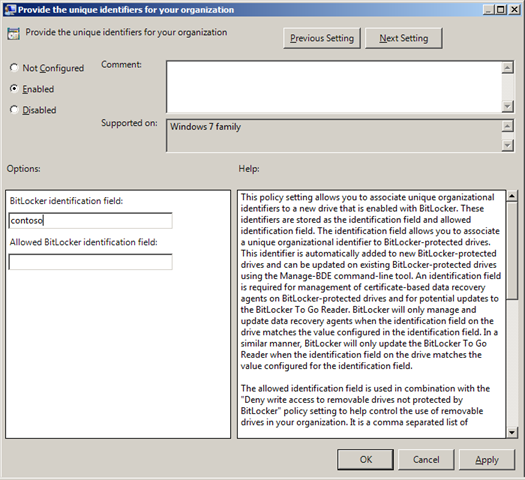
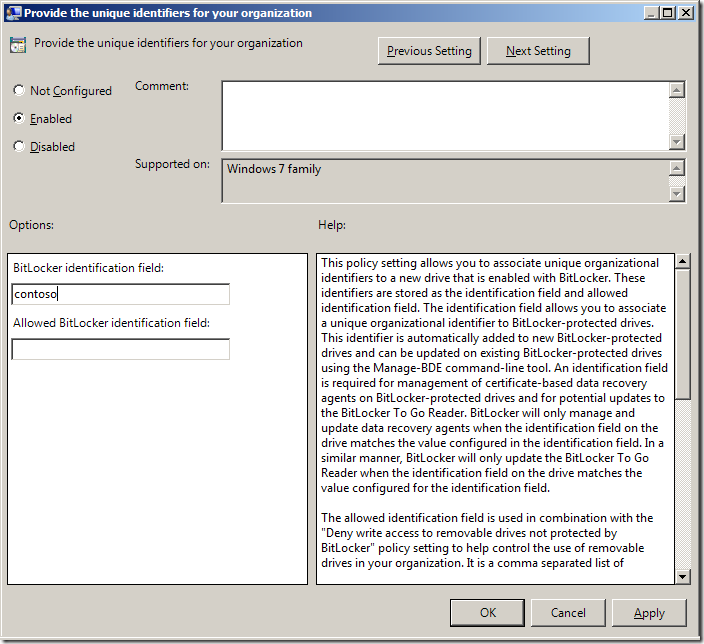
You now need to configure the BitLocker Identification field on all the computers you are going to use Bitlocker on as this helps identify what removable devices belong to your organisation.
Step 1. Click
Start, type
gpedit.msc in the
Search programs and files box, and then press ENTER.
Step 2. If the
User Account Control dialog box appears, confirm that the action it displays is what you want, and then click
Yes.
Step 3. In the console tree under
Computer Configuration\Administrative Templates\Windows Components\Bitlocker Drive Encryption and then double click on
Provide the unique identifiers for your organization
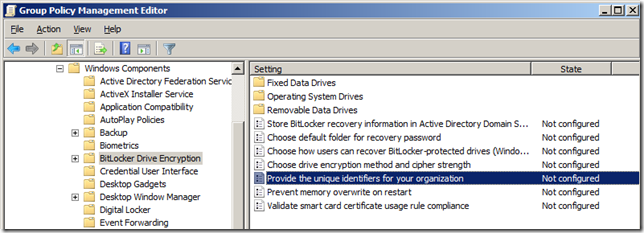
Step 3. Enter you specific Bitlocker identification name that you use to identify your Bitlocker encrypted devices in the
BitLocker identification field
Note: You can add additional Bitlocker identifiers from other trusted organisations in the
Allowed BitLocker identification field
 Enable Allow Data Recovery Agent
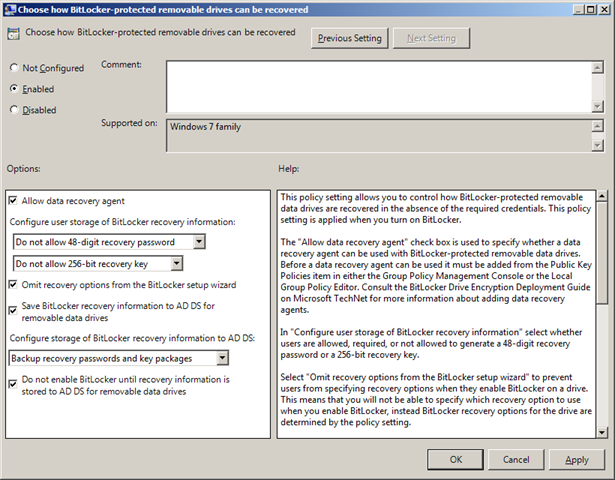
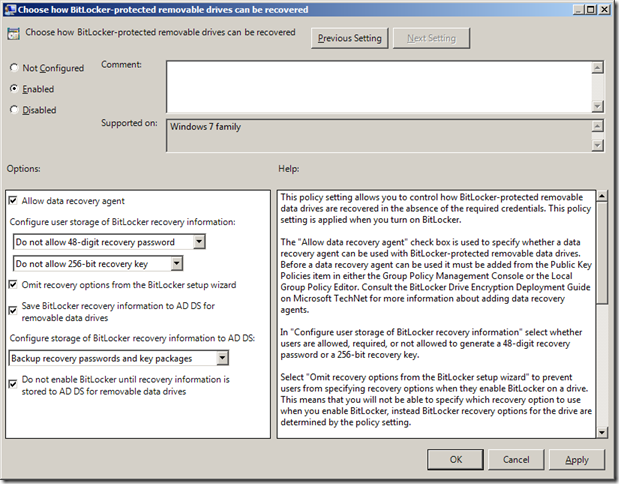
Continuing on from above you will need to configure you computers to Allow the Data Recovery Agent option.
Step 4 (cont.). In the console tree under
Computer Configuration\Administrative Templates\Windows Components\Bitlocker Drive Encryption\Removable Data Drive and then double click on
Choose how Bitlocker-protected removable drives can be recovered , then you will need to click
Enabled and tick
Allow data recovery agent then click
OK
Note: You still have the option of configuring the standard AD recovery keys in this window. The Allow Data Recovery Agent option as far as I can tell has no bearing of the other options.
You have now configured Group Policy to use a Data Recovery Agent certificate to be used to encrypt all the “Bitlocker to Go” drives in your organisation.
How to unlock a “BitLocker to Go” drive with a Data Recovery Agent
Below are the instructions explaining how to use the Data Recovery Agent to unlock a BitLocker to Go encrypted drive
Step 1. Put the drive into the computer you want to unlock.
Step 2. Right Click on a
Command Prompt, and then click
Run as administrator. If the
User Account Control dialog box appears, confirm that the action it displays is what you want, and then click
Yes.
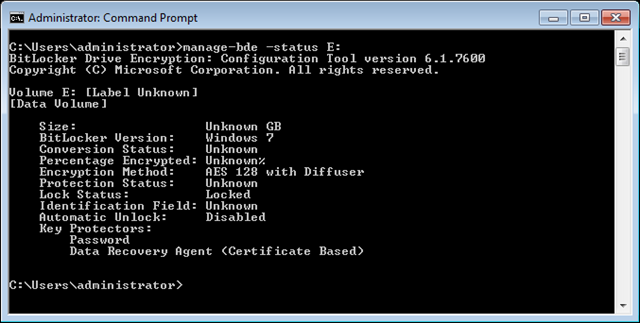
Step 3 (optional). If you want to get information on the volume before you unlock it you can run
manage-bde -status E:

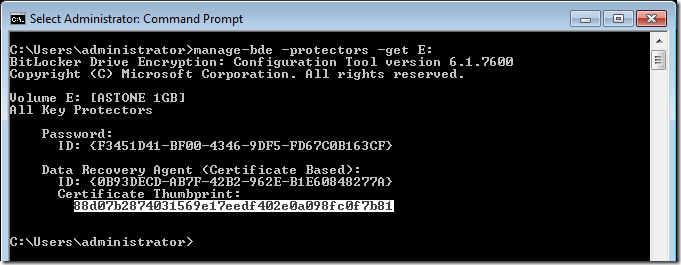
Step 4. Now you need to get the “CertificateThumbprint” of the drive you want to unlock type the command
manage-bde –protectors –get E: where E: is the volume you are trying to unlock
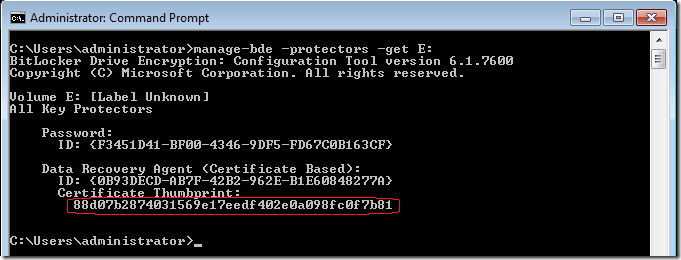
Note: Take a note of the
Data Recovery Agent (Certificate Based) Certificate Thumbprint (see circled in red).
Tip: You could also mark the thumbprint by using the
Edit >
Mark option of the command prompt.
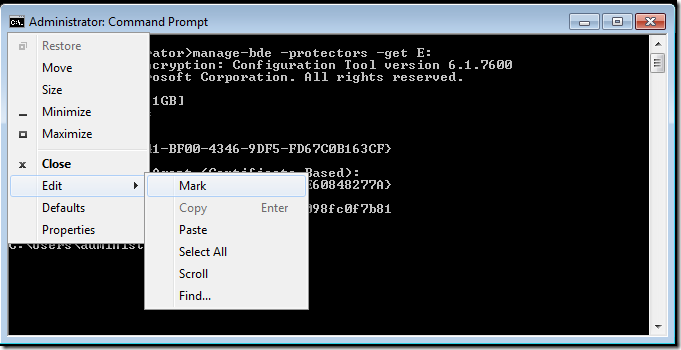
Then select the thumbprint by clicking on the first character of the thumbprint and dragging to the last character.
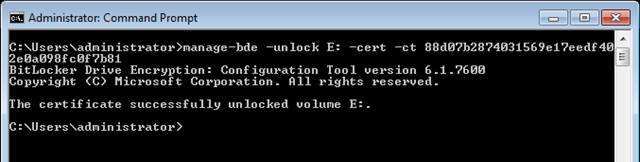
Step 4. To unlock the drive, type the following command
Manage-bde –unlock E: -cert –ct 88d07b2874031569e17eedf402e0a098fc0f7b81
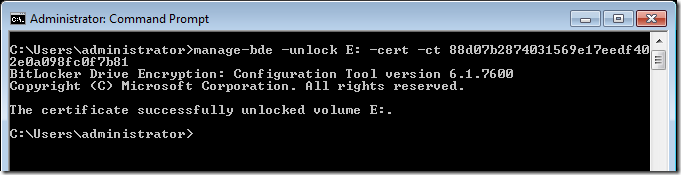
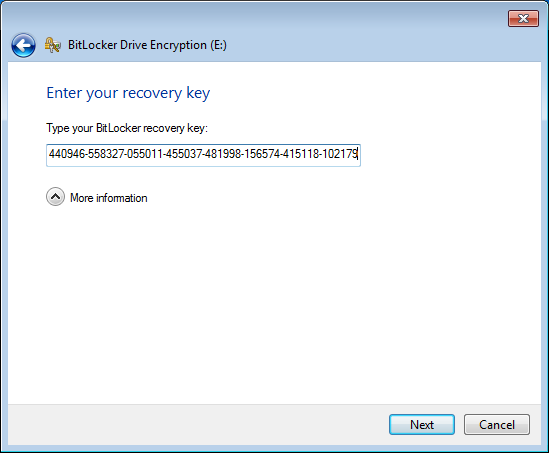
You have now successfully unlocked the drive using a Data Recovery Agent.
Note: You will need to have the Data Recovery Agent Certificate (with the private key) installed in the Personal certificate store on the computer you are performing this task.
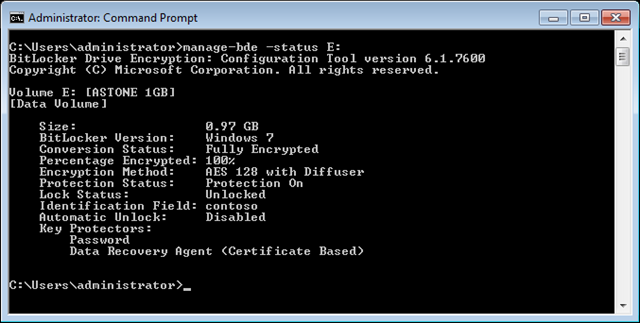
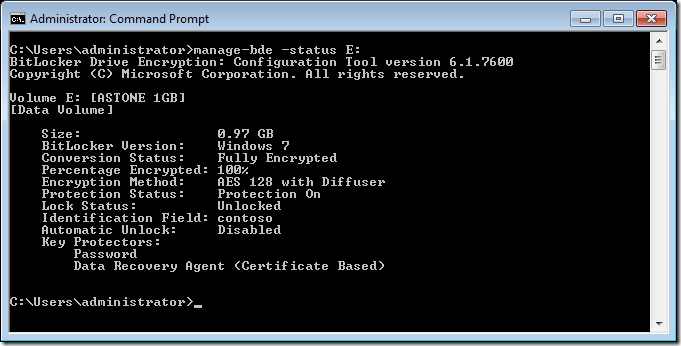
Step 5 (optional). Try getting running the following command again to view more information about the drives encryption
manage-bde -status E:
Form more information about BitLocker drive encryption with Data Recovery Agents see the following pages:

 LinkBack URL
 About LinkBacks