کد:
http://www.shudnow.net/2008/05/05/unattended-server-2008-base-image-creation-using-wsimsysprep/
In Windows Server 2003, creating a master image in which Sysprep was used to invoke an unattended installation was a fairly straight forward process. It consisted of the following:
- Installing Windows Server 2003
- Insert Server 2003 CDROM into the CDROM Drive
- Navigate to X:\Support\Tools\Deploy.cab
- Copy sysprep.exe and setupcl.exe to C:\Sysprep
- Copy Setup Manager to C:\Sysprep
- Open Setup Manager and create a Sysprep.inf file with the settings you want for an unattended installation
- Run Sysprep (Sysprep would automatically detect Sysprep.inf)
In Windows Server 2008, creating a master image is no easy feat. To briefly explain the process (will be detailed throughout the rest of this article), you must first download the Windows Automated Installation Kit (1GB in size) which you can download
here, load install.wim, and create a sysprep.xml file. You would finally run the built-in Sysprep utility and tell it to use the sysprep.xml file you just created along with some other options
Once you have downloaded the Windows Automated Installation Kit, you will need to burn it via your favorite burning utility; mine is
InfraRecorder which is free. Once it’s burned, go ahead and install it on your Vista or Server 2008 machine (we’ll be using Server 2008). Once it’s installed, open the Windows system Image Manager (
Start >
All Programs > Microsoft Windows AIK > Windows System Image Manager).

In order to begin creating a Sysprep.xml file, you will need to load a Windows Image File (WIM). Make sure that you are using the Windows Automated Kit Installation version (or above) for Vista and Server 2008 that is linked to in the beginning of this article. Otherwise the WIM you try to load will be incompatible with the version you are using.
The WIM file we will be using is located on our Server 2008 CD-ROM (
X:\sources\install.wim). X refers to the drive letter of your CD-ROM Drive. Proceed to entering your Server 2008 CD-ROM to your Server 2008’s CD-ROM Drive.
Once you have done so, in the Windows System Image Manager, go to
File >
Select Windows Image.

Browse to the location of the install.wim file. As stated above, this file is located at
X:\sources\install.wim. X refers to the drive letter of your CD-ROM Drive.

Once install.wim has been selected, choose
Open. This will bring up a new window which allows you to select the version of Windows Server 2008 you will be using as your Master Image. The edition we are currently running Server 2008 on and want to continue using for future cloned guests will be
Enterprise. Select
Enterprise and click
OK to
Continue.

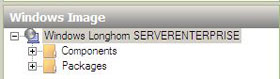
We now see our selected Windows Server 2008 Enterprise Image is loaded into Windows System Image Manager.
We will now want to begin the process of configuring our new Answer File which we will name sysprep.xml. In the Windows System Image Manager, go to
File >
New Answer File.

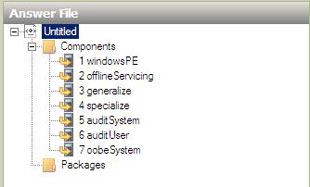
We now see our newly created Answer File is loaded into Windows System Image Manager.
Now that we have a WIM loaded and an Answer File created, the two are associated with each other and you now have many customizable settings under your Windows Image.

There are many settings I want to change, and I will leave this up to you as the point of this blog entry is to get you started on the basic concepts of getting the Master Image created. At the very least, I will show you how to remove Internet Explorer Enhanced Security Configuration so the Administrators constantly don’t get bogged down with Internet Explorer security prompts.
Note: I take no responsibility for you doing this in production and getting hacked due to you reducing the security of a production machine. Do this at your own risk.
Right-Click on
amd64_Microsoft-Windows-IE ESC_6.0.6001.18000_neutral and choose
Add Setting to Pass 4 specialize.

Once you add the setting to Pass 4 specialize, you see this setting get added into the Answer File. From here, you can
select amd64_Microsoft-Windows-IE ESC_6.0.6001.18000_neutral and
modify the settings in the
properties. For purposes of this lab, I chose both
IEHardenAdmin and
IEHardenUser and set them both to
false.

Some other popular options you may want to do are as follows:
- Auto-generated computer name
- Organization and Owner Information
- Setting language and locale
- Setting the initial tasks screen not to show at logon
- Setting server manager not to show at logon
- Configuring the Administrator password
- Creating a 2nd administrative account and setting the password
- Running a post-image configuration script under the administrator account at logon
- Setting automatic updates to not configured (to be configured post-image)
- Configuring the network location
- Configuring screen color/resolution settings
- Setting the time zone
These settings are outlined in Brian W. McCann’s sample Sysprep.xml file located
here. Even though my article shows you the steps required to create your own Sysprep.xml from scratch, I would still use Brian’s Sysprep.xml file as a baseline as he has popular options that most users are going to want. Why re-invent the wheel? Just copy his XML code, save it into your open Sysprep.xml file, and open it within Windows System Image Manager.
Once you are satisfied with all your modifications to your answer file, save the answer file to
C:\windows\system32\sysprep\ as sysprep.xml by pressing
Control + S and choosing
C:\windows\system32\sysprep\ as the save location and file name as
sysprep.xml.
Click Save to
Continue.

My final Sysprep.xml file which was derived using Brian’s Sysprep.xml file as the baseline looks as follows.

The next step would be to
Open a
Command Prompt,
Navigate to
C:\Windows\System32\Sysprep and
Type the following:
sysprep /generalize /oobe /shutdown /unattend:sysprep.xml
Once this command is initiated, you will see a window pop up showing Sysprep doing its’ magic.

Once Sysprep is finished working, the system will shut down. You can now clone your shut down machine which will provide you with a nice Sysprep’d copy of Windows Server 2008.
Before I conclude this article, I wanted to express some of my opinions on this entire process. I find it a lot more tedious to do than the method we used for Server 2003. The SetupManager laid out options very nicely and was intuitive to define the settings you wanted. Now, you must go through the process of downloading a 1GB file, burning it, installing it, figuring out all the options you want added to your XML, etc… I personally think that going forward, I will just create a base machine, shut it down without running a Sysprep, clone it, and just run NewSID which can be found
here. This is actually what I did for my Exchange 2007 SP1 SCC using Server 2008 Starwind article series. Granted you won’t want to use NewSID if you are doing this in production as you risk the chance of Microsoft not supporting you.
Also, I am not a Microsoft Deployment guy, so I understand that for production, there’s a much larger picture where this tool is a lot more integrated and it is a really great tool when using it with the Microsoft Deployment Tool (MDT). But I am speaking from merely of a perspective of wanting to Sysprep a machine for easy cloning via Virtualization Tools.
Either way, I hope this article helps you out with the process of creating a base image for Server 2008 to assist you in getting new Server 2008 machines up and running as quickly as possible

 LinkBack URL
 About LinkBacks

