نمایش نتایج: از شماره 1 تا 12 از مجموع 12

موضوع: Group Policy Setting of the Week

  
  1. #1
    نام حقيقي: 1234

    مدیر بازنشسته
    تاریخ عضویت
    Jul 2009
    محل سکونت
    5678
    نوشته
    5,634
    سپاسگزاری شده
    2513
    سپاسگزاری کرده
    272

    Group Policy Setting of the Week

    Group Policy Setting of the Week 14 – Prevent access to registry editing tools


    This weeks setting is another is another oldie but a goodie that is commonly used to lock down SOE’s so that users can use the registry editor. It is called “Prevent access to registry editing tools” which us a user setting found under User Configuration > Policies > Administrative Template > System and will work on all platforms since Windows 2000.

    The affect is pretty simple… It stops users from running regedit.exe so they cant make registry changes to their computer or profile. This will also work even if a user take a copy of the regedit.exe command and rename it to something else.

    If you select “No” for the “Disable regedit from running silently?” this will allow user to apply registry keys via a preconfigured .REG file using the “regedit.exe /s” silent switch so make sure you select “Yes” unless you need to this back door for something like a logon script.


    Group Policy Setting of the week 13 – Files


    This week I have selected the Group Policy preference “Files” setting which can be found under either Users or Computers > Preferences > Windows Settings > Files. I commonly see the file update option used where a licence file or a single .exe application needs to be updated on all the computers in an organisation. Here a central copy of the file(s) is stored on a central server and when then central version is updated all the computers will receive the new version of the file at the next policy update. Much better than a logon script!!!!
    You also have to ensure that the destination folder in the Create, Replate and Update options already exists as it will not automatically create the folder if it doesn’t exist. If you do need to create the folder for the destination then use the “Folders” option. Also make sure that if you are copying the file(s) to a location that its under the correct context (e.g. User context for files into their local profile and Computer context if it is being copied into the program files folder).
    This option is a Create Replace Update and Delete (CRUD) enabled setting so the behaviour is a little different depending on your action. All these options support wild cards so you can use it to copy (or delete) multiple files.
    Create

    This option will copy a file from a location (like a network share) to another location (like on the local computer) only if the destination file does not already exist.

    Replace

    Again, this option will copy a file from a location (like a network share) to another location (like on the local computer) but this option will delete and overwrite the destination if it already exists.

    Update

    This one is very similar to Replace however it only changes the individual attributes that changes. If the file does not already exist then it does the same as the Create option.

    Delete

    As the name suggests it will delete what ever file you specify in the “Delete file(s):” field. Remember this also include wild cards so you can use “C:\Path\*.*”


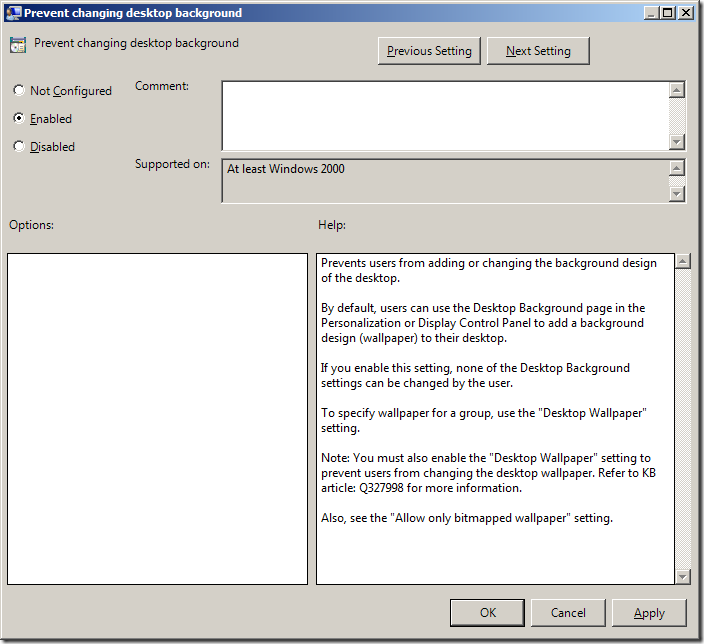
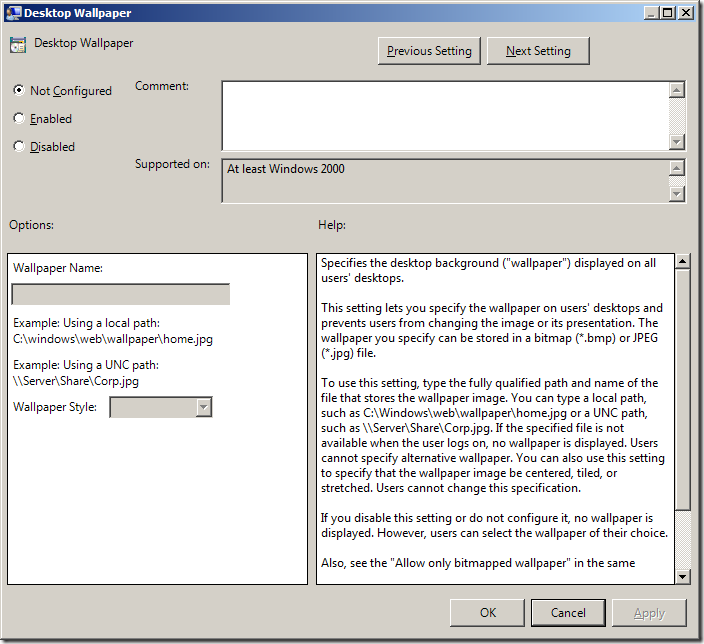
    Group Policy setting(s) of the week 12 – Prevent changing desktop background & Desktop Wallpaper


    This weeks setting of the week is a double header but they are really simple but so commonly used that they really have to be mentioned.
    The first setting is found under User Configuration > Policies > Administrative Templates > Control Panel > Personalization > Prevent changing desktop background. As the name suggest this setting prevents users from changing the background image via the Display Setting control panel applications however it does not prevent users from right clicking on an image and setting it as a background image.

    Recommendation: Enabled
    If you really want to stop users from changing the background image then you also need to configure the “Desktop Wallpaper” setting to specify a background image which can be found under User Configuration > Policies > Administrative Templates > Desktop > Desktop (yes Desktop is there twice).

    Recommendation: Enabled (specify path to background image)
    These setting should be configured for anyone want to implement a standard background desktop image of their SOE computers. However be warned if you are going to implement this setting then expect to cop a lot of flack from your users complaining they cant set their background image to their favourite family photo or even worse their cat.


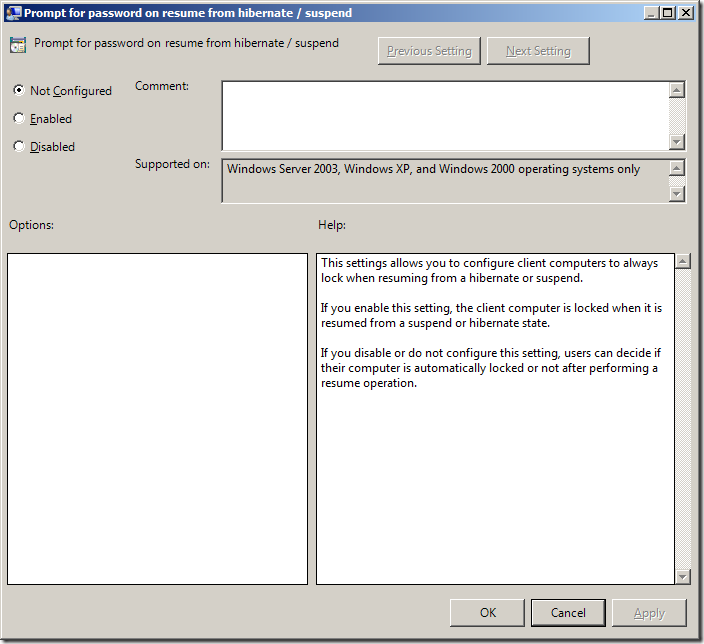
    Group Policy Setting of the Week 11 – Prompt for password on resume from hibernate /suspend


    The setting of the week this time highlights the one and ONLY power management policy that has been around since Windows 2000. The “Prompt for password on resume from hibernate / suspend” can be found under User Configuration > Administrative Templates > System > Power Management. Until Windows Vista came along this was the only power management setting that could be deployed via group policy so many people had to resort to many third party tools to manage power plans in windows via Group Policy.
    Note: For more information about configuring power plans using group policy see my other article HERE.
    None the less this is still a very important setting that most SOE’s I have seen have enabled to ensure that users are prompted for a password whenever their computers wake from hibernate or suspend .

    Not having this enabled could allow a uses to configured the laptop to auto-login during resume. As you can imagine this is not very good as a bad guy could steal a laptop while it is hibernating/sleeping and then power it on and have access to all the data with no effort.
    Recommended Configuration: Enabled


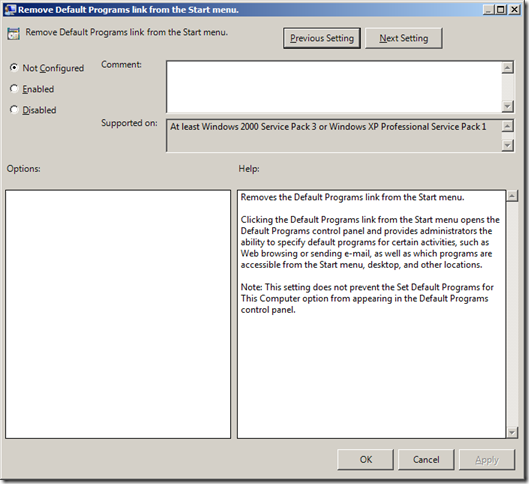
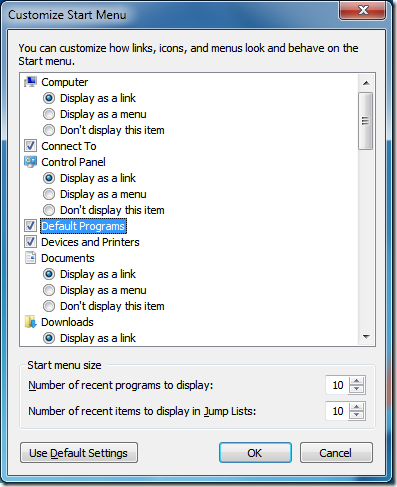
    Group Policy Setting of the Week 10 – Remove Default Programs link from the Start menu


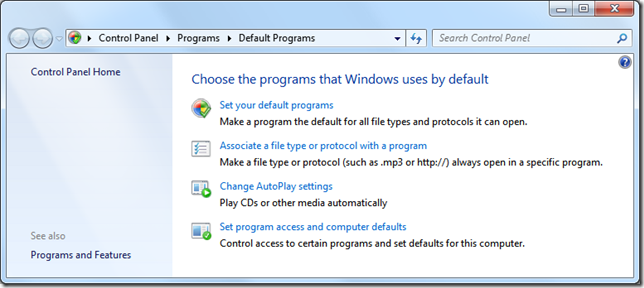
    This weeks group policy setting of the week is about the “Remove Default Programs link from the Start menu” option that can be found under User Configuration > Policies > Administrative Templates > Start Menu and Taskbar. The start menu entry “Default Programs” was was introduced as part of the United States v. Microsoft Antitrust settlement case back in the late 90’s so that users would have an easy way to re-configure their default programs. At the same time Microsoft also added this group policy setting so organisations could still remove this option from the start menu if they wanted.


    While this option is very usefully for the home and SOHO users, in a corporate environment where the computers are tightly controlled you really don’t want users messing with these setting.

    This is defiantly one you should consider disabling in you workstation SOE if for no other reason then to reduce the clutter in the start menu


    موضوعات مشابه:

  2. #2
    نام حقيقي: 1234

    مدیر بازنشسته
    تاریخ عضویت
    Jul 2009
    محل سکونت
    5678
    نوشته
    5,634
    سپاسگزاری شده
    2513
    سپاسگزاری کرده
    272
    Group Policy Setting of the Week 4 – Shared Printer


    This week I have selected the “Shared Printer” Group Policy Preference as my Group Policy Setting of the Week (GPSW). This is arguably one of the most wanted group policy settings by Group Policy admin’s that was missing before group policy preferences. It was possible previous to preferences to map printers natively in group policy using the pushprinterconnections.exe option but like the Star Trek Deep Space Nine episode “Trials and Tribble-ations” we defiantly “do not discuss it with outsiders” as this is just a setting we would rather forget.
    The “Shared Printer” options can be found under by right clicking on “User Configuration > Preferences > Control Panel Settings > Printers”. As with most group policy preference settings you also have the option to CRUD (see Group Policy Preferences Colorful and Mysteriously Powerful Just Like Windows 7) which means you can also use this option to remove any printer mapping that people have to printer queues that no longer exist.

    Now it has always been fairly straight forward to map printers via logon script either via batch, vbscript or even kix scrtip however the real power of this setting is that it can now take advantage of the really powerful targeting options. More commonly you can map a printer via a single security group or IP range but you can really start to do some really advance targeting when you start to combine multiple targeting setting using Boolean logic. If you want to see some more advanced targeting options for printer mappings then check out my “How to use Group Policy Preference to dynamically map printers when using Roaming Profiles” article.

    As you can see above you can also use this option to set the default printer for your users which can be very handy if people have a habit of always printing to the really expensive A3 colour printer on your floor when you are trying to reduce cost. Just use the default printer option wisely however as you could end up annoying your manager who likes to printer to their locally attached printer.
    Enjoy!


    Group Policy Setting of the Week 3 – Group Policy Preferences Power Plans


    I have selected for this weeks Group Policy Setting of the Week (GPSW) the group policy preferences that is used to configure Power Plans. While configuring power plans for your environment may be nothing new if you have deployed third party tools, you can now avoid the added expense and complexity of doing this as this functionality is now provided out of the box.
    This option can be found under User Configuration > Preferences > Control Panel Settings > Power Options and is used to control the individual power plan for your computers. Strangely I have found that this option only works under the User Configuration setting which I presume is the case because it is normally a user configured setting even though the option is under the computer configuration section as well. This power plan option also work with Windows XP however you do need to explicitly select the correct OS power plan as the XP plan will not work on Vista+ and vice versa.
    Windows Vista and later Power Plan

    Windows XP Power Plan

    As you can see this can be used to configured almost all the power plan setting that your version of windows has to offer. One notable omission is the CPU System Cooling Policy setting that was introduced with Windows 7 which is not available to be configured in the Vista (or later) power plan.
    Left (Windows 7 System cooling policy) Right (Windows Vista and Later plan without the System cool policy option)

    If you are interested in more advanced targeting option with Group Policy Preferences and want to learn how to apply different power plans to computers based on the time of the day check out my previous blog article at http://abskb.spaces.live.com/blog/cns!8834054641A09100!1133.entry
    If you have not already got Group Policy Preferences deployed in your organisation then this is definitely the excuse you need to get it deployed. Go to any manager today and say you can start reducing the power consumption of you computer fleet using software they are already licensed and almost always the reaction will be to have it done yesterday.
    Notes:

    • This setting will work on Windows XP or greater if you have the Group Policy Client side extensions installed.
    • You need to be running the Group Policy Management consol on Windows Vista (Windows 7 recommended) to manage these settings


    Group Policy Setting of the Week 2 – Verbose vs normal status messages


    This weeks Group Policy Setting of the Week (GPSW) can be found under Computer > Policies > Administrative Templates > System and is called “Verbose vs normal status message”. It is a really simple setting that doesn’t actually do much but I dub this setting the “Make my computer start faster” setting which give users the illusion that their computer are working faster.

    So what does it do and how does it make my Computer start faster? This setting displays a number of extra status messages during the start up and shutdown of the computer and when the user is logging on and off.
    Some of the verbose status messages you will see are (but not limited to):

    • Mapping Drives
    • Playing Logon Sound
    • Mapping Printers
    • Applying Power Settings
    • Stopping Services

    You will still see your Applying Computer settings and Preparing Desktop messages however these will be shown for a lot shorter time.
    Unfortunately it will not actually make your computer start any quicker but I have generally found that by enabling this option users seem to perceive that their computers are starting up quicker. Why? Well I think its because the extra status messages are holding their attention for a few seconds each time a new one is displayed something like the opposite of watching grass grow or a watched pot that never boils… In any case this is still a handy setting to enable as at the very least will help your IT support troubleshoot logon performance issues.
    This setting will work on Windows 2000 and above and it will also show the processing of newer Group Policy Preferences.


    Group Policy Setting of the Week 1 – How to remove old user profiles after X days


    (This will hopefully be the first of many Group Policy Setting of the Week (or GPSW) articles where I will showcase one policy setting and what it does.)
    I just read about this cool new policy setting on the “Ask the Performance Team” blog that will help address the issues of computers hard drives filling up over time with multiple user profiles. Previously you either had the option to purge the local users profile on log off or keep a cached copy of the profile forever. Either users would have to download their profile every time they logon to the computer which could greatly slow down the logon process or their cached profiles was never deleted which resulted in the system drive running out of space. This new setting “Delete user profiles older than a specified number of days on system restart” allows you to set a timer on the local cached profiles so that they will be purged X number of days after being used. This means users who commonly logon to a particular computer will still have their profile cached but users that logon seldomly will have their files cleaned up thus saving precious disk space.
    This might sound like a great setting to implement on a Terminal Server however note the clean up wont happen until the server is rebooted. This restriction should not be so bad as Terminal Servers are probably rebooted at least once a month any way for patching (you do patch your terminal servers don’t you?).
    This setting can be found under Computer Configuration \ Policies \ Administrative Templates \ System \ User Profiles

    Source: Ask the Performance Team : Just Me … and my Profile … (Part 2)


  3. #3
    نام حقيقي: 1234

    مدیر بازنشسته
    تاریخ عضویت
    Jul 2009
    محل سکونت
    5678
    نوشته
    5,634
    سپاسگزاری شده
    2513
    سپاسگزاری کرده
    272
    How to find and use WMI values for Group Policy Filtering


    The Ask the Performance Team has published a WMI Code Creator tool that allows queries your local WMI repository on your computer. This too can be useful if you want to find the WMI values to use with a WQL query filter for your Group Policy Objects (GPO). The tool itself does not actually create a WQL query for WMI filtering however you can it to get the required values and then then plug them into an existing WQL query.
    Here I will take you though the WMI Code Creator tool to get the values to make a filter to apply a GPO only to Latitude D830 computers. You can customize the query by simply substituting the Class and Property values of your choice.
    Step 1. Open the WMI Code Creator tool.
    Step 2. Select the Class you want to use and then select the properties you want to filter on.

    Step 3. Click the "Execute Code” button and you will see the value of the property

    Take the highlighted values in the screen shots above and replace them in the query below.
    Select * from Win32_ComputerSystem where model = ‘Latitude D830’
    Step 4. Open Group Policy Management Console (GPMC) and navigate to Group Policy Management > Forest > Domains > DomainName > WMI Filters
    Step 5. Click Action menu and then New…

    Step 6. Enter the name of the WMI Filter then click Add (e.g. Latitude D830)

    Step 7. Now enter the WQL query into the Query field and click OK


    Step 8. Click Save


    The filter will now be listed in the WMI Filters section of GPMC for use by other Group Policy Objects.


    To use the Group Policy WMI filter select a GPO in GPMC and you will be able to select the filter in the “WMI Filtering” section at the bottom of the Scope tab.


    So now you have applied a WMI filter to an existing GPO so that it will only be applied to Latitude D830 computers. This can be especially useful if you want to deploy hardware specific updates (e.g. drivers) to a particular type of computer.

    Here are two other useful example of a WMI filter query:

    Windows Vista or greater
    SELECT Version, ProductType FROM Win32_OperatingSystem WHERE Version >= ‘6.0′ AND ProductType = ‘1′

    Windows 7 of Greater
    SELECT Version, ProductType FROM Win32_OperatingSystem WHERE Version >= ‘6.1′ AND ProductType = ‘1′

    Additional Links


    Download as PDF


  4. #4
    نام حقيقي: 1234

    مدیر بازنشسته
    تاریخ عضویت
    Jul 2009
    محل سکونت
    5678
    نوشته
    5,634
    سپاسگزاری شده
    2513
    سپاسگزاری کرده
    272
    How to use Group Policy Preferences to Secure Local Administrator Groups


    One problem I see all the time is IT administrator never being able to control who is a local administrator of any particular computer. The problem is that when you give someone local admin access to a computer (because they legitimately need it) you cant stop them from giving admin access to someone else on the same computer. When this does happen it is also its almost impossible to discover as you have to run a query every computer to see who is in the local admin group and then figure out which account should be a member. Once solution to this is of course following Microsoft best practice and not give your users local admin access to their PC or Server and in an utopian environment this would be possible but we all live in the real world where managers have admin access to their PC’s and developers are allowed to install any software they want. So how do you give a users full admin access to a computer but stop them from adding more people to the local admin group on a computer?Use Group Policy Preference of course.
    But first a bit of History… Since Group Polices were first introduced with Windows 2000 there was an setting called “Restricted Groups” which allows you to control the membership of a group. This option had two modes one called “Members” option which I also call the “Iron Fist” mode and the other “Members Of” option which is much gentler. The “Members” option removes any groups or users that are not explicitly specified and the “Members Of” option just adds a specific group which out removing any existing groups. The “Members” option was really good at cleaning up those rogue members of the local admin group but its was also really hard to setup as you had to have a new group policy every time you wanted a different list of members in local group on a computer. The “Members Of” option was a lot easier to maintain as you could layer multiple group policies on top of each other but this normally resulted in just adding another layer of group to the pile of groups that were already in the local administrators group. The other problem was the “Members” option would override the “Members Of” option so there was really no way of mixing the two modes.
    BUT… Group Policy Preferences can use Variables which enabled you to be very extremely granular in controlling you local admin group while still having “Iron Fist” control. Muuhhaaaahahahahah!!!
    How do I setup a restricted local administrator group?
    The following steps will need to be applied to a GPO that is applied to the computer objects you want to control the local administrator groups. Note: You must make sure you don’t have any other Group Policy “Restricted Groups” settings applied to your computers as they will always override the group policy preferences settings.
    Step 1. Open the Group Policy Management Consol and edit the group policy that is applied to the scope of computers that you want to control.
    Step 2. Go to the Computer Configuration > Preferences > Control Panel Settings > Local User and Groups option (see Image 1.).
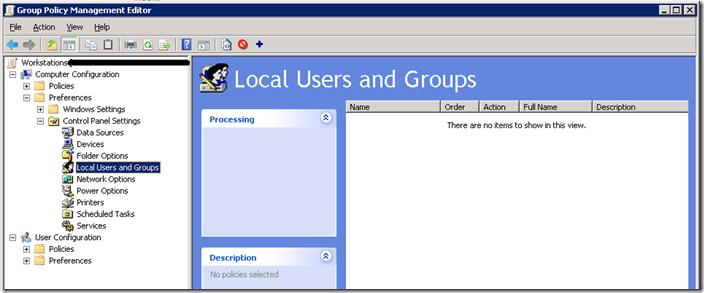
    Image 1. Local User and Group
    Step 3. Now click on Actions > New > Local Group
    Step 4. Now you will be need to select “Administrators (built-in)” from the group name as this always selects the built-in administrators group even if you have renamed it to obfuscate the name of the admin account.
    Step 5. Tick both “Delete all member users” and “Delete all member groups”. These two options will automatically remove any users or groups that are not explicitly being added to the group. You only need to do this on item number 1 in the list of settings as that setting will be processed last.
    Step 6. Now you will need to make sure you have added back in the Domain Admin’s and Local Administrator groups so that you don’t totally lock yourself out of the computer. To do this click the “Add…” button to bring up the “Local Group Member” dialogue box (see Image 2)
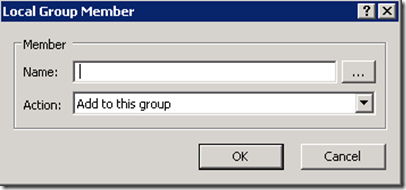
    Image 2. Local Group Member
    Step 7. Now type “BuiltIn\Administrators” in the Name field and click OK (see Image 3.)

    Image 3. Local Administrators group added to the local administrators group
    Step 8. You should also add “DOMAINNAME\Domain Admins” as it is a good practice to have the DA account as a member of the local admin group on all computers in the domain. To do this we are going to use the DomainName variables. Click “Add…” again and now click in the “Name:” text field and then press F3. This will now bring up the “Select Variable” dialogue box (See Image 4.). Click on the “DomainName” field and press “Select” and then “OK”. (alternatively you could type %DomainName% in the name field and just press OK.)

    Image 4. Selecting the DomainName Variable
    You should now see the following which will restrict the local administrator group to only have the Domain Admins and the local administrator.

    Image 5. Basic local administration group setting
    So what you as? I can do this already with the “Restricted Groups” Group Policy setting. Well only having the local Administrator and Domain Admin’s in the local admin group is not not much use unless you are willing to give everyone the local admin password or give them all Domain Admin’s privileges (Like that ever happens) when ever they needed admin access. Well again this is where Group Policy Preferences can help.
    How to add individuals to a single computer?
    Now we are going to go thorough how to add a uniquely named domain group to the local administrators group without having to set up multiple group policies objects. This scenario is very helpful if you want to grant a single user or group local administrators access on computer but still ensure that no other users or groups can be added without explicitly being approved. In the steps below the computer name is DESKTOP01 and the domain name is CONTOSO, we want to add the group “CONTOSO\DESKTOP01 Administrators” to the local administrator group but we also want the same to happen on DESKTOP02, DESKTOP03 and so on, each with their own uniquely named group based on the computer name.
    Step 9. First go back and repeat steps 1 to 6 until you get to the Local Group Member dialogue box (see Image 6.)

    Image 6. Add Local Group Member
    Step 10. Type “%DomainName%\%ComputerName% Administrators” in the Name text field and click “OK” (Image 7.)
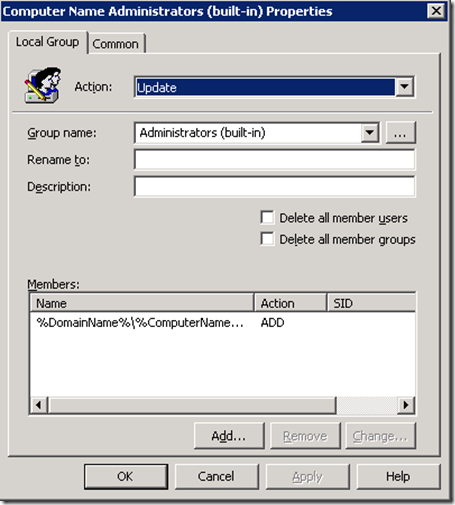
    Image 7. Configuration to automatically unique group to local administrators group
    Now this will now automatically add a domain group called “DOMAINNAME\COMPUTERNAME Administrators” to the local administrators group on the computer to which the policy is applied.
    This group policy setting combined with the other setting made earlier (see Image 5.) will mean that the local administrator group on the computer DESKTOP01 in the CONTOSO domain will have the following members automatically added to the group:

    • CONTOSO\Domain Admins
    • DESKTOP01\Administrators
    • CONTOSO\DESKTOP01 Administrators

    But ANY other users or groups will be automatically removed after the next group policy refresh. This does mean there is a slight window of opportunity for someone to slip in an un-authorised account into the local administrators group but they will get removed at the next policy update.
    Side Note: I have found that users almost never complain that they cant add un-authorised user to the local admin account on computer. Go figure…
    However the “CONTOSO\DESKTOP01 Administrators” group will only be added to the local administrators group on the computer DESKTOP01 if that group is already exists. Therefore you do not need to create the group until the need arises to add an individual user or group to just a single computer.
    AWSOME!!!! I hear you say… but wait there is more…
    How do I add additional broader groups to the local administrators group?
    Now that you are able to granuarlly add a single user or group to the local administrators group on a computer you might run into problems id you have more than a 1000 computers due to AD Token Bloat Issues . So to get around this we can setup some more broadly applied administrator groups to the computer that will give admin access to only a subset of computers such as all workstations or only the SQL Servers in your organisation.
    Workstations Admin Groups
    To apply a Workstation administrators group to the local administrators group on all workstations make sure you have a group policy only targeted to your workstations. This is normally pretty easy as most companies isolate their workstations computer accounts to one (or a select) number of Organisational Unit.
    Step 11. Go back and repeat steps 6 and 7 but this time add the group “%DomainName%”\Workstations Administrators” in the name field. This will added the additional group “CONTOSO\Workstation Administrators” to the local admin group on all the workstations in your domain which will allow you to easily add all the Desktop Administrators in your organisation access to all the workstations without having to give them the local admin password or domain admin’s privileges.
    Server Role Admin Groups
    It gets a little tricker when you want to grant access to a server based on its role as server are sometime configured for multiple roles. So in these steps we are going to automatically added a domain group called “CONTOSO\SQL Server Administrators” to all the servers you have that have SQL Server installed on them. This will be very handy to making sure SQL service accounts or database administrators have admin access to all the servers that have Microsoft SQL Server installed. You can however make multiple version of these admin group for other roles (e.g. Exchange,SCCM,ISA) you just need to know what the best way to target the setting.
    Step 12. First make sure you are editing a group policy that is applied to all your servers in your organisation.
    Step 13. Repeat Step 9 and 10 and then we open the properties of the new policy setting and specify the group but this time we type “%DomainName%\SQL Server Administrators” in the name field.
    Step 14. Click on the “Common” tab and then tick “Item Level Targeting” and click the “Targeting…” button.
    Step 15. Click on the “New Item” in the menu bar and select the option you want to use to target all the SQL servers in your organisation and select the “File Match” option to look in the Program Files folder and see if a sub-folder exists called “Microsoft SQL Servers” (See Image 8). This is normally true for any server that has Microsoft SQL Server installed and so it will then automatically apply the SQL Server Admin group to that server if it was installed.
    Note: In this example we tested that the “Microsoft SQL Server” folder exists but we could also make rule to test for the existence of a particular file or registry key.

    Image 8. Testing to see if Microsoft SQL Server is installed.
    Now any computer that SQL Server, MSDE or SQL Express installed will get the group “CONTOSO\SQL Server Administrators” automatically added to the local admin group.
    This nice thing about this is that if SQL is installed on the server at some point in the future the SQL Admin group will be added automatically at the next group policy refresh without you having to do a thing.
    Finally.. now you have tight control of the local administrator groups on all the computers in your domain it is now important to monitor and secure the domain groups that are being added to the local administrator groups as they now control who has admin access to all your computers. But I will save how to do that for another blog post…

    Download as PDF


  5. #5
    نام حقيقي: 1234

    مدیر بازنشسته
    تاریخ عضویت
    Jul 2009
    محل سکونت
    5678
    نوشته
    5,634
    سپاسگزاری شده
    2513
    سپاسگزاری کرده
    272
    How to schedule a delayed start logon script with Group Policy


    Logon Scripts!!! I hear you yelling at me about why I am doing a tutorial about logon scripts when Group Policy Preferences is supposed to allow me to stop using my logon scripts. Well in a utopian world there would be no logon scripts to maintain however there are still some situations that you might have to execute a program at logon. One example I recently saw on the Group Policy Forums was a person who wanted a way to delay the launching of the browser so as to not add additional delay to the users logon to what was already a slow computer. Somewhat similar to the Delay Start option for services that was introduced in Windows 7.
    Prerequisites: This is a Windows Vista+ configuration as Windows XP has a more limited scheduling engine. If you really want to do this via Windows XP (sucks to be you) you could run the script with some delay/timeout third party tool in it and just have it run from the users “Startup” start menu folder…
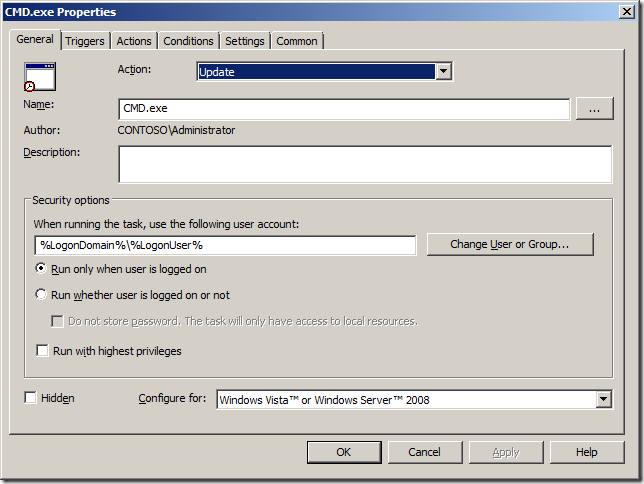
    Step 1. In a Group Policy Object (GPO) that you have targeted at all the users (or most of them) that you want the delayed start program/action to run on go to “Users Configuration” > “Preferences” > “Scheduled Task” then go “Action” > “New” > “Scheduled Task (Windows Vista and later)”. Then type the display name of the script in the “Name” field (see image 1) and click on the “Triggers” tab.
    Note: In this example we are just going to be running a command prompt so the Name is “CMD.exe”.

    Image 1: Scheduled Task Properties
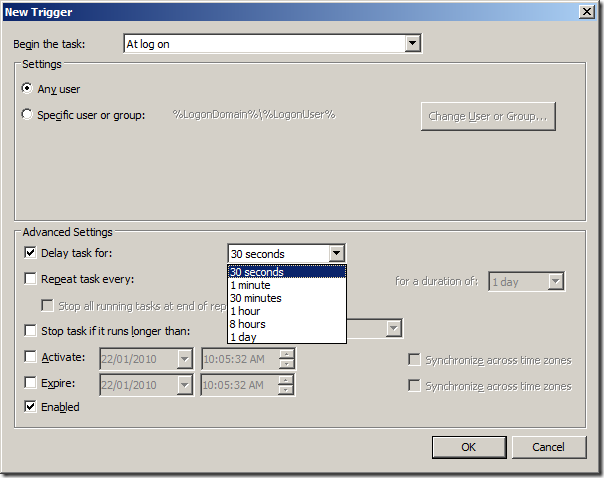
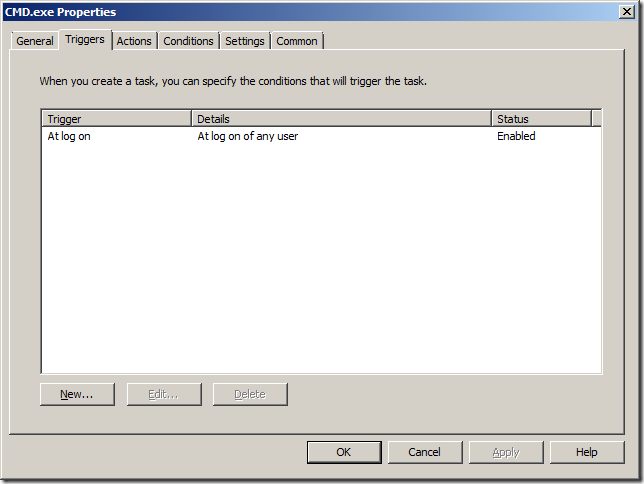
    Step 2. On the Triggers tab click the “New” button”. Change the “Begin the task” drop down option to “At log on” and then tick “Delay task for:” and configure the delay from the pop down menu (see image 2). Then click “OK”
    Note: Unfortunately this option does not seem to be user configurable so for the use of a logon script “30 seconds” and “1 minute” are the only practical options.

    Image 2: New Trigger
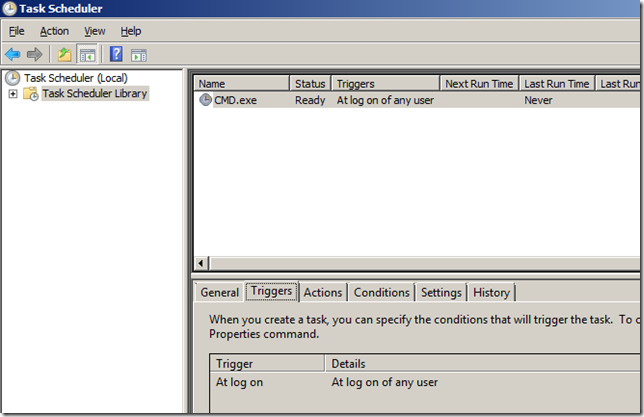
    Step 3. You should now have the trigger configured for your event that looks like the image below (see image 3). Now click on the “Actions” tab.

    Image 3: Configured Trigger
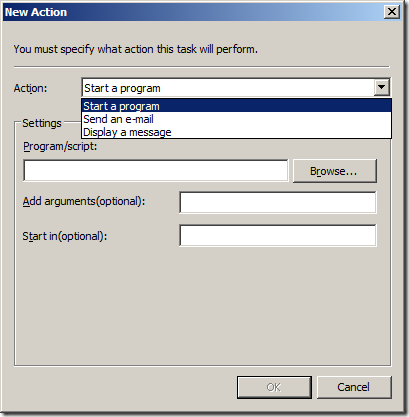
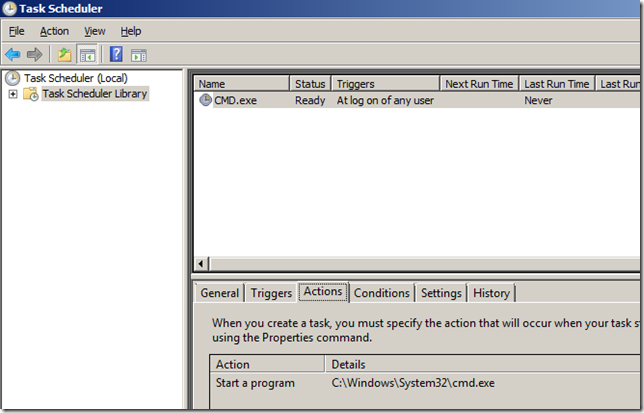
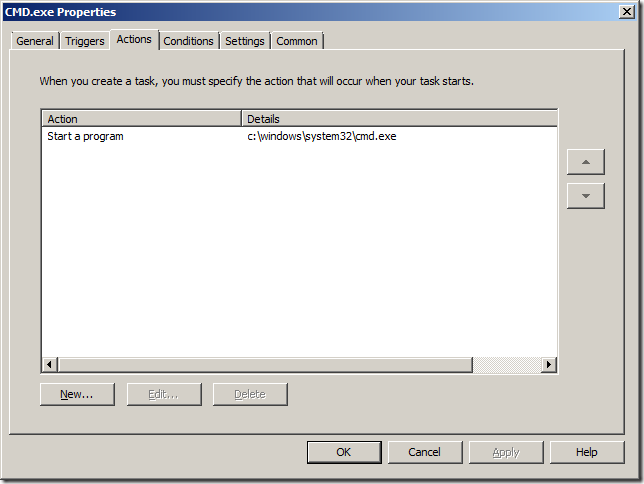
    Step 3. In the “Actions” tab click on the “New” button and then configure the action you want to take. Again in this example we are just going to be running a command prompt so configure the “Action” to “Start a program” (see image 4).
    Note: You can also use this option to send and e-mail or even display a pop-up message to the users. Very handy if you used to use the “net send” program in Windows XP before Service Pack 2 as it was disabled due to security issues.

    Image 4: New Action
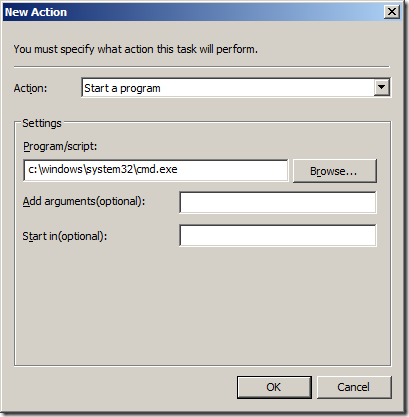
    Step 4. Configure the “Program/Script” to run to “C:\Windows\system32\cmd.exe” then click “OK” (see image 5).

    Image 5: New Action
    Step 5. Click “OK” (see image 6)

    Image 6: Actions Tab
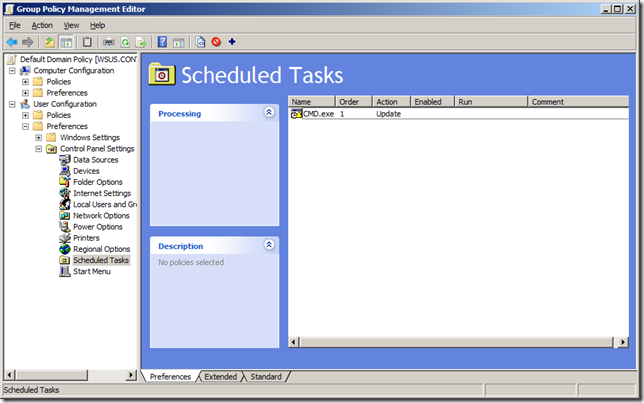
    Now you are done. The task is scheduled and it will be pushed out to all your users at the new Group Policy refresh. (see image 7).
    Note: If you don’t want this to apply to all your user accounts you can also use Group Policy Preferences targeting options to refine the targeting.

    Image 7: Scheduled Tasks
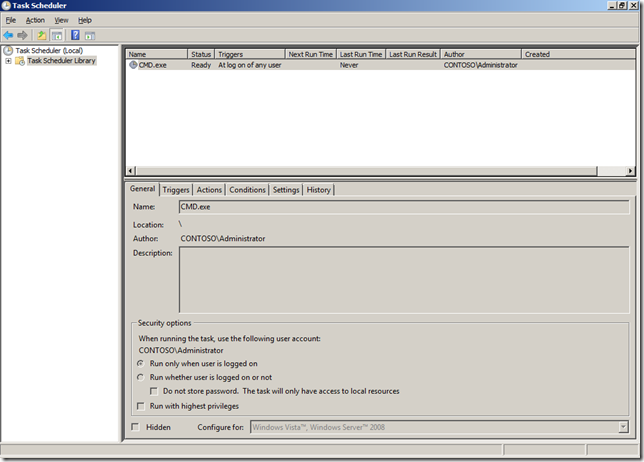
    Below is the view of the scheduled task as configured on the computer (see image 8,9 & 10).
    Note: The settings tab are greyed out because it is being controlled by Group Policy.

    Image 8: Scheduled Tasks General Tab

    Image 9: Scheduled Tasks Triggers Tab

    Image 10: Scheduled Tasks Actions Tab

    Download as PDF


  6. #6
    نام حقيقي: 1234

    مدیر بازنشسته
    تاریخ عضویت
    Jul 2009
    محل سکونت
    5678
    نوشته
    5,634
    سپاسگزاری شده
    2513
    سپاسگزاری کرده
    272
    How to use Group Policy Preferences to dynamically map printers with Roaming Profiles

    One of the great new feature with Group Policy Preferences is the ability to map printers based on a various number of criteria such as group membership, AD Site or even IP Address range to name a few. This allows for some powerful senarios such as being able to map all the printers physically near a user based on the computers IP address. Note: This assumes that the networking team allocates the same subnets to certain computers near each other (e.g. a building or floor) but I have found this is often the case.
    One of the problems that occur when you map printers with Group Policy Preferences is that if the user has a roaming profile configured and they then logon to a computer that is located in another area they will have all also have their old printers from the previous area. Now user might not really notice these printer mapping building up over time but they can soon amass a large number of mappings that makes their computer run slow to logon.
    Question? So how do you map all the printers in one location but not have them follow you to another location if you are using a roaming profile?
    Answer? Is a two step solution which I will go through below. There is also an optional third step that address the problem maintaining default printer mappings once a user gets back to their normal location.
    Step 1. The first part is just to create a simple printer mapping that maps the printer targeted by the IP address of the users current computer.

    Figure1. Create New Shared Printer
    The images belo shows the printer “\\server\printer1” being mapped for the users that logon to a computer that is in the 10.1.1.0/24 subnet. It is important to note that we are talking about the IP address range of the computer that you want to map the printer not the IP address range of the printer server or the printer NIC itself.

    Figure 2. Target setting to only be mapped for computers between 10.1.1.0 to 10.1.1.255

    Figure 3. Resulting printer mapping
    Step 2. The second step is to delete the printer mapping if the IP address of the printer does not fall within the IP address range that you want the printer to be mapped. To do this we start by copying the existing printer mapping that we made in step 1. This avoids making any typo’s in either the printer queue name of the IP addresses.

    Figure 4. Copying the existing printer mapping made in step 1.

    Figure 5. Paste the setting into an unused part of the pane

    Figure 6. Both printer mapping entries
    Now we make the changes to the action on the second printer mapping targeting so that it will remove the printer mapping when the user logs onto a computer in another area.

    Figure 7. Open the properties of the second printer

    Figure 8. Change the Action to “Delete”

    Figure 9. Go back to the targeting and change it to an “Is Not” between “10.1.1.0” and “10.1.1.255”

    Figure 10. New target rule

    Figure 11. Two printer entries to map and then clean up the printer queues for a user based on their location.
    Step 3. Maintaining Default Printer Mappings
    You have now configured dynamic printer mapping for your user based on location of the user. However this solution does have one problem/annoyance, user normally like to set a default printer. If a user was to logon to a workstation in another location then return to their normal desk their default printer will have been reset as it will have been removed. To get around this problem we have to add another rult to the targeting on the Delete printer option so it does NOT delete if the printer is configured as the default printer. To do this we check the registry location that the default printer is saved and test to see if the printer we are deleting is the default printer.
    So go back to the targeting option for the Delete printer action and add another test that will check to see if the printer is the default printer.

    Figure 12. Add a new Item of type “Registry Match”

    Figure 13. Configured Registry Match Setting
    Change the Match Type to “Match value data” and the Value data match type to “Substring match” as the value we are looking for will contain other information as well that we don’t care about. Make sure the Hive is set to “HKEY_CURRENT_USER” and the Key Path is set to “Software\Microsoft\Windows NT\CurrentVersion\Windows”. The Value name “Device” is where in the registry the default printer information is saved. We then set the Substring to “\\server\printer1” which is the UNC path to the printer queue. Note: The substring value has to be exactly the same as the value set in the Path for the printer mapping.
    There, now you know how to use Group Policy Preferences to map and remove network for users based on their physical location while avoiding the build up of mapping if your user have roaming profiles while still preserving their default printer.

    Download as PDF


  7. #7
    نام حقيقي: 1234

    مدیر بازنشسته
    تاریخ عضویت
    Jul 2009
    محل سکونت
    5678
    نوشته
    5,634
    سپاسگزاری شده
    2513
    سپاسگزاری کرده
    272
    How to use Group Policy to fix Adobe Reader PDF Preview in Windows 64bit


    Leo Davidson recently posted a fix for Adobe Reader integration on 64bit Windows. His fix resolves the thumbnail and file preview feature when you install Adobe Reader (which is still only available in 32bit) in 64bit Windows which Adobe have not seemed to work out for over 3 years now. On his site he has tool that you can download to manually apply the PDF fix. The file preview is just a simple registry key change so I have added some more instruction showing how to makes these changes using Group Policy Preferences.
    Update: Thanks to the feedback from Leo Davidson I have updated the instructions to only “Update” the value if it already exists.
    Update2: Reduced the complexity to check for a 64bit OS.
    Preview View

    Method 1: File Preview Fix – Step by Step – Hard

    Note: Before you do method 1 be sure to check out the much easier method 2
    Step 1. Open Group Policy Management Console
    Step 2. Edit a machine based Group Policy Object (GPO)
    Step 3. Go to Computer Configuration > Preferences > Windows Settings > Registry
    Step 4. Click on the “Actions Menu” > “New” > “Registry Item” then select the HKEY_LOCAL_MACHINE Hive type SOFTWARE\Classes\CLSID\{DC6EFB56-9CFA-464D-8880-44885D7DC193} in the “Key Path” then type AppID in the Value Name field and {534A1E02-D58F-44f0-B58B-36CBED287C7C} in the “Value Data” field.

    Now we are going to filter the Group Policy Preference setting so that we only apply the registry key fix to 64bit Operating Systems.
    Step 5. Click on the “Common” Tab then tick “Item-level targeting” and click the “Targeting” button.

    Step 6. Click the “New Item” then click “Registry Match” chose the “Key exists” match Type and then change the Hive to “HKEY_LOCAL_MACHINE” then type “Software\Wow6432Node” in the “Key path”

    Step 7. Click the “New Item” then click “Registry Match” again change the “Match Type” is “Value Exists” change the “Hive” to “HKEY_LOCAL_MACHINE” and the “Key Path” to “SOFTWARE\Classes\CLSID\{DC6EFB56-9CFA-464D-8880-44885D7DC193}” set the “Values Name” to “AppID” change the Value Type to “REG_SZ” and then click “OK” then “OK”

    Step 8. Right click the registry entry you just made and click on “Copy”

    Step 9. Then right click in the blank area and click “Paste”

    Step 10. Click “Yes” to the Confirm Import

    Step 11. Double click on the new registry entry and insert the text “Wow6432Node\” between “Software\” and “CLSID” then click “OK”

    Step 12. Click on the “the registry key HKLM\SOFTWARE\Wow6432Node exist” and then press delete

    Step 13. Click on the Registry Match item and again insert the text “Wow6432Node\” between “Software\” and “CLSID” in the “Key Path” then click “OK” then “OK”
    Note: You don’t need all the OS matches as the “Wow6432Node” key will only exist on 64bit versions of Windows.

    It should now look like this…

    You should now have fixed the Adobe File Preview issues to all the computer which you have applied this GPO.

    Method 2: File Preview Fix – Import Settings – Easy


    Step 1. Download this preconfigured XML Group Policy configuration that I have already made for you (click on icon below)

    Step 2. Open Group Policy Management Console
    Step 3. Edit a machine based Group Policy Object (GPO)
    Step 4. Go to Computer Configuration > Preferences > Windows Settings > Registry and copy the file you downloaded in step 1. into and paste it into the blank area

    Step 5. Click Yes to confirm the import and you are done.

    The registry settings are now setup the same as method 1… except this way was SO much easier.

    Thumbnail Preview


    The second fix that Leo’s tool does it fix the thumbnail live preview option by implementing a custom written thumbnail bridge. Still working on a group policy preference to fix this so I will post again when I get this working.
    A big thanks to Leo Davidson so be sure to visit his web site and make a donation if you find this fix useful…

    Download as PDF


  8. #8
    نام حقيقي: 1234

    مدیر بازنشسته
    تاریخ عضویت
    Jul 2009
    محل سکونت
    5678
    نوشته
    5,634
    سپاسگزاری شده
    2513
    سپاسگزاری کرده
    272
    How to use Group Policy Preferences to manage Windows Power Plans

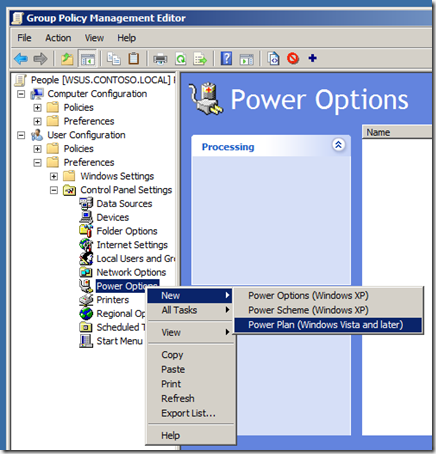
    One of the new feature of Group Policy Preferences in Windows 7 and Windows Server 2008 R2 is support for configuring power plans using preferences for Windows Vista and later (see Image 1). You used to be able to control power management in Vista using native policies however the advanced targeting of preferences now enables lot of new scenarios with power savings. AWSOME!


    Image 1. Creating a new Windows Vista and Later Power Plan
    One of the really neat things that you can do with Group Policy Preferences (GPP’s) and Targeting is change the power scheme of a computer based on the time of the day and the day of the week. This allows you to apply more aggressive power plans to your workstations after hours but then then back off during the day when people are working. Even though that Windows Vista (and Windows 7) support adaptive display time out which backs off the screen saver timeout when a user is still sitting at a computer but not actively using it they still have to wake up the computer by before the timeout started to back off. Applying the less aggressive power plan during working hours means that the user is less likely to have to keep waking up their computer in the first place as you have configured longer time out values.
    Now if this sounds familiar you’d be right as I did demo some of this during my TechEd Australia Group Policies session that I did with Lilia Gutnik and it is similar to the TechNet Edge video by Michael Kleef and Mark Gray. But in this article I am going to diving a lot deeper than my demo or in the TechNet Edge video.
    So before we talk about how to do this first lets go over what we are trying to achieve. We are assuming you manage a fleet of workstations that are only used during standard business hours and afterhours you want the computers to go to use as little as power as possible. You want to apply different power plans to the computers not only based on the day of the week but also the time of the day to make sure you get maximum possible power savings (see Image 2).

    Image 2. Example power plan timetable
    So to do this we setup two separate power plans, with one that is applied by default all the time and the other one that will take precedence and apply during business hours.
    How to setup the Default Power Plan Policy
    Step 1. Create a Power Plan under the User Configuration option of a GPO that has has aggressive power savings configured without any targeting other than being applied to all the users you want to control the power plans. I will leave the exact details of the power plan up to you but I will recommend that if you are going to set the “Sleep” timeout for Windows Vista (or greater) then make sure you also enable the “Allow hybrid sleep” option (even on your desktops) (see Image 3.) as this will protect your computers from data loss if you lose power to your office environment afterhours.


    Image 3. Enable hybrid sleep mode
    Step 2. Rename the item to be called something like “Default Power Plan” (see Image 4) and also make sure that it is always set to order number one.
    WARNING – If you do this make sure you either immediately disable the item (tool bar > red circle “disable this item”) or setup the Business Hours Power Plan straight away so that you don’t start shutting down all your computer during the middle of the day.

    Image 4. Default Power Plan at Order 1
    How to setup the Business Hours Power Plan Policy
    Step 3. Create another Power Plan setting item called “Business Hours Power Plan” (see Image 5.) making sure it is lower order than the default power plan. Again I will leave the exact settings up to you but this one should be less aggressive than your default power plan.

    Image 5. Business Hours Power Plan
    Step 4. Now go into the properties of the “Business Hours Power Plan”
    Step 5. Click on the Common Tab and tick “Item-Level Targeting”
    Step 6. Click on the targeting button
    First of all we are going to create a collection that will target the Business House Power Plan to only the weekdays of the week.
    Step 7. In the targeting Editor click on “Add Collection” (see Image 6.)

    Image 6. Creating a targeting collection
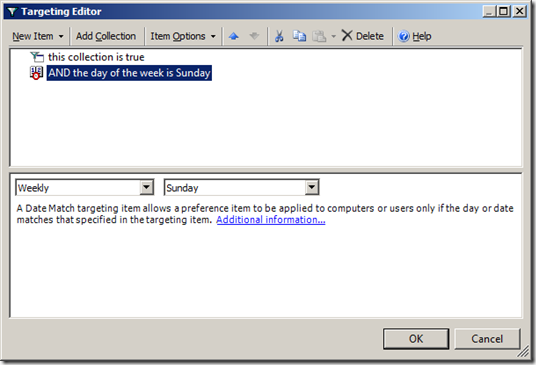
    Step 8. Click on the “New Item” and then click on “Date Match” (see Image 7 & 8.)

    Image 7. Creating a Date Match rule


    Image 8. Date match rule before being dragged into a Collection
    Step 9. Now you will need to drag the “AND the day of the week is Sunday” onto the “the collection is true” and change the day to “Monday” (see Image 9.)

    Image 9. Date Match rule after being dragged in the collection.
    Step 10. Now make sure that “the day of the week is Monday” is highlighted and click CTRL-C once and CTRL-V four times to copy and paste the date match rule once for each weekday (see Image 10).

    Image 10. Five date match rules in one collection
    Step 11. Now click on each of the “AND the day of the week is Monday” and press F6 to change each date match rule from and “AND” to a “OR” and then change the days to Tuesday , Wednesday, Thursday and Friday (see Image 11).

    Image 11. Data Range Collection configured to apply only during weekdays
    Now we will add a Time Range option that will refine when we target the Business House Power Plan to just working hours of the weekdays.
    Step 12. Click on the “this collection is true” and then click on “New Item” and then click on “Time Range” (see Image 12).

    Image 12. Adding Time Range to targeting
    Step 13. Now configured the time range to when during the day you want to Business Hours Power Plan to apply (see Image 13).
    Note – Make sure you allow for the policy refresh interval (default 90 minutes with a 20% random offset) when configuring the start and end time. This means you might want to start applying the policy 2 hours before the start of business (e.g. 6:30am) to make sure all the computers are configured with the Business Hours Power Plan before people login in the morning (e.g. 8:30am).

    Image 13. Targeting configured with Date Range collection and a Time Range
    Now you have configured a Group Policy Preference to apply less aggressive power plans to your computer during business hours while still having more aggressive power plans applied after hours.
    Other Option – More user Control
    In the example above we just modified the “Balanced” power plan setting when we wanted to make changes to the power settings. If you did not want to give your users some more control and not force specific power plans you could just select the “High performance“ plan and tick “Set as the active power plan” for the Business Hours Power Plan (see Image 14) and the “Power Saver” plan as active in the Default Power plan (see Image 15).

    Image 14. Setting the High Performance plan as active

    Image 15. Setting the Power Saver plan as active
    This way your users can still configure each of the power plans to their own preference but you will still make sure that the “Power Saver” plan will be applied to your computers after hours. However as you are only setting which plan is active then your users could get around the power plan as by configure both plans to never time out thus negating the benefit of any of the plan’s.
    Other Options – Less aggressive Default Power Plan
    You may also want to set the default power policy to be less aggressive by default and then apply the aggressive power as the second item in the list using a little more complicated targeting (see Image 16). The advantage of this method is you can easily turn off the aggressive power savings plan when you want to do afterhours by just disabling the “Afterhours Power Plan”.

    Image 16. Targeting to apply plan only afterhours

    Download as PDF


  9. #9
    نام حقيقي: 1234

    مدیر بازنشسته
    تاریخ عضویت
    Jul 2009
    محل سکونت
    5678
    نوشته
    5,634
    سپاسگزاری شده
    2513
    سپاسگزاری کرده
    272
    Loopback Policy Processing Debug Series – Normal Mode

    by Rich Crandall

    When it rains it pours I suppose. Just after I dropped the last loopback policy processing post, I got an email from another friend at Microsoft asking about how replace mode actually works.

    What he wanted to know exactly was when does the user configuration portion of policies which apply to the computer object get applied. Is it applied when the computer starts up? Or is it applied when a user logs on?
    It’s a fair question. The loopback policy setting is configured in the computer configuration portion of policy so it seems logical that the computer could pick up on the fact that loopback policy is configured in replace mode. Knowing that user policy won’t be used, it could very well just apply the user configuration portion of applicable policy at startup instead of waiting for a user logon to occur.
    So, how does the user configuration portion of policies linked to a computer object’s parents get applied when loopback policy processing is in replace mode? Well, before we answer that question, let’s actually take a look at debug logging for each of the different modes. To do this, we are going to set the UserEnvDebugLevel registry value to log verbose output to a log file, userenv.log, as explained in KB221833. We’ll use the same user and computer account for each of the policy application modes, normal, merge mode, and replace mode.
    Originally I intended for this to all go into a single post but it just started to get too big so I am now separating these out into a 3 part series. This is part 1 of the 3 part series:

    1. Loopback Policy Processing Debug Series – Normal Mode
    2. Loopback Policy Processing Debug Series – Merge Mode
    3. Loopback Policy Processing Debug Series – Replace Mode

    Besides the images in the walkthrough, I have included the log files for each of the policy modes. The final post will have the explanation of when the policy engine applies the user configuration portion of policy in replace mode and why it does it when it does. At the end of each post is a consolidated UserEnv log which includes snippets of each of the modes.
    First, here is what our OU structure looks like. The workstation that we’ll be using, XP01, is in the HR OU.
    The user that we’ll be using, John Galt, is in the Users OU.

    Normal Mode
    One last thing, the captures in these posts are limited to what is needed to compare between the different modes of policy processing. That is, if we were looking at debugging policy processing in normal mode by itself, we would want to capture quite a bit more than what is below (like the deferred evaluation of GPOs, CSE processing, etc).
    Here is the full text log file: normal_UserEnv.log [165.5 KB] (previously noLoopback.log)
    Here is the consolidated log file: consolidated_UserEnv.log [15.93 KB]
    Not long after the workstation is booted, at 2:54:14:195 AM, (yea, that’s pretty precise), computer policy begins evaluation of workstation XP01.

    Policy evaluation for the workstation begins in normal mode.

    Policies are enumerated starting with the OU closest to the workstation, then working through the parent OUs, on to site policy, and finally to the local policy.

    The computer configuration portion of policy is completed at 2:54:19:232 AM.

    A few seconds later, the user John Galt logs on to the workstation and at 2:54:38:098 AM, policy processing begins evaluation of user John Galt.

    Policy evaluation for the user begins in normal mode.

    Policies are enumerated starting with the OU closest to the user, then working through the parent OUs, on to site policy, and finally to the local policy.

    The user configuration portion of policy is completed at 2:54:40:359 AM.

    This is the standard process that we see with our users and workstations on a daily basis. For each object, the computer or user, the policy set is built, starting with the OU closest to the user and working all the way to the domain head, on to site policies, and finally to local policy. Then the appropriate portion (computer configuration for workstations and user configuration for users) of policies are applied in reverse order of enumeration, starting with the local policy, then to site policy, then the domain head, and on down through the OU structure until it gets to the nearest parent of the object itself. This allows the closest policy settings to win.
    More advanced versions of normal policy processing would include the use of settings like Enforced, Block Inheritance, Security Group Filtering, WMI Filtering, and Item-Level Targeting. For this illustration though, we are keeping it as simple as possible and assuming that none of these are configured.
    In part 2, Loopback Policy Processing Debug Series – Merge Mode, we’ll see how policy processing works in merge mode


  10. #10
    نام حقيقي: 1234

    مدیر بازنشسته
    تاریخ عضویت
    Jul 2009
    محل سکونت
    5678
    نوشته
    5,634
    سپاسگزاری شده
    2513
    سپاسگزاری کرده
    272
    Loopback Policy Processing Debug Series – Merge Mode

    by Rich Crandall

    This post is part 2 of a 3 part series where we are examining the debug output for each policy processing mode:

    1. Loopback Policy Processing Debug Series – Normal Mode
    2. Loopback Policy Processing Debug Series – Merge Mode
    3. Loopback Policy Processing Debug Series – Replace Mode

    In our last post, we reviewed the UserEnv log to see how policy is applied to workstations and users under normal circumstances. In normal mode, processing of workstation group policy restricts itself to those settings configured in the computer configuration node of applicable policies and user group policy restricts itself to those settings configured in the user configuration node of applicable policies.
    Now things are going to change a little bit with the introduction of loopback policy processing in merge mode. Our OU structure has not changed, but so you don’t have to go look at previous posts I have included it here. The workstation that we’ll be using, XP01, is in the HR OU.

    The user that will be using, John.Galt, is in the Users OU.

    Merge Mode
    Here is the full text log file: merge_UserEnv.log [171.92 KB] (previously loopbackMerge.log)
    Here is the consolidated log file: consolidated_UserEnv.log [15.93 KB]
    At 2:47:02:753 AM, computer policy begins evaluation of workstation XP01.

    Policy evaluation for the workstation begins in normal mode.

    Policies are enumerated starting with the OU closest to the workstation, then working through the parent OUs, on to site policy, and finally to the local policy.

    The computer configuration portion of policy is completed at 2:47:02:993 AM.

    A few seconds later, the user John Galt logs on to the workstation and at 2:54:38:098 AM, user policy processing begins evaluation of user John Galt.

    Policy evaluation for the user begins in merge mode.

    Policies are enumerated starting with the OU closest to the user, then working through the parent OUs, on to site policy, and finally to the local policy.

    The transition to evaluation of user policy for the workstation begins after user policy evaluation completes.

    Enumeration and evaluation of the policies for XP01 begins.

    Once both lists are defined, they are merged together. Settings configured in the user portion of policies linked to the workstation’s parents apply last.

    The user configuration portion of policy is completed at 02:47:29:824 AM.

    Policy application has completed successfully and any user configuration settings which were applied to policies which are applicable to XP01 have overwritten those policy settings which applied to John.Galt. The initial evaluation of XP01 evaluated the GPOs which applied but then only applied those settings in the computer configuration node of the applicable policies. When John.Galt logged on, then the user policy processing engine evaluated the applicable policies for John.Galt and XP01, applying only the policy settings in the user configuration node.
    This process is very similar to what we saw in Loopback Policy Processing Debug Series – Normal Mode except with the additional evaluation of the user configuration policies for the workstation after evaluation of the user policy settings.
    In part 3, Loopback Policy Processing Debug Series – Replace Mode, we’ll get far away from normal and see how policy processing works in replace mode


  11. #11
    نام حقيقي: 1234

    مدیر بازنشسته
    تاریخ عضویت
    Jul 2009
    محل سکونت
    5678
    نوشته
    5,634
    سپاسگزاری شده
    2513
    سپاسگزاری کرده
    272
    Loopback Policy Processing Debug Series – Replace Mode

    by Rich Crandall

    Well, we’ve made it through the debug logs for normal mode and merge mode and now it is on to replace mode and time to answer our original question, “In replace mode, when does the user configuration portion of policies which apply to the computer object get applied. Is it applied when the computer starts up? Or is it applied when a user logs on?”
    This post is part 3 of a 3 part series where we are examining the debug output for each policy processing mode:

    1. Loopback Policy Processing Debug Series – Normal Mode
    2. Loopback Policy Processing Debug Series – Merge Mode
    3. Loopback Policy Processing Debug Series – Replace Mode

    Our OU structure still hasn’t changed, but here it is again. The workstation that we’ll be using, XP01, is in the HR OU.

    The user that will be using, John.Galt, is in the Users OU.

    Replace Mode
    Here is the full text log file: replace_UserEnv.log [171.08 KB] (previously loopbackReplace.log)
    Here is the consolidated log file: consolidated_UserEnv.log [15.93 KB]
    At 3:03:07:041 AM, computer policy begins evaluation of workstation XP01.

    Policy evaluation for the workstation begins in normal mode.

    Policies are enumerated starting with the OU closest to the workstation, then working through the parent OUs, on to site policy, and finally to the local policy.

    The computer configuration portion of policy is completed at 3:03:12:018 AM.

    A few seconds later, the user John Galt logs on to the workstation and at 3:03:30:996, policy processing begins evaluation of user John Galt.

    Policy evaluation for the user begins in replacement mode.

    This discards the user account policies and reinitiates enumeration of workstation policy, applying the user portion of those policies which apply to the workstation.

    The user configuration portion of policy is completed at 3:03:32:189 AM.

    The user configuration portion of the policies which apply to the workstation are not applied with the computer configuration portion because the policy engine evaluates the computer portion of policy and the user configuration portion of policy at separate times. The computer configuration portion is evaluated when a workstation boots. The user configuration portion of policy is evaluated when a user logs on. And this is where the state of the loopback policy setting is evaluated as well (which is how the policy engine knows which policy processing mode to enter).
    Well, I am tired of looking at log files and I am sure that you are tired of seeing pictures of log files. The next loobpack policy processing blog (and hopefully the last for a while) will be a look at how loopback policy processing can go wrong


  12. #12
    نام حقيقي: 1234

    مدیر بازنشسته
    تاریخ عضویت
    Jul 2009
    محل سکونت
    5678
    نوشته
    5,634
    سپاسگزاری شده
    2513
    سپاسگزاری کرده
    272
    Demystifying Loopback Policy Processing

    by Rich Crandall


    It’s not the first time that we’ve talked about it and it certainly won’t be the last – Microsoft’s well-intentioned proliferation of information sometimes can actually create confusion through incomplete information or contradiction, perceived or real. Loopback policy processing is one of those technologies that is destined to fit into this bucket.
    It comes up pretty frequently in the newsgroups and not long ago we responded to one such question here: Loopback Policy Processing. I was going to leave it there but today I had a friend at Microsoft ask how it worked (well, really, why the implementation they were using wasn’t working) so I decided to post the contents of my newsgroup response here with a little polishing.
    Understanding loopback policy processing really requires that we understand standard policy architecture, policy evaluation, and policy application. The first thing to remember is that precedence and application of policies for users and computers is typically evaluated separately (except for loopback processing) as a user and computer may be, and likely are, in separate OU structures. Though there may be overlap, there is also a fair chance that the policy set for each object diverges somewhere.
    Loopback policy processing changes that dynamic some and creates an intersection of user and computer policies. There are two possible modes with Loopback Policy Processing, Merge Mode and Replace Mode. There’s plenty of documentation explaining how this technology works but I think the easiest way to understand this technology is with an illustration. Let’s walk through how policy application to computers and users typically works, then we’ll look at loopback policy processing with merge mode, and finally loopback policy processing with replace mode.
    Here's the typical policy application scenario:
    a. A computer starts up and applies the computer portion of the policies that apply to the computer object through the layers of the OU structure where the computer resides. Let's say for the sake of this illustration that there are 4 of them in reverse order of precedence:
    4. default domain policy
    3. efs
    2. restricted_groups
    1. fdcc

    b. A user comes along, logs on and applies the user portion of policies linked to the user object’s parents through the layers of the OU structure where the user resides. Let's say for the sake of this illustration that there are 2 of them in reverse order of precedence:
    2. default domain policy
    1. desktop

    END RESULT: Computer portion of policies linked to the computer object's parents (or site) are applied; User portion of policies linked to the user's object's parents (or site) are applied. What the actual resulting policy settings will be depends on the user that logs on.
    Here's loopback policy with merge mode enabled on the same user and computer:
    a. A computer starts up and applies the computer portion of the policies that apply to the computer object through the layers of the OU structure where the computer resides. let's say for the sake of this illustration that there are 4 of them in reverse order of precedence:
    4. default domain policy
    3. efs (pretend we added the loopback policy setting here)
    2. restricted_groups
    1. fdcc

    b. A user comes along, logs on, and applies the user portion of policies that are linked to the user object’s parent objects through the layers of the OU structure where the user resides. Let’s say for the sake of this illustration that there are 2 in reverse order of precedence:
    6. default domain policy
    5. desktop

    AND any settings in the user portion of the same policies as applied to the computer object in the same order of precedence:
    4. default domain policy
    3. efs
    2. restricted_groups
    1. fdcc

    END RESULT:
    Computer portion of policies linked to the computer object's parents (or site) are applied; User portion of policies linked to the user object's parents (or site) are applied and they are overwritten by any conflicting policy settings in the user portion of policies linked to the computer object’s parent (or site)
    Finally, here's loopback policy with replace mode enabled on the same user and computer:
    a. A computer starts up and applies the computer portion of the policies that are linked to the computer object’s parents through the layers of the OU structure where the computer resides. Let's say for the sake of this illustration that there are 4 of them in reverse order of precedence:
    4. default domain policy
    3. efs (pretend we added loopback setting here)
    2. restricted_groups
    1. fdcc

    b. When the user comes along, the user portion of policies that apply to the user object’s parent containers are not applied. Only the user portion of the policies that are linked to the computer object’s parent objects are applied and in the same order of precedence as above:
    4. default domain policy
    3. efs
    2. restricted_groups
    1. fdcc

    END RESULT: Computer portion of policies linked to the computer object's parents (or site) are applied; User portion of policies linked to the computer object's parents (or site) are applied. The user object’s policies are discarded altogether.
    I know that can be a lot to take in. Microsoft not only cautions the use of loopback policy processing because it can be a performance hit (read slow logons) but also because, as previously mentioned, using it correctly really requires a solid understanding of policy structure, policy evaluation, and policy application and an understanding of loopback policy processing. For this reason, in most instances, it tends to cause more problems than it solves. But it doesn’t have to. Hopefully this gives some clarity to loopback policy processing and helps you avoid some common pitfalls


کلمات کلیدی در جستجوها:

1

2

4

gpo first day of weekgroup policy apply wallpaper prevent regedit from running silently20group policy preferences log intersectlocal administrators access to registry windows 2008 r2HKEY_CURRENT_USERControl PanelInternational -> FirstDayOfWeek GPO15policygroup policy preferences reg file importgroup policy preference scheduled task paste xmlgroup policy preference environment variable substringwindows server 2008 gpp using substring of variablegroup policy item level targeting file match wildcardssystem cooling policy win7 regeditgpo set first day mondaygroup policy management editor targeting editorwindows 7 first day of week calendar settings gpogroup policy preferences printer mapping too slowgroup policy how to avoid clsidgroup policy first 4-day weeklogoff script session printers reg.exeselect username from win32_computersystem where logoff

برچسب برای این موضوع

مجوز های ارسال و ویرایش

  • شما نمی توانید موضوع جدید ارسال کنید
  • شما نمی توانید به پست ها پاسخ دهید
  • شما نمی توانید فایل پیوست ضمیمه کنید
  • شما نمی توانید پست های خود را ویرایش کنید
  •