نمایش نتایج: از شماره 1 تا 15 از مجموع 15
سپاس ها 20سپاس
  • 5 توسط patris1
  • 1 توسط patris1
  • 3 توسط patris1
  • 1 توسط patris1
  • 5 توسط patris1
  • 1 توسط patris1
  • 4 توسط patris1

موضوع: نصب و تنظیم WSUS 3 - روش راه اندازی WSUS

  
  1. #1
    نام حقيقي: 1234

    مدیر بازنشسته
    تاریخ عضویت
    Jul 2009
    محل سکونت
    5678
    نوشته
    5,634
    سپاسگزاری شده
    2513
    سپاسگزاری کرده
    272

    نصب و تنظیم WSUS 3 - روش راه اندازی WSUS

    How to install WSUS 3.0 SP1 The guide requires you to download the WSUS package from

    http://www.microsoft.com/downloads/d...laylang=en#top

    and you must also download the Microsoft Report viewer redistributable

    Download details: Microsoft Report Viewer Redistributable 2008


    This guide also assumes that you have setup and installed IIS in Windows 2008 and that you have configured and installed SQL 2008 or SQL 2005.


    Overview

    WSUS 3.0 SP1 delivers important customer-requested management, stability, and performance improvements. Some of the features and improvements include:

    * Support for Windows Server 2008.
    * Support for SQL Server 2008.
    * Enhanced bulk approval capability, preserving existing approvals.
    * Support for separate proxy servers and ports for SSL and non-SSL traffic.
    * Office Excel report export.


    WSUS 3.0 SP1 can be installed alone, or as an upgrade of either WSUS 3.0 RTM or WSUS 2.0 SP1.

    This package installs both the WSUS 3.0 SP1 Server and WSUS 3.0 SP1 Administration Console components, for all Windows Server 2003 SP1 supported languages. Additionally, the WSUS 3.0 SP1 client is included in all supported client platform languages. You must install the server components on a computer running Windows Server 2008 or Windows Server 2003 SP1 or later. You may install the Administration Console on a remote computer running Windows Server 2008, Windows Vista, Windows Server 2003 SP1, or Windows XP SP2.

    WSUS 3.0 SP1 Server Installation on Windows Small Business Server 2003

    If you are installing the WSUS 3.0 SP1 product on Windows Small Business Server 2003, follow the instructions in Installing Windows Server Update Services 3.0 on Windows Small Business Server 2003.


    There are 4 common methods of deploying WSUS:

    * Single WSUS server
    * Multiple independant WSUS servers
    * Multiple Internally synchronised WSUS servers
    * Disconnected WSUS servers

    A Single Wsus server would be suitable for a small or simple network. It will synchronise with Microsoft update and then distribute its updates to your servers/clients.

    Multiple independant WSUS servers could be setup to synchronise with microsoft Update and configured to for example, update only one specific type of client, eg: XP clients or Vista, then another WSUS server in your organisation could be setup just to update your Server 2008 servers.

    Multiple Internally synchronised WSUS servers is where you have multiple WSUS servers in your organisation but only one connects to Microsoft Update, this is called the Upstream WSUS server and all other WSUS servers (called the Downstream WSUS servers) synchronise via this WSUS server. The synchronisation methods can be either Autonomous or Replica.

    Disconnected WSUS servers are not connected to the internet at all. You would typically utilise this setup in an organisation that doesn't have or allow internet access. The Microsoft Updates would have to be pulled down from another internet conencted WSUS server and then burned to cd or dvd and copied to the disconnected WSUS server.

    Installation


    Install the Report Viewer first

    Double-click on the Report viewer exe, choose next to continue at the welcome screen


    accept the license terms


    click Install to install

    once done click finish


    Install WSUS


    Double click on the WSUS exe, choose next at the welcome screen


    choose the Full Server installation


    accept the license agreement


    Select your update source (local or on windowsupdate)


    now if you havn't installed SQL 2008 yet, then please do so as the next screen will allow us to pick between an internal windows database (first option) or to connect to our MSSQL database (default) second option.

    Choose use existing database as below in the screenshot


    it will hopefully successfully connect to your database, click next to continue


    when prompted what IIS website to use, choose the default option (use the existing IIS website)


    you'll see a summary click next to continue


    that's it, all done, click Finish


    Note: if you are going to use SCCM to manage patch management then do NOT run the WSUS configuration wizard below

    The WSUS configuration wizard automatically starts after the Setup wizard completes. Because Configuration Manager 2007 SP1 manages the WSUS settings, you should exit the configuration wizard after it opens.


    موضوعات مشابه:
    Hakimi، Reza.D، ali.b و 2 نفر دیگر سپاسگزاری کرده‌اند.

  2. #2
    نام حقيقي: 1234

    مدیر بازنشسته
    تاریخ عضویت
    Jul 2009
    محل سکونت
    5678
    نوشته
    5,634
    سپاسگزاری شده
    2513
    سپاسگزاری کرده
    272
    Remove SUSClientID for clone workstation

    By default when you clone the workstation, the workstation will consist the same SUSClientID. This will cause a problem whereby the workstation will not report status/detected on WSUS server. To verify you can compare both machine by go to the registry

    کد:
    HKEY_LOCAL_MACHINE\SOFTWARE\Microsoft\Windows\CurrentVersion\WindowsUpdate\SUSClientId
    In order to fix this problem, i have created two script file

    1. File:- clonewsus.reg
    کد:
    Windows Registry Editor Version 5.00
    
    [HKEY_LOCAL_MACHINE\SOFTWARE\Microsoft\Windows\CurrentVersion\WindowsUpdate]
    "SusClientId"=-
    2. File:-clonewsus.bat
    کد:
    @echo off
    ::
    Pause
    net stop "wuauserv"
    Echo importing clonewsus.reg
    %windir%\regedit.exe /s c:\clonewsus.reg
    echo wsus.reg imported successfully
    net start "wuauserv"
    echo forcing update detection
    wuauclt /detectnow
    pause
    Copy both files to C:\drive. Execute file clonewsus.bat.

    The script will stop the Windows Update services, go to registry and remove SusClientID and start back the Windows Update services. A new SusClientID entry will obtained. Command wuauclt /detectnow will trigger manual detection using the new SusClientId.

    Wait 10-15 minute, Client should be visible in WSUS console


    ویرایش توسط patris1 : 2009-11-28 در ساعت 04:13 AM
    f14f21 سپاسگزاری کرده است.

  3. #3
    نام حقيقي: 1234

    مدیر بازنشسته
    تاریخ عضویت
    Jul 2009
    محل سکونت
    5678
    نوشته
    5,634
    سپاسگزاری شده
    2513
    سپاسگزاری کرده
    272
    BITS Peer cashing (in WSUS 3.0)

    BITS (Background Intelligent Transfer Service) Peer caching is a new feature of BITS 3.0 supported on Vista platforms, that allows peers to share files on the same subnet.

    When a BITS job is created to download the files for an update, the Automatic Update agent instructs BITS to make the downloaded files available to Peers.

    When the files have been downloaded, BITS caches the downloaded files and makes them available to other computers. When another computer tries to download the same update, BITS sends a multicast request to peers on the same subnet.

    If one or more of the peers responds that it has the update, BITS will download the file from the peer rather than the WSUS server. Should the download from the peer fail or take too long, BITS will fall back to the WSUS server and continue the download.

    This feature of BITS can:

    Decrease the amount of data transferred from the WSUS server. Computers in the same subnet will tend to download the updates from each other.

    Decrease the amount of data transferred across the WAN in branch office scenarios where no local WSUS server is located.
    Decrease the amount of data transferred across the internet in the scenarios where several WSUS clients in the same subnet are configured to download update files directly from Microsoft update.
    Remember: The use of BITS Peercaching requires computers to be running Windows Vista or Windows Codename Longhorn, and be part of an Active Directory Domain.


    To enable BITS Peercaching:

    Within Group Policy Object Editor (gpedit.msc), under Computer Configuration\Administrative Templates\Network\Background Intelligent Transfer Service (BITS), set the Allow BITS Peercaching policy to Enabled


    There are some other related settings to limit the BITS Peercache size (default: 1% of disk), limit the age of items in the BITS Peercache (default: 14 days), ...

    To verify that BITS Peercaching is enabled or disabled, run from an command prompt:

    bitsadmin /peercaching /getconfigurationflags


    There are a couple of new BITSADMIN (ships with Vista) commands that allow you to see into the cache etc, and these are:

    BITSADMIN /PEERCACHING /? - Prints the list of commands to manage Peercaching

    BITSADMIN /CACHE /? - Prints the list of cache management commands

    BITSADMIN /PEERS /? - Prints the list of peer management commands


  4. #4
    نام حقيقي: 1234

    مدیر بازنشسته
    تاریخ عضویت
    Jul 2009
    محل سکونت
    5678
    نوشته
    5,634
    سپاسگزاری شده
    2513
    سپاسگزاری کرده
    272
    Starting WSUS for the first time

    Click on Start/All Programs/Administrative tools/Microsoft Windows Server Update Services 3.0 SP1

    this will start a wizard (pictured below) click next


    choose to opt in or opt out (default is opt in)


    Next you can choose your Upstream Server, I stayed with the default option


    enter your proxy settings (if any)


    click next and then start connecting

    once the Wizard has synchronized information with the Microsoft Update web servers you can click next to continue


    next you get to choose which languages to support


    and which Microsoft Products to support by default all office versions and all windows versions are selected, remove those which you don't need as all of these updates etc will take up storage space


    next you can choose what type of updates to download


    pick a schedule to synchronise


    finished


    review next steps and then click on Finish to end the wizard.


    At this point you can now use the WSUS UI


    Hakimi، Reza.D و hashemie سپاسگزاری کرده‌اند.

  5. #5
    نام حقيقي: 1234

    مدیر بازنشسته
    تاریخ عضویت
    Jul 2009
    محل سکونت
    5678
    نوشته
    5,634
    سپاسگزاری شده
    2513
    سپاسگزاری کرده
    272
    Adding workgroup computer into WSUS server Domain Computer can be added into WSUS console by using Group Policy. But how about workgroup computer !

    You can add workgroup computer into WSUS console by using registry.
    I have created two scripts to simplify the task to add computer into WSUS server

    1. File: wsus.bat
    کد:
    @echo off
    ::
    Pause
    net stop "wuauserv"
    Echo importing wsus.reg
    %windir%\regedit.exe /s c:\wsus.reg
    echo wsus.reg imported successfully
    net start "wuauserv"
    echo forcing update detection
    wuauclt /detectnow
    pause
    Note: Stop the Windows Update Service, execute wsus.reg and start Windows Update Service. Perform manual detection by using the command wuauclt /detectnow

    2. File:wsus.reg
    کد:
    Windows Registry Editor Version 5.00
    
    [HKEY_LOCAL_MACHINE\SOFTWARE\Policies\Microsoft\Windows\WindowsUpdate]
    "WUServer"="http://wsussvr01"
    "WUStatusServer"="http://wsussvr01"
    
    [HKEY_LOCAL_MACHINE\SOFTWARE\Policies\Microsoft\Windows\WindowsUpdate\AU]
    "NoAutoUpdate"=dword:00000000
    "AUOptions"=dword:00000004
    "ScheduledInstallDay"=dword:00000000
    "ScheduledInstallTime"=dword:0000000d
    "UseWUServer"=dword:00000001
    "NoAutoRebootWithLoggedOnUsers"=dword:00000001
    Note:-
    a) WUServer and WUStatusServer - specify your WSUS server using the following format http://wsus server name

    b) Value: NoAutoUpdate
    •0 - Enable Automatic Updates (Default)
    •1 - Disable Automatic Updates

    c) Value: AUOptions
    •2 - Notify for download and notify for install
    •3 - Auto download and notify for install
    •4 - Auto download and schedule the install

    d) Value: ScheduledInstallDay
    •0 - Install every day
    •1 to 7 - Install on specific day of the week from Sunday (1) to Saturday (7).

    e) Value: ScheduledInstallTime
    •0 to 23 - Install time of day in 24-hour format

    f) UseWUServer - Enabled Automatic Update.

    g) NoAutoRebootWithLoggedOnUsers -NoAutoRebootWithLoggedOnUsers is enabled which Specifies that to complete a scheduled installation, Automatic Updates will wait for the computer to be restarted by any user who is logged on, instead of causing the computer to restart automatically in 5 minutes to complete the installation.

    Note: Copy both files into C:\ drive and run wsus.bat

    For more detail, please refer to
    کد:
    http://technet.microsoft.com/en-us/library/cc708449(WS.10).aspx


  6. #6
    نام حقيقي: 1234

    مدیر بازنشسته
    تاریخ عضویت
    Jul 2009
    محل سکونت
    5678
    نوشته
    5,634
    سپاسگزاری شده
    2513
    سپاسگزاری کرده
    272
    Configure WSUS to deploy updates

    This guide assumes that you intend on using WSUS to deploy updates and that you have already installed it

    Note: If you intend on using SCCM 2007 to deploy updates using the WSUS integration then do NOT do any of the steps here.


    The instructions here also assume that your network runs Active Directory and that you use Group Policy to manage your network. For more information about Group Policy, see Microsofts Group Policy home page.

    You can configure one or more computers by including them in a Group Policy object (GPO). By configuring Automatic Updates using Group Policy, these settings will take precedence over any settings that are defined locally on the computers within your Domain.

    Note: You should Link this WSUS GPO to an Active Directory container appropriate for your environment. In a simple environment, you link a single WSUS GPO to the domain. In a more complex environment, you might link multiple WSUS GPOs to different organizational units (OUs).


    Start the Group Policy Management MMC and highlight your domain as in the screenshot below


    Right-click the domain and choose Create a GPO in this domain, and link it here


    When the New Group Policy Object window appears, give it a name like WSUS GPO and click OK


    right click on our new GPO and choose Edit


    expand Policies then click and highlight Administrative Templates. Before you can configure WSUS group policy settings you should load the latest version of the administrative template, wuau.adm. Right click on Administrative Templates and choose Add/Remove Templates, click on the Add button and scroll down to the bottom until you can see the wuau.adm file. Select the file and click Open and close.


    Now that you have loaded the wuau.adm template, you are ready to expand Windows Components.


    Scroll down to Windows Update and enable the following options (circled in Red)


    Automatic Updates are now enabled, but before the computers can receive updates from the WSUS server we need to configure the following group policy setting:

    Specify intranet Microsoft Update service location and fill in the https address of the WSUS server, so click on it and view it's properties. We have already enabled the group policy setting as in the screenshot above, however we need to enter the https address of our WSUS server, so do that in the two empty fields provided and click ok.

    Startup WSUS


    ویرایش توسط patris1 : 2009-11-28 در ساعت 04:40 AM
    Reza.D سپاسگزاری کرده است.

  7. #7
    نام حقيقي: 1234

    مدیر بازنشسته
    تاریخ عضویت
    Jul 2009
    محل سکونت
    5678
    نوشته
    5,634
    سپاسگزاری شده
    2513
    سپاسگزاری کرده
    272
    Install WSUS 3.0 - Step-By-Step

    I've managed to compose a quick installation procedure for those of you who want to utilize the great free utility from microsoft...
    Enjoy!
    Pre-Requisites

    1. IIS 6.0 with ASP.net installed (windows Components).


      go to control panel à add/remove programs à Windows Components


      check application server and click details.

      make sure that application server console and ASP.net are check and then check Internet Information Services and click Details.

      make sure that BITS, Common files, Internet Information Services Manager, and then click world wide web service and click details:

      make sure that Active server pages and world wide web service are check and click OK twice and click next.


      Click Finish.
    2. MMC 3.0 (no need if win2003 sp2 exists).
    3. .net framework 2.0 (exists as part of windows server R2 or available for download from Microsoft at Download details: .NET Framework Version 2.0 Redistributable Package (x86))
    4. Microsoft Report Viewer Setup (available for download from Microsoft at Download details: Microsoft Report Viewer Redistributable 2005)


    Wsus3.0 Installation


    Install Wsus 3.0 from location: http://www.microsoft.com/downloads/d...B-ED6AA4A336D9


    Check I Accept and then click next.

    Check the Store updates locally and type D:\Wsus (or any other folder. Recommended not to use your system partition for storing WSUS updates) on the path to save the updates. Then click next.

    Chose Install Use and Existing server Database on this computer and leave the path on default (same location as WSUS update). Then click next.


    Click Next.


    Check "Use existing IIS Default Web Site" and click next.


    WSUS Configuration Wizard

    After the setup ends, the following screen will open up:

    Click Next.

    Check the I would like to join box and click Next.


    Choose synchronize from Microsoft update, and click next.


    In case you have a proxy server on you organization specify proxy settings, else leave all settings at default and click next. It is recommended to set the WSUS to work without a proxy server and allow it a direct connection to the internet (open the appropriate ports on the FW).


    In the connect to upstream server page, click start connecting. After the server has finished the initial sync, the next button will be available. Click next.


    In the choose language window, choose English and Hebrew (or any other language of your choice) and click next.


    On the choose products page, check the products you wish to sync (default, windows – all version, office – all versions, Exchange – all versions). Then click next.


    On the choose classifications page, choose all classifications and click next.


    On the sync schedule page, choose synchronize automatically when first sync is at 12:00:00AM and the sync per day setting is set to 24. Then click next.


    On the finished page, check both checkboxes and click finish. WSUS initial configuration


    On the Update service administrator console that opens when the setup ends, click options and on the options tab. On the options window, click automatic approvals.


    On the automatic approval window, check the default automatic approval rule (automaticly approves critical and security updates) and click new rule if you wish to add additional auto-approve rules for specific products or classifications.


    On the add rule wizard specify any other auto approve rules that you wish by product or classification.


    On the choose product window, check only forefront-forefront client security and click ok.


    Back on the add rule window under step 3, type rule name (ex. FCS Update rule) and click ok twice. Defining WSUS Update Policy (GPO)


    Open Group Policy Management Console (GPMC). Start -> Run -> write gpmc.msc -> OK.


    Right click on the Group policy objects container and click new.


    Write the policy name and click OK.


    Expand the group policy objects container and then right-click the object you have just created and click edit.


    Expand the Computer configuration -> Administrative Templates -> Windows Components -> Windows Update.

    Now configure the following options:
    1. Configure Automatic Updates


    2. On the specify internet Microsoft update service location, enter the netbios name that your internal clients will need to address when connecting to the wsus server.


    Recommended settings
    1. Client Side targeting Specifies the target group name or names that should be used to receive updates from an intranet Microsoft update service.

      If the status is set to Enabled, the specified target group information is sent to the intranet Microsoft update service which uses it to determine which updates should be deployed to this computer.
      note: in order for this to work, you need to create groups in the WSUS server.


    2. Reschedule automatic updates scheduled installations Specifies the amount of time for Automatic Updates to wait, following system startup, before proceeding with a scheduled installation that was missed previously.


      If the status is set to Enabled, a scheduled installation that did not take place earlier will occur the specified number of minutes after the computer is next started.


    3. No auto-restart Specifies that to complete a scheduled installation, Automatic Updates will wait for the computer to be restarted by any user who is logged on, instead of causing the computer to restart automatically.


      If the status is set to Enabled, Automatic Updates will not restart a computer automatically during a scheduled installation if a user is logged in to the computer. Instead, Automatic Updates will notify the user to restart the computer.


    4. Automatic updates detection frequency Specifies the hours that Windows will use to determine how long to wait before checking for available updates. The exact wait time is determined by using the hours specified here minus zero to twenty percent of the hours specified. For example, if this policy is used to specify a 20 hour detection frequency, then all clients to which this policy is applied will check for updates anywhere between 16 and 20 hours.


      If the status is set to Enabled, Windows will check for available updates at the specified interval.

      If the status is set to Disabled or Not Configured, Windows will check for available updates at the default interval of 22 hours.


    5. Allow automatic updates immediate installation Specifies whether Automatic Updates should automatically install certain updates that neither interrupt Windows services nor restart Windows.


      If the status is set to Enabled, Automatic Updates will immediately install these updates once they are downloaded and ready to install.


    6. Allow non-administrators to receive update notifications pecifies whether, when logged on, non-administrative users will receive update notifications based on the configuration settings for Automatic Updates. If Automatic Updates is configured, by policy or locally, to notify the user either before downloading or only before installation, these notifications will be offered to any non-administrator who logs onto the computer.


      If the status is set to Enabled, Automatic Updates will include non-administrators when determining which logged-on user should receive notification.


    After finished configuring the GPO, go back to the GPMC console and link the GPO to the OU that contains the computer objects you wish to work with the WSUS server. Do this by right clicking the OU and choosing link an existing GPO.


    hashem_wol، hashemie، pardazande و 2 نفر دیگر سپاسگزاری کرده‌اند.

  8. #8
    نام حقيقي: 1234

    مدیر بازنشسته
    تاریخ عضویت
    Jul 2009
    محل سکونت
    5678
    نوشته
    5,634
    سپاسگزاری شده
    2513
    سپاسگزاری کرده
    272

    Install and configure WSUS 3.0 SP2 Step-By-Step

    کد:
    http://araihan.wordpress.com/2009/08/13/install-and-configure-wsus-3-0-sp2-step-by-step/
    I needed to deploy WSUS in my organisation. I started googling materials about WSUS. I found more talks about entire Microsoft products, very little on WSUS. Here I will share with you guys how I deployed WSUS successfully in my organisation. So why WSUS, Microsoft Windows Server Update Services 3.0 SP2 (WSUS 3.0 SP2) enables information technology administrators to deploy the latest Microsoft updates, hotfixes and service packs to computers running Microsoft Windows Server 2003 family, Windows Server 2008, Microsoft Windows Vista family, Microsoft Windows XP with Service Pack 2 operating systems. By using WSUS, administrators can fully manage and take control of the distribution of updates that are released through Microsoft Update.
    Prerequisites for WSUS server

    • Windows Server 2003 SP1 or Windows Server® 2008
    • Microsoft Internet Information Services (IIS) 6.0 or later
    • Windows Installer 3.1 or later
    • Microsoft .NET Framework 2.0
    • Microsoft Report Viewer Redistributable 2005
    • Microsoft Management Console 3.0
    • SQL Server 2005 SP1 or later

    Prerequisites for WSUS clients (x86 and x64)

    • Windows XP SP2, Windows Vista, Windows 7
    • Windows Server 2003 or Windows Server 2008

    WSUS Deployment Scenarios
    WSUS is flexible enough to deploy starting from small to enterprise organisation. just you need to make sure active directory, DNS and DHCP working perfect. If port 80 is occupied by your company web site you can use port 8530. I used port 8530 on WSUS server. I have ISA 2004 so I will show how to add WSUS publishing rule in ISA 2004 also.
    Install prerequisites
    1. IIS installation
    go to add/remove windows component and select Application server

    click next

    Select as above. you must select ASP.net and IIS, then check Internet Information Services and click Details.

    Check BITS, check IIS manager and click on details

    Check ASP and WWW and click ok.

    2. MMC 3.0 installation
    no need to install you installed service pack on your server
    3. .net framework installation
    Download .net 2 framework from the link Download details: .NET Framework Version 2.0 Redistributable Package (x86)
    run installation, click next, accept EULA and follow the installation screen.

    4. MS report viewer installation
    Download report viewer from the Link
    Download details: Microsoft Report Viewer Redistributable 2005
    run installation, click next, accept EULA and follow the installation screen.

    5. SQL Server 2005 SP1 installation
    download SQL server 2005 from the link
    Download details: Microsoft SQL Server 2005 Express Edition SP1

    Click next and click install, click next again

    follow installation screen until finish.

    Now you have fulfil prerequisite as mention above.
    WSUS installation
    download WSUS from Microsoft Feedback and Bug Reporting - Product and Program Categories | Microsoft Connect website. sign in using hotmail or live account. download x86 or x64 as you prefer. here I am installing x86 version.

    Click on run

    click next

    Check Full server installation radio button, click next

    Accept EULA

    You must have two partition in your server as you can see above. I selected D:\WSUS . click next

    Check use existing database. It is required for enterprise deployment. internal database will not work if you have large number of desktop and server. click next.

    Click next
    On the next screen “web site selection” check create Microsoft Windows Server Update Services Web Site on port 8530
    DO NOT CHECK RECOMMENDED

    Click next

    Click next , Click next again


    Click finish. WSUS config wizard will start next

    click next

    Click next

    Provide proxy server IP and credentials above if you have proxy server. in my case I typed my ISA server IP, port 80 and my domain admin credentials.

    Click on start connecting and wait until finish, click next and follow the config screen to select your language, products, classification


    wait until synchronisation finish. It might take 30/40 minutes depending on speed of your internet.
    Now set permission in IIS in WSUS server, you may set anonymous logon. Don’t worry its inside your firewall or DMZ.


    open WSUS management console go to option then Change update File and language


    Go to automatic approval and create new rules and run the rules. In my case I have two custom rules.


    Create computer group by right clicking on All computers. example, I have two group desktop and Server.
    WSUS update policy deployment through GPO

    Go to group policy management, Right click on the Group policy objects container and click new. I created two policies one for desktop and another WSUS Server policy


    Now right click on WSUS policy that is desktop policy and change settings of four gpo that are enabled here on screen

    Configure Auto download and schedule installation that fit for you

    Point WSUS server and port as http://yourserver:8530 in both the box

    mention target group to populate desktop/pc in WSUS

    Check enabled in following box not to reboot machine if user logged on

    Repeat this process for WSUS server policy and mention Server on the target group.
    Right click on the organisational unit that contain desktop/workstation in GPO management console and link WSUS policy with this organisational unit.

    Link it with WSUS policy

    Follow same steps for server organisational unit in GPO management console. Now you may close GPO now.


  9. #9
    نام حقيقي: 1234

    مدیر بازنشسته
    تاریخ عضویت
    Jul 2009
    محل سکونت
    5678
    نوشته
    5,634
    سپاسگزاری شده
    2513
    سپاسگزاری کرده
    272

    Install and configure WSUS 3.0 SP2 Step-By-Step


    If you have ISA 2004/2006, you have to set WSUS policy in ISA firewall access rule. so that ISA doesn’t block communication between server and client. You don’t need to do it if nothing blocking between Client and Server communication.
    To publish WSUS policy, Go to ISA management console
    Go to Network Object and expand WEB listener, right click on web listener click new. Name should be netbios name of WSUS server. Follow the screen shot.


    Click next, click finish.
    On firewall publishing tasks, click on the publish a web server, follow the screen shot


    Right click WSUS Publishing policy, go to property and check web server and port

    On the paths add these path if not existing already


    uncheck verify and block option.
    All done. You are ready to go now.
    Troubleshooting
    Go to client machine, run gpupdate /force if client not showing on WSUS
    Run wuauclt /resetauthorization /detectnow command from client machine.
    Check Registry of client.


    Conclusion
    Auto update and patch up gives administrator more time to concentrate other things without spending time on patching up servers and pc. I enjoyed deploying WSUS. I hope these instruction would be handy for you to find out more of better IT


  10. #10
    نام حقيقي: 1234

    مدیر بازنشسته
    تاریخ عضویت
    Jul 2009
    محل سکونت
    5678
    نوشته
    5,634
    سپاسگزاری شده
    2513
    سپاسگزاری کرده
    272

    Deploying Microsoft Windows Server Update Services

    کد:
    http://www.windowsnetworking.com/articles_tutorials/Deploying-Microsoft-Windows-Server-Update-Services.html
    What is WSUS?

    Simply put, Microsoft Windows Server Update Services (WSUS) is the Microsoft provided solution for enterprise patch management. Using WSUS, network administrators can manage and deploy software updates for all of the Microsoft products in a network. This includes client operating systems such as Windows XP and Windows Vista, server operating systems such as Windows Server 2003 and Windows Server 2008, and other products including Microsoft Exchange, ISA Server, and Forefront Security.
    Looking Under the Hood

    There are three main components that come together to make a WSUS deployment work. The first of these is the Microsoft managed component, Microsoft Update, which manages and distributes updates to Microsoft clients upon request. Next, is the WSUS server itself, which allows administrators to specify which updates are downloaded from Microsoft Update and then deployed to network clients. The final component is Automatic Update, which is built in to Windows 2000 SP4, Windows XP, Windows Server 2003, and Windows Server 2008 and allows these operating systems to download updates from a specified source.
    Whether deploying WSUS for a small LAN or a large geographically disperse WAN, all that is involved is leveraging these three components. Let’s take a look at some of the scenarios you may need to deploy WSUS in and how we can effectively do this. Afterwards, we will actually step through the installation process.
    WSUS in a Small LAN

    The majority of WSUS installations take place in a smaller environment consisting of a single location and less than a hundred computers. In this configuration, a network administrator will manage a single WSUS server which downloads updates directly from Microsoft Update. More often than not, budget reasons prohibit the purchase of a server exclusively for WSUS, so the service will share hardware with something such as a file or application server.
    Once you have everything set up, the only burden on the network administrator is to ensure that synchronization between the server and Microsoft Update is occurring properly and to approve the downloaded updates occasionally. Clients will download and install updates automatically using the Automatic Update component.

    Figure 1: A Simple WSUS Deployment
    WSUS in a Large LAN

    A larger network brings a few new concerns into the mix. These networks are still contained in a single location, but have a much greater number of computers, servers, and network segments.
    The first thing to consider is that that not all computers should receive the same set of updates. For instance, the users in your accounting department may run an application that does not play friendly with .NET framework 3.0, whereas users in the engineering department require it. This is a pretty simple fix through the use of computer groups. Every computer that reports to the WSUS administration console can be placed in a computer group depending on its individual needs. By default, all computers are placed in the “Unassigned Computers” group when they first report to a WSUS server. Once they have reported however, you can create a custom group and place them in that group. Updates are approved on a per group basis which will allow you to customize the updates installed to a group of computers based upon the user’s needs.
    Aside from this, the next consideration here is the management burden imposed by multiple WSUS servers. Monitoring synchronization, approving updates, and ensuring the successful installation of updates is typically a pretty simple task. However, if you have five separate WSUS servers then the management of these can get time consuming for a single person…not to mention mind numbing. Luckily, WSUS was designed with the use of multiple servers in mind and averts this issue through the use of WSUS Server Hierarchies. This hierarchy model allows a single WSUS server to act as an upstream server and impose its configuration on those servers configured as downstream servers below it.
    A WSUS hierarchy supports two modes, autonomous mode (which we will discuss later) and replica mode. In replica mode, the upstream server is the only WSUS server that downloads its updates from Microsoft Update. It is also the only server that an administrator has to manually configure computer groups and update approvals on. All information downloaded and configured on to an upstream server is replicated directly to all of the devices configured as downstream servers. Using this method you will save a great deal of bandwidth as only one computer is constantly updating from the Internet. More importantly however, you will save a countless amount of time since you are only managing one server now from a software standpoint.

    Figure 2: Deploying WSUS in a Large LAN
    WSUS in a WAN

    The final and most complex scenario in which WSUS can be installed is a large WAN. These WANs are characterized by a large number of devices spread amongst several geographic locations.
    Unlike our other scenarios, networks such as this often have a distributed IT management model. Rather than a single administrator managing all WSUS activities, each particular location could have a separate administrator who will need to manage computer groups and update approvals separate from that of the main office. As you would expect, this is another scenario where we can make use of upstream and downstream severs, or more specifically, autonomous mode.
    Using autonomous mode, the upstream server transmits update files to the downstream servers, but nothing else. This means that individual computer groups and update approvals must be configured for each particular downstream server. In this deployment type, you get the benefit of optimized bandwidth usage with the flexibility of allowing individual site administrators to manage computer groups and update approvals themselves.
    Another typical WAN scenario is caused by bandwidth restriction. It is common that remote network locations will have a high speed connection to the internet but a rather low speed link back to the main office, such as through a VPN. In these cases, an upstream server can manage update approvals, but those remote downstream servers can be configured to download the approved updates directly from the Internet as opposed to the upstream server.

    Figure 3: A WSUS Deployment Designed for a WAN
    Installing WSUS

    After you decide what deployment scenario is right for your network, you will want to get to installing it. We are going to step through the process of installing WSUS on to your server.
    Before you get started you will need to download the latest release of WSUS directly from Microsoft. After you have downloaded WSUS 3.0 to the server, simply run the executable to get started. At this point you will be notified if you are missing any of the requirements for installing WSUS (check those out at WSUS Installation Requirements). If you are in the clear, then you will be asked what components of WSUS you want to install. You can install either the full package containing the WSUS program components and the management console, or just the management console itself. In this case we will be installing all of the components. Proceed by accepting the license agreement.
    The next screen will prompt you to select the update source. This is where your client computers will download updates from. For our purposes here we will select Store Updates Locally and choose a location with at least 20 GB of free disk space (more if you have a highly diverse range of products you will be updating). If you do not choose this option, the client computers will only use WSUS to manage what updates are approved and will download these updates directly from Microsoft Update over the Internet.

    Figure 4: Selecting an Update Source during WSUS Installation
    The database options page is next. This is where you choose the database technology WSUS will use to maintain update information about clients. By default, setup will use the Windows Internal Database. This works just fine, but if SQL Server software happens to be installed on the machine then you can also use that as well by entering its information in on this page.
    The following screen allows you to select how WSUS will use IIS. You can use the default web site on port 80 or have WSUS create its own site using port 8530. Using port 8530 is recommended as it allows you some flexibility if you end up adding other web based applications to the same physical server later on.

    Figure 5: Selecting what IIS Website WSUS Will Use
    This is all of the configuration that is required at this point. Click Next through the remaining screens and choose Finish to complete the installation.
    Wrap Up

    We have just gone through a lot of the possible deployment options for WSUS as well as how to install it. There is quite a bit more to know about WSUS but the information provided here should give you a good jump start in determining how you should deploy this Microsoft technology so that you increase update efficiency and decrease administrative overhead


  11. #11
    نام حقيقي: 1234

    مدیر بازنشسته
    تاریخ عضویت
    Jul 2009
    محل سکونت
    5678
    نوشته
    5,634
    سپاسگزاری شده
    2513
    سپاسگزاری کرده
    272

    Uninstalling WSUS

    One common problem you may encounter with WSUS is when you go to uninstall it. WSUS has a nasty habit of simply not uninstalling correctly. Here is a quick way to remedy this.

    Windows Server Update Services is a really great idea for networks of virtually any size. However, you may run into situations where you have to uninstall it from a server for various reasons. Although the uninstallation may seem to go smooth at first, it is when you reinstall it that you will notice that something is wrong.

    Typically, when running the installation file for WSUS to install it after an uninstallation, you will be prompted with the uninstallation screen a second time. This is because even though you may have selected to remove all of the components, the uninstallation doesn’t always remove all of them.

    The best way to remove everything completely is to clean it with Microsoft’s Windows Installer CleanUp utility. You can download this utility at: Use the Windows Installer CleanUp Utility to remove Office 2000, Office XP, or Office 2003. Simply install it, run it, select WSUS from the menu, and choose Remove. After doing this WSUS should be completely removed from your system.


  12. #12
    نام حقيقي: 1234

    مدیر بازنشسته
    تاریخ عضویت
    Jul 2009
    محل سکونت
    5678
    نوشته
    5,634
    سپاسگزاری شده
    2513
    سپاسگزاری کرده
    272

    Deploy Windows Media Player 11 using Windows Server Update Services - WSUS

    کد:
    http://araihan.wordpress.com/2009/11/23/deploy-windows-media-player-11-using-windows-server-update-services-wsus/

    Log on to WSUS Server using Administrative credential
    Open Administrative Tools>Windows Server Update Services>Right Click on update>click on import

    Now Microsoft update catalog will be presented to you via IE, Search Windows Media Player on the Catalog. Add Media Player according to your system architecture

    Click on view basket>click import and wait for import to be completed

    Windows Server Update Services>Right Click on update>click search>Type Windows Media Player>Select all>right click and approve selected to the desired desktop group.


  13. #13
    نام حقيقي: 1234

    مدیر بازنشسته
    تاریخ عضویت
    Jul 2009
    محل سکونت
    5678
    نوشته
    5,634
    سپاسگزاری شده
    2513
    سپاسگزاری کرده
    272

    Troubleshooting WSUS server

    کد:
    http://araihan.wordpress.com/2010/01/27/troubleshooting-wsus-server-step-by-step/
    Client not showing in WSUS Server:

    There are several reasons client don’t pop up in WSUS server. a) GPO and WSUS miss-configured. b) Proper prerequisite has not been meet both for server and client as I mentioned in my post.
    Log on to WSUS sever as Domain Admin. Open WSUS Console>Option>Computers>Select use group policy or registry settings on computers>Apply>ok.
    WSUS Console>Server Name>computers>All Computers>Add Proper Computer Groups, I mean client target group you have mentioned in GPO.
    Are all the computers and Server pointing proper client target group as you mentioned in GPO? Did you configure parent GPO and computers pointing child GPO??? Check group policy object using GPO management console to find out any miss-configuration!!! Make sure the computer you are looking WSUS console is placed in right GPO. Run gpresult.exe from command prompt to find out computer and user config. Wait until GPO refresh time and you will see client in WSUS console.
    Another way to see client quickly in WSUS console is to log on to Windows XP SP2 (Must have SP2) client. Run WUAUCLT /DETECTNOW and GPUPDATE /FORCE from command prompt. Reboot client. Log back again.
    Start menu>run>Type regedit.exe>ok. Now go to HKEY_Local_Machine\Software\Policies\Microsoft\Win dows\Windows Update


    Another critical point to note here, don’t use default configuration port that is 80. Use port 8530 because in ISA server or corporate firewall might be pointing this port to corporate web site unless web publisher added in ISA.
    WSUS database full of BugCheck Dump causing WSUS to stop functioning:

    ***This file is generated by Microsoft SQL Server version 9.00.4035.00 upon detection of fatal unexpected error. Please return this file, the query or program that produced the bugcheck, the database and the error log, and any other pertinent information with a Service Request***
    ***Stack Dump being sent to c:\Program Files\Microsoft SQL Server\MSSQL.1\MSSQL\LOG\SQLDump0154.txt***
    I am one of the victim of this SQL error. This will occupy entire disk space in system partition causing WSUS to stop working. This error got nothing to do with WSUS. This is purely SQL problem. It happens when WSUS is running long and you don’t run clean up wizard to clean database and WSUS. I have to be honest here. I am not an SQL Expert. I found some clues by searching books and google, this SQL error occur when SQL index is corrupt. I logged to SQL server using management studio express and follow this Microsoft link and run DBCC CHECKDB. But this will not solve this issue. Basically, SQL database is screwed. You have to backup database, reinstall WSUS and restore will solve this issue. But my best suggestion would be fresh installation of everything….. start from scratch.
    Connection Error

    “An error occurred trying to connect the WSUS server. This error can happen for a number of reasons. Check connectivity with the server. Please contact your network administrator if the problem persists.
    Click Reset Server Node to connect the server again.”
    Reason: WSUS-related Web services (IIS) may stop working when you upgrade a Windows Server 2003-based computer to Windows Server 2008
    Solutions:
    Verify that the Update Services service, IIS and SQL are running on the server. If the problem persists, try restarting IIS, SQL, and the Update Services Service.
    Try removing the persisted preferences for the console by deleting the wsus file under C:\Documents and Settings\%username%\Application data\Microsoft\MMC\
    To work around this problem, uninstall the ASP.NET role service in IIS, and then use Service Manager to reinstall the service. To do this, follow these steps:

    1. Click Start, click Administrative Tools, and then click Server Manager.
    2. Expand Roles, and then click Web Server (IIS).
    3. In the Role Services section, click Remove Role Services.
    4. Disable the ASP.NET check box, and then click Next.
    5. Click Remove.
    6. Wait for the removal process to finish, and then click Close.
    7. In the same Role Services section, click Add Role Services.
    8. Enable the ASP.NET check box, and then click Next.
    9. Click Install.
    10. Wait for the installation process to finish, and then click Close
    11. Restart all WSUS related services such as IIS, SQL, Update services (Location Administrative Tools>Services)


  14. #14
    نام حقيقي: 1234

    مدیر بازنشسته
    تاریخ عضویت
    Jul 2009
    محل سکونت
    5678
    نوشته
    5,634
    سپاسگزاری شده
    2513
    سپاسگزاری کرده
    272

    How to configure Windows Server Update Services (WSUS) to use BranchCache

    کد:
    http://araihan.wordpress.com/2010/02/17/wsus-how-to-configuring-a-wsus-server-to-use-branchcache/

    What is branchCache? BranchCache™ is a new feature in Windows® 7 and Windows Server® 2008 R2 that can reduce wide area network (WAN) or bandwidth utilization and enhance network application responsiveness when users access content in a central office from branch office locations. When you enable BranchCache, a copy of the content that is retrieved from the Web server or file server is cached within the branch office. If another client in the branch requests the same content, the client can download it directly from the local branch network without needing to retrieve the content by using the Wide Area Network (WAN).
    How Branchcache works? When a Windows 7 Client from a branch office request data such as WSUS content to a head office Server then server check authentication and authorise data to pass on to the client. This is an ordinary communication happens without branchcache also.
    But with branchcache, The client uses the hashes in the metadata to search for the file in the Hosted Cache server. Because this is the first time any client has retrieved the file, it is not already cached on the local network. Therefore, the client retrieves the file directly from the content server. The Hosted Cache server connects to the client and retrieves the set of blocks that it does not have cached.
    When a second Windows 7 client from the same branch requests the same WSUS content from the content server or WSUS server. The content server authorizes the user/client and returns content identifiers. The second client uses these identifiers to request the data from the Hosted Cache server residing in branch. This time, it does not retrieve data from the DFS share residing in head office.
    To configure a Web server or an application server that uses the Background Intelligent Transfer Service (BITS) protocol, you must install the BranchCache feature using server manager. To configure a file server to use BranchCache, you must install the BranchCache for Network Files feature and configure the server using Group Policy. This article discuss and show how to configure WSUS to use branchcache. The followings are the steps involve in head office and Branch Offices.
    Head Office:

    1. Install and configure back end SQL Server
    2. Create DFS share
    3. Install and configure front end WSUS Server
    4. Configure GPO for WSUS client

    Branch Office:

    1. Install and configure Branchcache File Server
    2. Configure GPO for Branchcache
    3. Install and configure front end WSUS server
    4. Configure GPO for WSUS client

    Installing BranchCache File Server

    1. Click Start, point to Administrative Tools, and then click Server Manager.
    2. Right-click Roles and then click Add Roles.
    3. In the Add Features Wizard, select File Server and BranchCache for network files and then click Next.
    4. In the Confirm Installation Selections dialog box, click Install.
    5. In the Installation Results dialog box, confirm that BranchCache installed successfully, and then click Close.
    Using Group Policy to configure BranchCache

    1. Open the Group Policy Management Console. Click Start, point to Administrative Tools, and then click Group Policy Management Console.
    2. Select the domain in which you will apply the Group Policy object, or select Local Computer Policy.
    3. Select New from the Action menu to create a new Group Policy object (GPO).
    4. Choose a name for the new GPO and click OK.
    5. Right-click the GPO just created and choose Edit.
    6. Click Computer Configuration, point to Policies, Administrative Templates, Network, and then click Lanman Server.
    7. Double-click Hash Publication for BranchCache.
    8. Click Enabled.
    9. Under Options, choose one of the following Hash publication actions:
    a. Allow hash publication for all file shares.
    b. Allow hash publication for file shares tagged with “BranchCache support.”
    c. Disallow hash publication on all file shares.
    10. Click OK.
    Using the Registry Editor to configure disk use for stored identifiers

    1. Open an elevated command prompt (click Start, click All Programs, click Accessories, right-click Command Prompt, and then click Run as administrator).
    2. At the command prompt, type Regedit.exe, and then press Enter.
    3. Navigate to HKLM\CurrentControlSet\Service\LanmanServer\Parame ters.
    4. Right-click the HashStorageLimitPercent value, and then click Modify.
    5. In the Value box, type the percentage of disk space that you would like BranchCache to use. Click OK.
    6. Close the Registry Editor.
    Setting the BranchCache support tag on a file share

    1. Click Start, point to Administrative Tools, and then click Share and Storage Management.
    2. Right-click a share and then click Properties.
    3. Click Advanced.
    4. On the Caching tab, select Only the files and programs that users specify are available offline.
    5. Select Enable BranchCache, and then click OK.
    6. Click OK, and then close the Share and Storage Management Console.
    To replicate cryptographic data
    1. Open an elevated command prompt (click Start, click All Programs, click Accessories, right-click Command Prompt, and then click Run as administrator).
    2. At the command prompt, type netsh branchcache set key passphrase=“MY_PASSPHRASE”, and then press Enter. Choose a phrase known only to you. Repeat this process using the same phrase on all computers that are participating in the cluster.
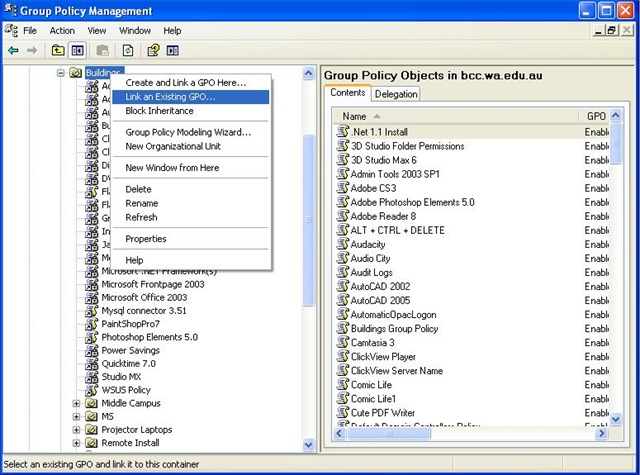
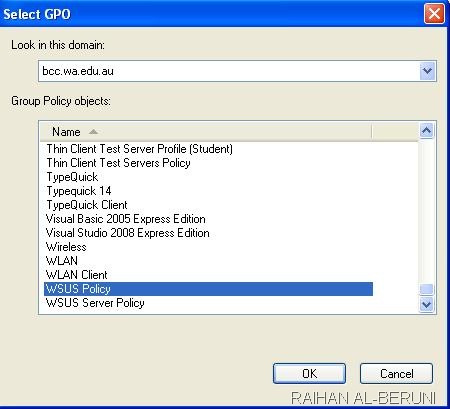
    Client configuration using Group Policy

    1. Click Start, point to Administrative Tools, and click Group Policy Management Console.
    2. In the console tree, select the domain in which you will apply the GPO.
    3. Create a new GPO by selecting New from the Action menu.
    4. Choose a name for the new GPO, and then click OK.
    5. Right click the GPO you created and choose Edit.
    6. Click Computer Configuration, point to Policies, Administrative Templates: Policy definitions (ADMX files) retrieved from the local machine, Network, and then click BranchCache.
    7. Double-click Turn on BranchCache.
    8. Click Enabled, and then click OK.
    9. To use Distributed Cache mode, double-click Turn on BranchCache – Distributed Caching mode, click Enabled, and then click OK. or
    To use Hosted Cache mode, double-click Turn on BranchCache – Hosted cache mode, click Enabled, and then click OK.
    10. To enable BranchCache for SMB traffic, double-click BranchCache for network files, click Enabled, select a latency value under Options, and then click OK.
    Configuring a Branch WSUS server to use BranchCache

    In addition to enabling BranchCache in your environment, the WSUS server must be configured to store update files locally (both the update metadata and the update files are downloaded and stored locally on the WSUS server). This ensures that the clients get the update files from the WSUS server rather than directly from Microsoft Update.
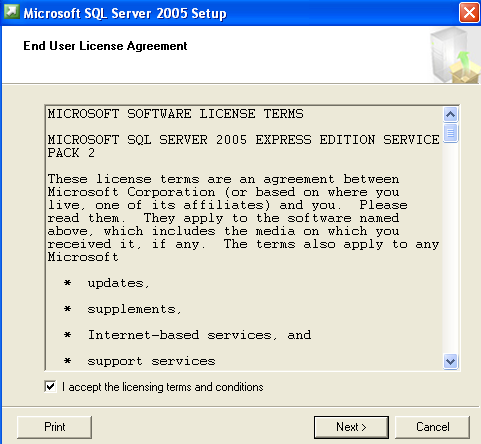
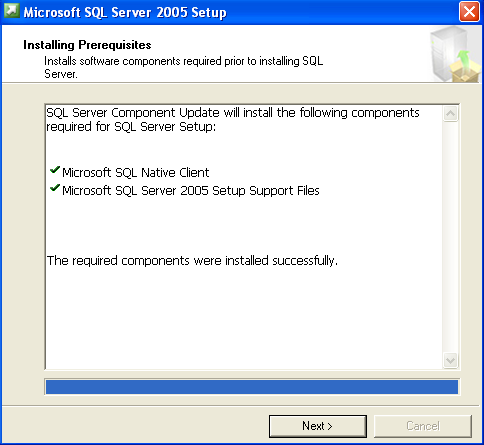
    Install SQL Server 2005/2008 with Management Studio Express on the back-end computer


    1. Click Start, point at All Programs, point at SQL Server 2005, point at Configuration Tools, and select SQL Server Surface Area Configuration.
    2. Choose Surface Configuration for Services and Connections.
    3. In the left window, click the Remote Connections node.
    4. Select Local and remote connections and then select Using TCP/IP only.
    5. Click OK to save the settings.

    To ensure administrative permissions on SQL Server

    1. Start SQL Server Management Studio (click Start, click Run, and then type sqlwb).
    2. Connect to the SQL Engine on the server where SQL Server 2005 was installed in Step 1.
    3. Select the Security node and then select Logins.
    4. The right pane will show a list of the accounts that have database access. Check that the person who is going to install WSUS 3.0 on the front-end computer has an account in this list.
    5. If the account does not exist, then right-click the Logins node, select New Login, and add the account.
    6. Set up this account for the roles needed to set up the WSUS 3.0 database. The roles are either dbcreator plus diskadmin, or sysadmin. Accounts belonging to the local Administrators group have the sysadmin role by default.

    Install Branch WSUS Server

    To install WSUS on the front-end computer At the command prompt, navigate to the folder containing the WSUS Setup program, and type:
    WSUSSetup.exe /q FRONTEND_SETUP=1 SQLINSTANCE_NAME=server\instance CREATE_DATABASE=0
    Here, Server\instance is the name of the remote SQL server that is holding the instance of WSUS database. If you do not want silent installation then don’t use /q switch and follow WSUS installation link
    Important! Microsoft recommend 1GB free space for Systems Partition and 30GB for WSUS contents. But this minimum recommended space will create havoc when WSUS log, database log and content grow over the years. So, I used 50GB as systems partition and 100GB as WSUS contents in DFS share.
    To configure the proxy server on WSUS front-end servers

    1. In the WSUS administration console, select Options, then Update Source and Proxy Server.
    2. Select the Proxy Server tab, then enter the proxy server name, port, user name, domain, and password, then click OK.
    3. Repeat this procedure on all the front-end WSUS servers.

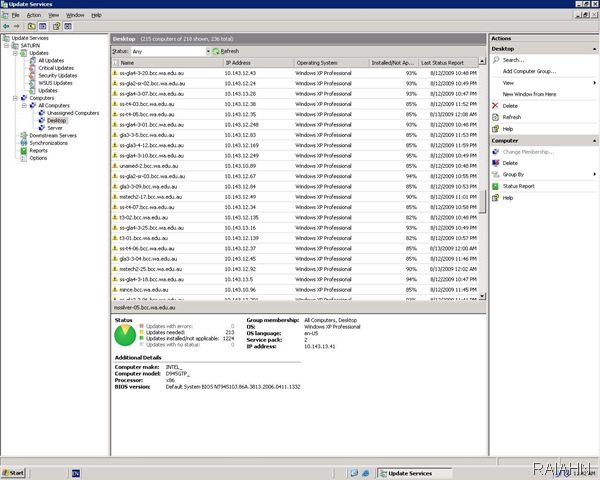
    To specify where updates are stored

    1. In the left pane of the WSUS Administration console, click Options.
    2. In Update Files and Languages, click the Update Files tab.
    3. If you want to store updates in WSUS, select the Store update files locally on this server check box.

    To specify whether updates are downloaded during synchronization or when the update is approved

    1. In the left pane of the WSUS Administration console, click Options.
    2. In Update Files and Languages, click the Update Files tab.
    3. If you want to download only metadata about the updates during synchronization, select the Download updates to this server only when updates are approved check box.

    To specify language options

    1. In the left pane of the WSUS Administration console, click Options.
    2. In Update Files and Languages, click the Update Languages tab.
    3. In the Advanced Synchronization Options dialog box, under Languages, select one of the following language options, and then click OK.
    4. Select Download updates only in these languages: This means that only updates targeted to the languages you select will be downloaded during synchronization.

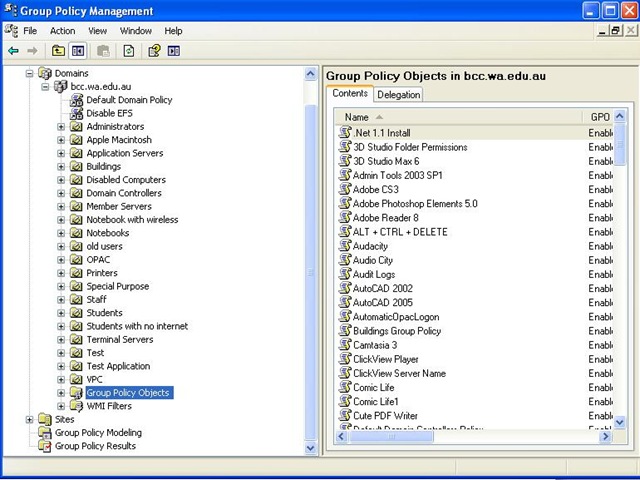
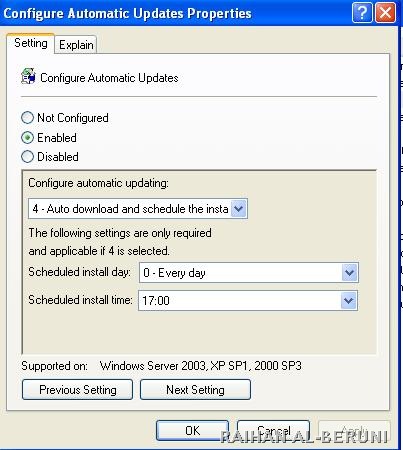
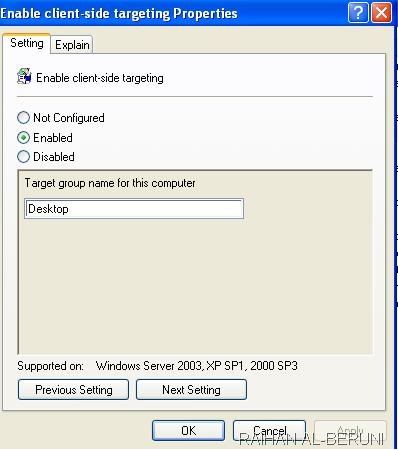
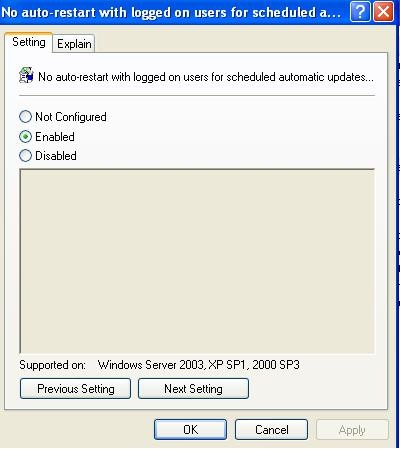
    How to configure automatic updates by using Group Policy
    Log on to Domain Controller using Administrative Privilege. Open GPO management Console>Select Organisational unit>Right client>create and link a new GPO> Name it as WSUS policy>right click>Edit. Go to Computer Configuration\Administrative Templates\Windows Components\Windows Updates\
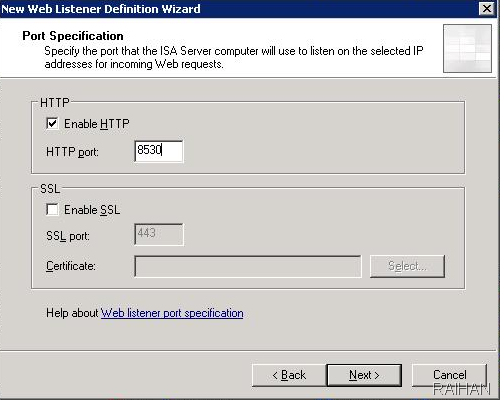
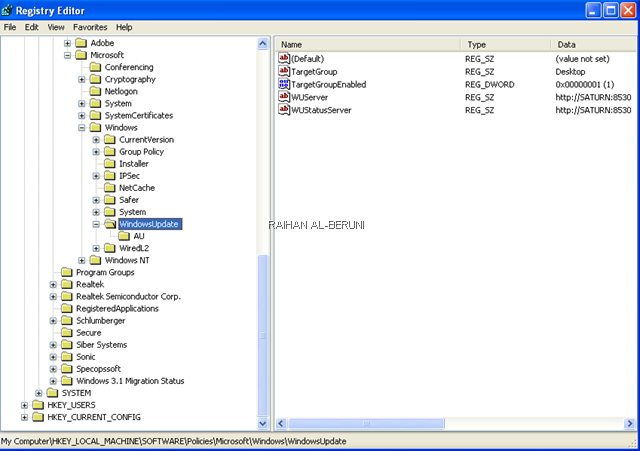
    Now Specify Client target group, Intranet update server location i.e. http://servername:8530 , update schedule, installation schedule.
    To set up a DFS share
    Note:This DFS share will be used by all front end WSUS servers.

    1. Go to Start, point at All Programs, point at Administrative Tools, and click Distributed File System.
    2. You will see the Distributed File System management console. Right-click the Distributed File System node in the left pane and click New Root in the shortcut menu.
    3. You will see the New Root Wizard. Click Next.
    4. In the Root Type screen, select Stand-alone root as the type of root, and click Next.
    5. In the Host Server screen, type the name of the host server for the DFS root or search for it with Browse, and then click Next.
    6. In the Root Name screen, type the name of the DFS root, and then click Next.
    7. In the Root Share screen, select the folder that will serve as the share, or create a new one. Click Next.
    8. In the last screen of the wizard, review your selections before clicking Finish.
    9. You will see an error message if the Distributed File System service has not yet been started on the server. You can start it at this time.
    10. Make sure that the domain account of each of the front-end WSUS servers has change permissions on the root folder of this share.

    Important! If you are using a DFS share, be careful when uninstalling WSUS from one but not all of the front-end servers. If you allow the WSUS content directory to be deleted, this will affect all the WSUS front-end servers.
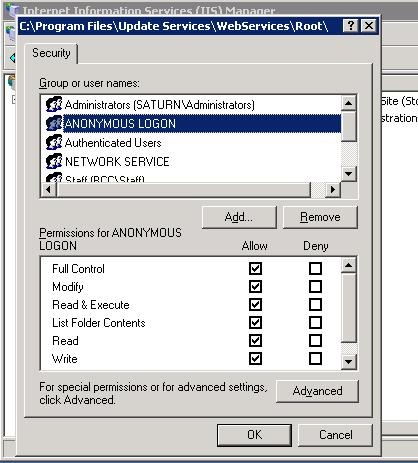
    To configure IIS for remote access on the front-end WSUS servers

    1. On each of the servers, go to Start, point at All Programs, point at Administrative Tools, and click Internet Information Services (IIS) Manager.
    2. You will see the Internet Information Services (IIS) Manager management console.
    3. Click the server node, then the Web Sites node, then the node for the WSUS Web site (either Default Web Site or WSUS Administration).
    4. Right-click the Content node and select Properties.
    5. In the Content Properties dialog box, click the Virtual Directory tab. In the top frame you will see The content for this resource should come from:
    6. Select A share located on another computer and fill in the UNC name of the share.
    7. Click Connect As, and enter the user name and password that can be used to access that share.
    8. Be sure to follow these steps for each of the front-end WSUS servers that are not on the same machine as the DFS share.

    To move the content directories on the front-end WSUS servers

    1. Open a command window.
    2. Go to the WSUS tools directory on the WSUS server:
      cd \Program Files\Update Services\Tools
    3. Type the following command:
      wsusutil movecontent DFSsharename logfilename
      where DFSsharename is the name of the DFS share to which the content should be moved, and logfilename is the name of the log file.

    To configure Network Load Balancing
    1. Enable Network load balancing

    • a) Click Start, then Control Panel, Network Connections, Local Area Connection, and click Properties.
    • b) Under This connection uses the following items, you may see an entry for Network Load Balancing. If you do not, click Install, then (on the Select Network Component Type screen) select Service, then click Add, then (on the Select Network Service screen) select Network Load Balancing, then OK.
    • c) On the Local Area Connection Properties screen, select Network Load Balancing, and then click OK.

    2. On the Local Area Connection Properties screen, select Network Load Balancing, and then click Properties.
    3. On the Cluster Parameters tab, fill in the relevant information (the virtual IP address to be shared among the front end computers, and the subnet mask). Under Cluster operation mode, select Unicast.
    4. On the Host Parameters tab, make sure that the unique host identifier is different for each member of the cluster.
    5. On the Port Rules tab, make sure that there is a port rule specifying single affinity (the default). (Affinity is the term used to define how client requests are to be directed. Single affinity means that requests from the same client will always be directed to the same cluster host.)
    6. Click OK, and return to the Local Area Connection Properties screen.
    7. Select Internet Protocol (TCP/IP) and click Properties, and then click Advanced.
    8. On the IP Settings tab, under IP addresses, add the virtual IP of the cluster (so that there will be two IP addresses). This should be done on each cluster member.
    9. On the DNS tab, clear the Register this connection’s addresses in DNS checkbox. Make sure that there is no DNS entry for the IP address


    ARM سپاسگزاری کرده است.

  15. #15
    نام حقيقي: 1234

    مدیر بازنشسته
    تاریخ عضویت
    Jul 2009
    محل سکونت
    5678
    نوشته
    5,634
    سپاسگزاری شده
    2513
    سپاسگزاری کرده
    272

    Best practice guide lines for WSUS installation, Configuration and Management

    کد:
    http://araihan.wordpress.com/2010/02/26/wsus-best-practice-guide-lines-to-optimize-wsus-installation-configuration-and-management/

    Windows Server Update Services (WSUS) is highly important services in a Microsoft infrastructure. WSUS provides automated delivery of service packs, hot fixes and update rollups to desktops and servers and keep them up to date. When you configure WSUS in an enterprise you have to consider maximum benefits you can get it from using minimum bandwidth and resources. However, you must provide WSUS server enough resources to run in optimum conditions and deliver up to the expectation over the years. Capacity Planning

    Capacity planning is the step 1 before deploying WSUS in an enterprise. There are number of factors you have to consider before deploying WSUS. The following hardware and database requirements are driven by the need of an organization.

    1. Number of clients and servers
    2. Frequency of update delivery
    3. Single server or multiple server deployment

    Minimum requirements:

    1. CPU – Minimum 1 GHz, 1.5 GHz or faster is recommended
    2. RAM – Minimum 1 GB, 2 GB or more is recommended
    3. Both the system partition and the partition on which you install WSUS 3.0 SP2 must be formatted with the NTFS file system
    4. Minimum 1 GB of free space on the system partition
    5. Minimum 2 GB of free space on the volume on which database files will be stored
    6. Minimum 20 GB of free space on the volume on which content is stored, 30 GB is recommended
    7. Notice that WSUS 3.0 SP2 cannot be installed on compressed drives.
    8. Database – internal or SQL Express

    But with this minimum hardware, WSUS server will not perform well when content and Data base log start growing. Recommended Systems that supports up to 25k clients:

    1. CPU- Intel Core 2 or Quad or Xeon
    2. RAM – 4GB
    3. Disk – at least 50 GB or more free space in Systems partition and 150GB or more disk space for WSUS content in separate partitions or DFS.
    4. Database – SQL Remote database or local SQL Express 2005 or later
    5. Windows Server 2003 (x64 or X86) or Windows Server 2008
    6. un-compressed NTFS Partitions

    Bandwidth Management

    WSUS is a bandwidth hungry systems in whole infrastructure. The decisions you make about how to synchronize with Microsoft Update have a dramatic effect on the efficient use of bandwidth. Set Synchronization schedule and download option when update is approve. To do this log on to WSUS front end Server as an administrator.
    Start menu>Administrative Tools>WSUS>Update Services>Options>Synchronization Schedule
    ►Set Synchronisation schedule on later at night when nobody is at work.
    Start menu>Administrative Tools>WSUS>Update Services>Options>Update Files and Languages
    ►Set download files to this server only when update is approved
    ►Download update only in these languages (check preferred language)
    In a chain of WSUS servers (head office and branch office deployment) , WSUS automatically sets all downstream servers to use the deferred download option that is selected on the highest upstream server—in other words, the server that is directly connected to Microsoft Update. I would recommend not to use express installation option because this will download larger files then preferred download.
    Update Delivery: To manage bandwidth of internal networks, it’s better to deliver update based on internal network uses i.e. set update time when there will be no bottle neck in internal infrastructure.
    Firewall Management

    You have to configure the firewall (ISA or Forfront) that is positioned between Front End WSUS and the Internet to allow WSUS traffic pass through. Because WSUS initiates and synchronize with Microsoft update using port 80 and 443. there is no need to configure Windows Firewall on the WSUS server or Windows client. Only you have to allow WSUS server connect the following websites .
    کد:
    http://windowsupdate.microsoft.com 
     http://*.windowsupdate.microsoft.com 
     https://*.windowsupdate.microsoft.com 
     http://*.update.microsoft.com 
     https://*.update.microsoft.com 
     http://*.windowsupdate.com 
     http://download.windowsupdate.com
     http://download.microsoft.com 
     http://*.download.windowsupdate.com 
     http://wustat.windows.com 
     http://ntservicepack.microsoft.com


    Group Policy Management

    Managing GPO for WSUS client is easy. But you must not modify Default Domain Controller GPOs to add WSUS settings. After you set up a client computer, it will take a few minutes before it appears on the Computers page in the WSUS console. For client computers configured with an Active Directory-based GPO, it will take about 20 minutes after Group Policy refreshes (that is, applies any new settings to the client computer). By default, Group Policy refreshes in the background every 90 minutes, with a random offset of 0–30 minutes. For Windows XP SP2 and Windows Server SP2, you don’t need load administrative template of windows update in GPO.
    To configure the behaviour of Automatic Updates
    1. In the Group Policy Object Editor, expand Computer Configuration, expand Administrative Templates, expand Windows Components, and then click Windows Update. 2. In the details pane, click Configure Automatic Updates.
    3. Click Enabled and select one of the following options:

    • Set Auto download and schedule the install. If Automatic Updates is configured to perform a scheduled installation, you must also set the day and time for the recurring scheduled installation.

    4. Click OK.
    To redirect Automatic Updates to a WSUS server
    1. In the Group Policy Object Editor, expand Computer Configuration, expand Administrative Templates, expand Windows Components, and then click Windows Update. 2. In the details pane, click Specify Intranet Microsoft update service location.
    3. Click Enabled and type the HTTP URL of the same WSUS server in the Set the intranet update service for detecting updates box and in the Set the intranet statistics server box. For example, type http//WSUS:8530 in both WSUS server stat server.
    4. Click OK.
    To reschedule Automatic Update scheduled installation
    1. In the Group Policy Object Editor, expand Computer Configuration, expand Administrative Templates, expand Windows Components, and then click Windows Update. 2. In the details pane, click Reschedule Automatic Update scheduled installations, click Enabled, and type the number of minutes to wait.
    3. Click OK.
    Database Management

    I would prefer to install SQL Express version with Management studio Express because it free and serve my purpose. So no to Windows Internal Database (WID). SQL Express will deliver optimum performance. For large scale deployment you can create separate SQL database server and use remote database in all front end servers. The WSUS database i.e. Server\SUSDB stores the following types of information:

    1. WSUS server configuration information
    2. Metadata that describes each update
    3. Information about client computers, updates, and client interaction with updates

    Set Proper security in SUSDB as shown below

    Backup SUSDB regularly to save all config and client info as shown below.

    Cleanup WSUS Server

    You have to clean up WSUS server on and off to remove expired updates, downloads and computers. you can freed up storage by running clean up wizard. To run clean up wizard, Log on the WSUS server. Go to Start menu>Administrative Tools>WSUS SP2>Update Services>Options>Server Clean Up Wizard>Check Specific Options you want>Next>Finish.
    Management of WSUS server

    WSUS supports deployments in both central and distributed management models. Centre Management means Front End WSUS server placed in head office will manage everything including update approval, database and also facing proxy and windows update. Rest of WSUS servers are place in branches and replicating main WSUS server. Distributed WSUS means every WSUS server placed in branch and head office works independently.
    The WSUS 3.0 SP2 administration console installed in Admin PC can be used to manage any WSUS server or Front End WSUS server placed in head office. WSUS can be managed from one of the following supported operating systems: Windows Server 2008 R2, Windows Server 2008, Windows Server 2003 SP2 or later, Windows Small Business Server 2008 or 2003, Windows Vista, or Windows XP SP3. Also prerequisite must be installed.

    1. Microsoft .NET Framework 2.0 or later
    2. Microsoft Management Console 3.0
    3. Microsoft Report Viewer Redistributable 2008

    To open the WSUS administration console
    1. Click Start, point to Control Panel, point to Administrative Tools, and then click Windows Server Update Services 3.0 Sp2. 2. If you are bringing up the remote console for the first time, you will see only Update Services in the left pane of the console.
    3. To connect to a WSUS server, in the Actions pane click Connect to Server.
    4. In the Connect To Server dialog box, type the name of the WSUS server and the port 8530 on which you would like to connect to it.
    5. If you wish to use SSL to communicate with the WSUS server, select the Use Secure Sockets Layer (SSL) to connect to this server check box. In this case use port 8531.
    6. Click Connect to connect to the WSUS server.
    7. You may connect to as many servers as you need to manage through the console.
    Related References:
    Minimum Systems Requirement Guide
    Prerequisite software
    Install and configure WSUS SP2— Step by Step
    IIS Planning


    ARM، parviz_p_t، mory_relax و 1 نفر دیگر سپاسگزاری کرده‌اند.

کلمات کلیدی در جستجوها:

1

نصب و راه اندازی wsus

wsus

6Content synchronization failed. Reason: Cannot open database SUSDB requested by the login. The login failed.2an error occurred trying to connect the wsus serverمراحل راه اندازی wsus در ویندوز 2008r2راه اندازی wsusروش wsusنصب wsusراه اندازی wsus serverwsus update rule list3نحوه تنظیم wsusstep by step guide to install wsus 3.0 sp2 by default with sccm 2010 rtmadd sottorete wsuswsusutil fatal error you must be an administrator to use this commandBackground Intelligent Transfer Serviceنحوه نصب wsusconfiguration synchronisation wsus 3.0 sp2 isa 2006دسترسی wsus read34how do you add host header to default website for WSUS 3.0 SP2REG ADD HKLMSOFTWAREPoliciesMicrosoftWindowsWindowsUpdateAU v ScheduledInstallTime t REG_DWORD d 0000000d f

برچسب برای این موضوع

مجوز های ارسال و ویرایش

  • شما نمی توانید موضوع جدید ارسال کنید
  • شما نمی توانید به پست ها پاسخ دهید
  • شما نمی توانید فایل پیوست ضمیمه کنید
  • شما نمی توانید پست های خود را ویرایش کنید
  •