Internet Connection Settings (wireless connection)
This setting is available only on PS3™ systems that are equipped with the wireless LAN feature.
Set the method for connecting the system to the Internet. Internet connection settings vary depending on the network environment and the devices in use. The following procedure describes a typical setup when connecting to the Internet wirelessly.
1.
Check that the settings for the access point have been completed.
Check that there is an access point connected to a network with Internet service near the system. Settings for the access point are typically set using a PC. For details, contact the person who set up or maintains the access point.
2.
Confirm that an Ethernet cable is not connected to the PS3™ system.
3.
Select

(Network Settings) under

(Settings) in the home menu.
4.
Select [Internet Connection Settings].
Select [Yes] when a confirmation screen is displayed stating that you will be disconnected from the Internet.
5.
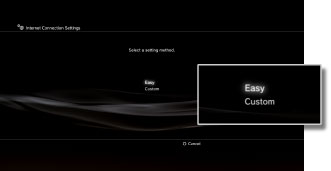
Select [Easy].
6.
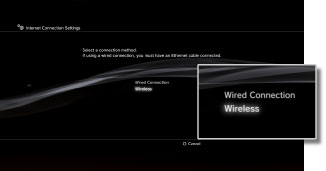
Select [Wireless].
7.
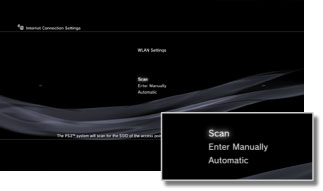
Select [Scan].
A list of access points within the range of the PS3™ system is displayed.
Depending on the model of PS3™ system in use, you may have the option [Automatic]. Select [Automatic] when using an access point that supports automatic setup. If you follow the on-screen instructions, the necessary settings will be completed automatically. For information on access points that support automatic setup, contact your local retailer.
8.
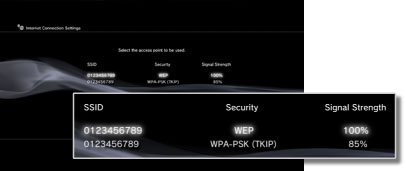
Select the access point that you want to use.
An "SSID" is an identification name assigned to an access point. If you do not know which SSID you should use or if an SSID is not displayed, contact the person who set up or maintains the access point for assistance.
9.
Check the SSID for the access point.
10.
Select the security settings that you want to use.
The types of security settings vary depending on the access point. Contact the person who set up or maintains the access point for information on which setting to select.

11.
Enter the encryption key.
The encryption key is displayed as a series of [*]. If you do not know the encryption key, contact the person who set up or maintains the access point for assistance.

When you have finished entering the encryption key and have confirmed the network configuration, a list of settings will be displayed.
Depending on the network environment, additional settings for PPPoE, proxy server or IP address may be required. For details on these settings, refer to the information from your Internet service provider or the instructions supplied with the network device.
12.
Save your settings.
13.
Test the connection.
If you select [Test Connection], the system will attempt to connect to the Internet.
14.
Confirm the connection test results.
If a successful connection has been made, information on the network will be displayed.
Hints
- If the connection fails, follow the on-screen instructions to check your settings. Also refer to the information from your Internet service provider and the instructions supplied with the network device in use.
- If you test the connection immediately after selecting [Automatic] > [AOSS™] in step 7, the router settings may not be completed and the connection may fail. Wait approximately 1 or 2 minutes before testing the connection.
------------------------------------------------------------------------------------------------------------------------------------
Internet Connection Settings (advanced settings)
If you are unable to connect to the Internet with basic settings, change your settings as necessary. Adjust each item as necessary for your particular network environment.
1.
Select
(Network Settings) under
(Settings) in the home menu.
2.
Select [Internet Connection Settings].
Select [Yes] when a confirmation screen is displayed stating that you will be disconnected from the Internet.
3.
Select [Custom].
Adjust each item as necessary for the network environment in use. The items displayed vary depending on the settings you have selected.
Connection Method
Set the method for connecting to the Internet. This setting is available only on PS3™ systems that are equipped with the wireless LAN feature.
Wired Connection Make a wired connection using an Ethernet cable Wireless Make a wireless connection via a wireless LAN
WLAN Settings
Set the SSID of the access point. This setting is available only on PS3™ systems that are equipped with the wireless LAN feature.
Scan Scan for a nearby access point.
Select this setting when you do not know the SSID of the access point. The system will detect nearby access points and display information on the SSID and security settings. Enter Manually Specify the access point by entering its SSID manually using a keyboard.
Select this setting when you know the SSID. Automatic Use the automatic setting feature of the access point.
This setting is available only in regions where PS3™ systems that support this feature are sold. Select this setting when using an access point that supports automatic setup. Follow the on-screen instructions.
WLAN Security Setting
Set an encryption key for an access point. This setting is available only on PS3™ systems that are equipped with the wireless LAN feature.
None Do not set an encryption key. WEP Set an encryption key.
The encryption key can be entered on the next screen. The encryption key is displayed as a series of asterisks. WPA-PSK / WPA2-PSK
Authentication Setting
These settings are available only on PS3™ systems sold in Korea and are available only on PS3™ systems that are equipped with the wireless LAN feature.

None Do not set authentication information. EAP-MD5 Set authentication information when using public WLAN services.
Enter your user ID and password on the next screen. For details, refer to the information supplied by the public WLAN service provider.
Ethernet Operation Mode
Set the Ethernet data transfer rate and operation method. Usually select [Auto-Detect].

Auto-Detect Automatically set basic settings. Manual Settings Manually adjust the Ethernet data transfer rate and operation method.
IP Address Setting
Set the method for obtaining an IP address when connecting to the Internet.
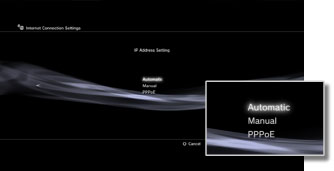
Automatic Use the IP address allocated by the DHCP server.
You can enter the DHCP server host name on the next screen. Manual Set the IP address manually.
You can enter values for the IP address, subnet mask, default router and primary and secondary DNS on the next screen. PPPoE Connect to the Internet using PPPoE.
You can enter your user ID and password on the next screen.
DHCP
Set the DHCP host name. Usually select [Do Not Set].

Do Not Set Do not set the DHCP host name. Set Set the DHCP host name.
DNS Setting
Set the DNS server.

Automatic Automatically acquire the DNS server address. Manual Manually enter the DNS server address.
MTU
Configure the MTU value used when transmitting data. Usually select [Automatic].

Automatic Automatically set the MTU value. Manual Specify the maximum size of data packets (in bytes) that can be sent in one transmission.
Proxy Server
Set the proxy server to be used.

Do Not Use Do not use a proxy server. Use Use a proxy server.
You can enter the proxy server address and port number on the next screen.
UPnP
Set to enable or disable UPnP (Universal Plug and Play).

Enable Enable UPnP. Disable Disable UPnP.
Hint
If set to [Disable], communication with others may be restricted when using the voice / video chat feature or communication features of games.
--------------------------------------------------------------------------------------------------------------------------------------------------
Settings >
Network Settings > Internet Connection Test
Internet Connection Test
Test the Internet connection and view the results.
Obtain IP Address Check whether an IP address has been obtained. Internet Connection Check whether a connection to the Internet has been established. PlayStation®Network* Check whether you are able to sign in to PlayStation®Network. UPnP* Check the status of UPnP (Universal Plug and Play).
Available: You can use UPnP.
Not Available: You cannot use UPnP.
Disabled: UPnP has been disabled in the network settings of the PS3™ system. NAT Type* Check how the PS3™ system is connected to the Internet. This information can be used to judge the ease or difficulty of connecting to other PS3™ systems when using voice / video chat or the communication features of games.
Type 1: Connected directly to the Internet
Type 2: Connected to the Internet via a router
Type 3: Connected to the Internet via a router
With type 3, it may not be possible to communicate with other PS3™ systems, and voice / video chat and the communication features of games may be restricted. In this case, see [
Connecting to PlayStation®Network] in this guide. Connection Speed (Download) Check the connection speed at which the PS3™ system downloads data from the Internet. Connection Speed (Upload) Check the connection speed at which the PS3™ system uploads data to the Internet, such as transmission of a message. * Displayed only if a PlayStation®Network account has been created.
Hints
- If [Failed] is displayed for [Obtain IP Address] or [Internet Connection], follow the on-screen instructions to check the network settings. You can adjust network settings under (Settings) > (Network Settings) > [Internet Connection Settings]. For details on the required settings, refer to the information from your Internet service provider or the instructions supplied with the network device.
- You can create a PlayStation®Network account under
 (PlayStation®Network) >
  (Sign Up for PlayStation®Network).
 - If [None] is displayed for [UPnP], either the network device in use does not support UPnP or UPnP may be disabled in your network settings. For more information, refer to the instructions supplied with the network device.
- If [Type 3] is displayed under [NAT Type], the PS3™ system or the network device may not be enabled to use UPnP. Check the [UPnP] item.
- A router is a device that allows multiple devices to connect to a single Internet line.
Connecting to PlayStation®Network
When using PlayStation®Network in an office or a housing complex, security features such as a firewall may block the communications. In this case, refer to the following instructions.
In PlayStation®Network, you can communicate with PlayStation®Network servers on the Internet or directly with other PS3™ systems. Communication with PlayStation®Network servers on the Internet is done mainly when:
- Signing in / signing out
- Using your Friends list or block list
- Exchanging messages
- Using
 (PlayStation®Store)
The port numbers for PlayStation®Network servers used for this are TCP: 80, 443, 5223 and UDP: 3478, 3479.
For voice / video chat and online game play, direct communication with other PS3™ systems is used for data transmission during voice / video chat and online gaming. The port number used for this is UDP: 3658. However, you may need to use a different port number when you are connected using a NAT router.
Hints
- When you are using a router, direct communication with other PS3™ systems may be restricted depending on the type of router and its settings. When using a UPnP-compatible router, enable the UPnP feature.
- Communication may be restricted by routers and security functions provided by Internet service providers. Refer to the instructions supplied with the network device and the information from your Internet service provider.
-----------------------------------------------------------------------------------------------------------------------------------------------
Media Server Connection
Adjust settings for the connection to devices that support DLNA.
Enable Enable connection to devices that support DLNA. Disable Disable connection to devices that support DLNA.
About DLNA
DLNA (Digital Living Network Alliance) is a standard that enables digital devices such as personal computers, digital video recorders, and TVs to be connected on a network and to share data that is on other connected, DLNA-compatible devices.
DLNA-compatible devices serve two different functions. "Servers" distribute media such as image, music, or video files, and "clients" receive and play the media. Some devices perform both functions. Using a PS3™ system as a client, you can display images, or play music or video files that are stored on a device with DLNA Media Server functionality over a network.
 Connecting the PS3™ system and DLNA Media Server
Connect the PS3™ system and DLNA Media Server using a wired or wireless connection.
Example when connecting to a personal computer using a wired connection
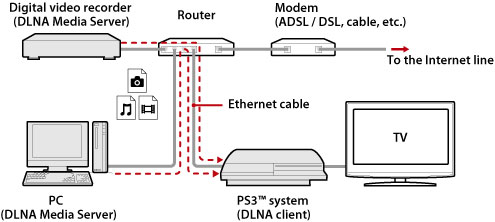 Example when connecting to a personal computer using a wireless connection
 Setting up a DLNA Media Server
Set up the DLNA Media Server so that it can be used by the PS3™ system. The following devices can be used as DLNA Media Servers.
- Devices that support the DLNA standard, including products of companies other than Sony
- Microsoft® Windows® XP or Microsoft® Windows Vista™ personal computers with Windows Media® Player 11 installed
When using an AV device as a DLNA Media Server
Enable the DLNA Media Server function of the connected device to make its content available for shared access. The setup method varies depending on the connected device. For details, refer to the instructions supplied with the device.
When using a Microsoft® Windows® personal computer as a DLNA Media Server
A Microsoft® Windows® personal computer can be used as a DLNA Media Server by using Windows Media® Player 11 functions.
1.
Start Windows Media® Player 11.
2.
Select [Media Sharing] from the [Library] menu.
3.
Check [Share media].
4.
From the list of devices under the [Share media] checkbox, select the devices that you want to share data with, and then select [Allow].
5.
Select [OK].
Setup for the DLNA Media Server is completed.
Hints
- Windows Media® Player 11 is not installed by default on a Microsoft® Windows® personal computer. Download the installer from the Microsoft® Web site to install Windows Media® Player 11.
- For details about how to use Windows Media® Player 11, refer to the Windows Media® Player 11 Help feature.
- In some cases, original DLNA Media Server software may be installed on the personal computer. For details, refer to the instructions supplied with the computer.
Playing DLNA Media Server content
When you turn on the PS3™ system, DLNA Media Servers on the same network are automatically detected and icons for the detected servers are displayed under

(Photo),

(Music), and

(Video).
1.
Select the icon of the DLNA Media Server that you want to connect to under
(Photo),
(Music), or
(Video) in the home menu. All available folders and files that can be played by the PS3™ system will be displayed.

2.
Select the file that you want to play.
Hints
- The PS3™ system must be connected to a network. For details on network settings, see (Settings) > (Network Settings) > [Internet Connection Settings] in this guide.
- When the method of allocating IP addresses has been changed from AutoIP to DHCP under the settings for the network environment, perform another search for servers under
 (Search for Media Servers).
 - The DLNA Media Server icon is only displayed when [Media Server Connection] is enabled under (Settings) > (Network Settings).
- The folder names that are displayed vary depending on the DLNA Media Server.
- Depending on the DLNA Media Server, some files may not be playable or operations that can be performed during playback may be restricted.
- You cannot play copyright-protected content.
- File names for data that is stored on servers that are not compliant with DLNA may have an asterisk appended to the file name. In some cases, these files cannot be played on the PS3™ system. Also, even if the files can be played on the PS3™ system, it might not be possible to play the files on other devices.
Searching for DLNA Media Servers manually
You can initiate a search for DLNA Media Servers on the same network. Use this feature if no DLNA Media Server is detected when the PS3™ system is turned on.
Select
(Search for Media Servers) under
(Photo),
(Music) or
(Video). When the search results are displayed and you return to the home menu, a list of DLNA Media Servers that can be connected will be displayed.
 Hint
Hint
(Search for Media Servers) is only displayed when [Media Server Connection] is enabled in
(Network Settings) under
(Settings).

 28سپاس
 LinkBack URL
 About LinkBacks

 (Users) on the PS3™ system.
 (Remote Play Settings) from
  (Turn Off System) from
  (Network) >
  (Remote Play) > [Using remote play] in this guide.


