کد:
http://sqlblog.com/blogs/john_paul_cook/archive/2008/03/23/using-wireless-with-hyper-v.aspx
For those of us who do demos on laptops, Hyper-V provides great performance but no wireless capability. You simply can't bind a Hyper-V virtual machine to a wireless adapter, but you can implement a workaround in just a few minutes. There are three options. One option is to use Internet Connection Sharing (ICS, see Ben Armstrong's blog
Using Hyper-V with a Wireless Network Adapter - Virtual PC Guy's WebLog - Site Home - MSDN Blogs). ICS imposes a restriction that seems too inconvenient to me. It requires an IP address of 192.168.0.1, which is also the default address for many NAT routers. Although it is possible to change the NAT router's address, there are always networks you're not allowed to reconfigure. A second option is to use Routing and Remote Access Service (RRAS, see Ken Schaefer's blog
Ken Schaefer : Windows Hyper-V and Wireless adapters - using RRAS (Routing and Remote Access Service)). RRAS offers the flexibility of being able to change the IP address it uses to avoid conflicts. It requires the most steps but it can still be configured in under 10 minutes. The third option, which was suggested by a reader, is to bridge network connections. It's simple and quick to implement. My personal recommendation is to use RRAS.
Ken described the steps in written form. After explaining this in person to several people, I'm providing the screen captures so you can see exactly what you need to do for implementing either a network bridge or RRAS. The initial steps are the same for both.
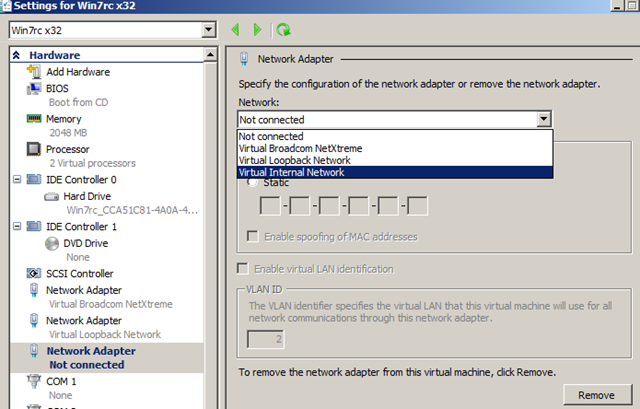
You'll need to bind your virtual machines to an internal only virtual network adapter. Use the Virtual Network Manager in Hyper-V to accomplish this. Notice a meaningful name of
Virtual Internal Network was specified, which is referenced in the next step. This step is necessary for both RRAS and bridging network connections.

To implement RRAS or a network bridge, go to
Manage network connections to configure the network adapter. Notice that in this example, the
Virtual Internal Network name from the previous step appears under
Local Area Connection 3.

Select
Internet Protocol Version 4 (TCP/IPv4) and click the
Properties button. This is the same for both RRAS and a network bridge.

To implement a network bridge, configure the virtual network adapter to use DHCP.
To implement RRAS, assign a static IP address on a different subnet than the one the wireless adapter is connecting to. The wireless adapter is connecting to a 192.168.0.x network, so
192.168.1.1 is specified to provide a different subnet for the virtual machines.

 DHCP for Network Bridge Static IP for RRAS
To implement a network bridge, select both the virtual network adapter and the wireless adapter. Right-click and select
Bridge Connections.

Your virtual machines bound to this bridged network adapter can use the wireless network adapter but they will not be able to access the host partition (physical computer) because of Windows Firewall. If you need your child partitions to have full connectivity to the parent partition, you'll need to change your Windows Firewall settings. On the
Advanced tab, uncheck the network bridge to allow communication between the parent and child partitions. This is similar to what is shown in the last screen capture in this post.
To implement RRAS, add the RRAS role to your Hyper-V server. In the Server Manager, right-click
Roles and select
Add Roles.

A wizard will appear. Click Next to advance to the dialog box shown below. Check the box for
Network Policy and Access Services and then click
Next.

You'll see a dialog box with no options. Click Next to advance to the following dialog box. Check the box for
Routing and Remote Access Services. Be sure the two checkboxes underneath it are checked and click
Next.

Click the
Install button to install RRAS. When the installation finishes, click the
Close button.

Once RRAS is installed, use the Server Manager to configure it. Right-click on
Routing and Remote Access and select
Configure and Enable Routing and Remote Access.

Select
Network address translation (NAT) and click
Next.

Select your wireless network adapter and click
Next.

Select the network interface you assigned the static IP address to and click Next.

Select
Enable basic name and address services and click
Next.

Click
Next and then click
Finish on the screen that follow.

At this point, your virtual machine (called the child partition in Hyper-V parlance) has network connectivity, but not to the host physical machine (called the parent partition). If you want to enable child partition network access to the parent partition, you'll need to configure exceptions in Windows Firewall or disable it completely on the virtual network adapter used by your virtual machines.

Keep in mind that what was disabled here is the firewall on the internal network connection. The virtual machines are being routed to the network using the wireless adapter which is still protected by Windows Firewall
But
کد:
http://jimblizzard.wordpress.com/2009/06/02/quick-hit-wireless-network-and-hyper-v/
After creating the network bridge as described in John’s post, add that bridge to the VM’s settings in Server Manager as shown below:
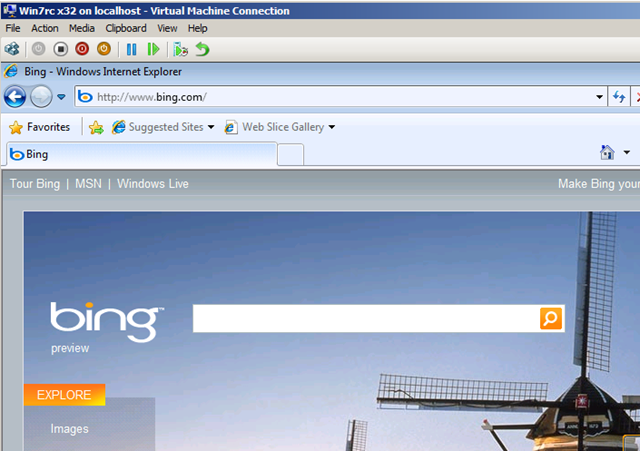
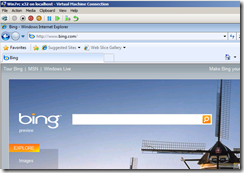
Once you do that, when you start your Hyper-V VM you’ll be able to connect to the internet using your wireless network.
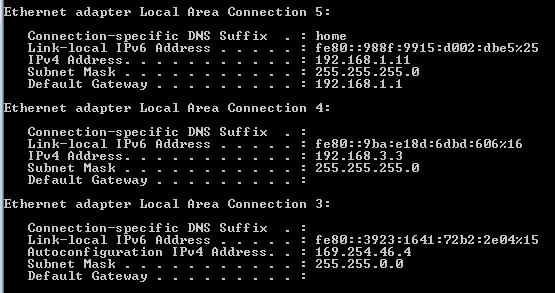
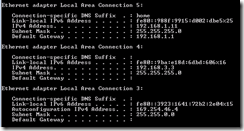
Within my VM, as shown below,
- LAN Connection 5 is for the wireless network adapter.
- LAN Connection 4 is for the loopback adapter.
- LAN Connection 3 is for the wired network adapter (which is not plugged in).
And it works:

 LinkBack URL
 About LinkBacks