PART1
Now that Office Communications Server (OCS) 2007 R2 is RTM, and that I have already created an article series on how to deploy OCS R2 Enterprise Edition Front End Servers and Edge Servers
here, I thought it would be nice to create an article on how to deploy a Group Chat Server with Compliance which is connected to an x64 SQL Server 2008 RTM Back-End Server.
This article series is to guide you through the entire OCS Group Chat deployment process from scratch. Part1 will include the necessary pre-work that is required in order to begin the installation states of the Chat Server. This includes:
- Creating our SQL Database
- Creating our Group Chat Services and assigning the necessary permissions on SQL and our Group Chat Server
Group Chat OCS 2007 R2 Server Installation
When installing OCS R2 Group Chat and running the setup executable, you will be asked to install several pieces of software to prepare the environment.
You will be asked to install the Microsoft Visual C++ 2008 Redistributable. Click
Yes to
Continue.
You will then be asked to install the Microsoft .NET Framework 3.5. Click
Yes to
Continue.

You will then be asked to install the Microsoft Unified Communications Managed API 2.0 Core Redist 64-bit version. Click
Yes to
Continue.

Once Microsoft Unified Communications Managed API 2.0 , you will be presented with the Welcome screen which will begin the installation process. Click
Next to
Continue.
The next screen is the licensing screen. Make sure you fully read the entire agreement! Once you have done so (and I know you will, right?) Click
Next to
Continue.
Enter your Username and Company information. Click
Next to
Continue.
Enter the installation path you want the binaries installed to. Click
Next to
Continue.
When the feature screen appears, you have 2 choices which are both selected at the same time. Keep in mind, that you must disable one of the options. You cannot have both the Chat Server and the Compliance Server collocated on the same box. Make sure the Chat Server is selected and the Compliance Server is not selected. We will be installing the Compliance Service in the next Part. Click
Next to
Continue.

Confirm your installation. Click
Next to
Continue.
Installation is ready to proceed. Click
Next to
Continue.

During the installation, you will see the Server Configuration wizard appear. Because we chose the Chat Server to be installed, you will see three Server/Service roles being installed:
- Lookup Server
- Channel Server
- Web Service
Click
Next to
Continue.

We now want to specify what SQL Instance we want to use. One thing to keep in mind is to take a look at the collocation technet article to see how databases can be collocated on the same SQL box. You can find this article
here. You can see the following databases can be on the same SQL Box:
- Archiving database
- Monitoring database
- Group Chat database
- Compliance database (for Group Chat)
One thing to keep in mind here, is that for each database, it requires its own instance. In the case of Group Chat database and the Compliance Database, the Compliance Database can be a dedicated database or it can be the same database as the Group Chat database. In Part 2, we will be using the Group Chat database as the Compliance database.
As you may recall from the OCS R2 Enterprise article series
here, we’re using a SQL 2008 x64 Back End. Make sure port 1433 is allowed inbound. Instructions on how to do this are documented in that article series.
Specify your Server\Instance and Database. As stated, I’m just using the default instance for everything since it’s a lab. Specify your settings accordingly. Click
Next to
Continue.

The next screen will just notify you that your databases are empty and that it will create the schema information. Click
Next to
Continue.
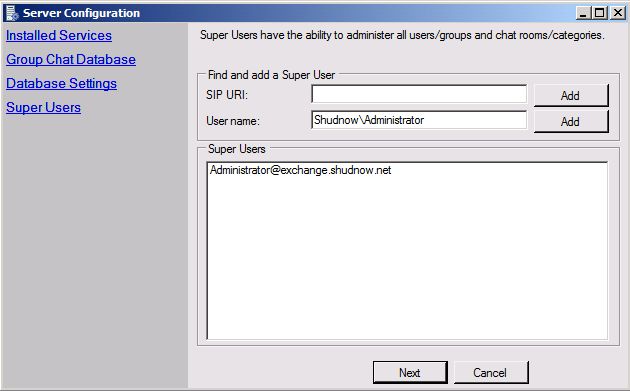
We will want to specify a Super User. It’s pretty obvious what this user is. It’s essentially the Administrator account in AD. The first time you create AD, you will log in with the Administrator account and start creating other Administrator accounts from there. The Super User is the same thing. Because this is a lab, I am using the Administrator account to manage everything. So in the User name field, I specified my Administrator account and clicked Add. Click
Next to
Continue.
Specify the name of your pool and the MTLS Certificate that will be used by your Group Chat Server. You will need to create this certificate beforehand by using LCSCMD, CertSRV website for an internal CA, or using the OCS Administrative Tools. Click
Next to
Continue.

Remember I said the Lookup Service is the one service that will be utilized across all Group Chat Servers and that it also needs to be SIP Enabled? Well now is the time to enter in the Lookup Service credentials and SIP information. Click
Next to
Continue.

Do the same for your Channel Service. Click
Next to
Continue.

On the next screen, we’ll be asked for our Compliance settings. Because this is the first Group Chat Server and we have not yet deployed our Compliance Server, we’ll leave these settings blank and re-visit the configuration later. Click
Next to
Continue.
Specify the directory that will be used for uploads to the Web Service. You will want to use a UNC path, especially if you’re using multiple Group Chat Servers. I created a shared folder called WebService. You will need to ensure your Channel Service has read/write to this share (both Share and NTFS permissions.) Click
Next to
Continue.

Review your settings. Click
Finish to
Continue. When finished installing, Click
Close.
You will want to ensure that Anonymous Authentication is enabled in IIS on your MGCWebService directory in your Default Web Site. After doing so, you will want to use your Channel Service account as the credentials used for Anonymous Authentication. It doesn’t have to be the Channel Account, but just an account that has RTCComponentUniversalServices permissions because the account needs to access the file repository and Message Queuing.
 Group Chat OCS 2007 R2 Administrative Tools
As most of the other client and administrative tools installations, I won’t go over the installation procedures as they’refairly straightforward. So go ahead and install the Administrative Console. I have installed it on our SHUD-PG1 Server which is the server we installed the Group Chat Server on.
Once installed, go to
Start >
Programs >
Microsoft Office Communications Server R2 >
Microsoft Office Communications Server R2, Group Chat Administration Tool
Once you open it, Group Chat Administration will always be set to do an Automatic Logon and use the existing signed on account.

You may have trouble getting this part to work properly. This is my 2nd time installing and getting Group Chat to work so I’ve went through the pain to get everything to work properly and seamlessly off the bat. The trick is, during Group Chat installation, you gave it a super user. You’ll want this to be your Administrator account you’re using to install Group Chat and the system that you will be loading the Administration Tool. Only a super user can load up the Administrative Tool. So if you set your Administrator account that you log onto which is also SIP enabled as the Super User, and are logged onto that account when loading up Administrative Tool, everything will just work.
If Automatic Configuration does not work, you can set the Account to Manual Configuration and manually configure the account to use for log-on, DC to use, etc…

You can now create new Chat Rooms on the left, add new Super Users, Chat Room Managers, etc..
Summary
Well folks, that is all for Part 2 of this article as well as the 2 part article series. Hopefully it helps you plan and deploy Group Chat.
Elan Shudnow

 1سپاس
1سپاس
 LinkBack URL
 About LinkBacks

