PART2
Welcome to Part 2 of this article series. In Part 1, we started off by preparing our servers in preparation for OCS Group Chat Installation. We created our services, created our SQL Database, and assigned permissions.
In this Part, I will go over the installation of our Group Chat Server and Administrative Tools.
Lab Setup
Guest Virtual Machines
There will be two new virtual machines being introduced into the same lab I set up for my OCS R2 Article series which is located
here. The same exact lab set up you see in that article series still exist in this lab environment. The only difference is one out of my two Domain Controllers is running Server 2008 R2 Beta. The Certificate Services Domain Controller is still running Server 2008.
Two new virtual machines will be introduced. Two Server 2008 Enterprise (Standard can be used) x64 (x64 required) Member Servers. One server will contain Group Chat and the other server will contain the Compliance Service. The Compliance Service requires a dedicated server; something I hope changes in the future. Both servers will contain a single NIC.
Assumptions
- You have a domain that contains at least one Server 2003 SP2 Domain Controller (DC)
- You have configured the IP settings accordingly for all servers to be on the same subnet. I have provided the IP scheme of my lab below, but this will vary depending on your needs and Virtualization Software configuration.
- You have at least SQL 2005 SP2 server installed. We will be using SQL 2008 installed on Server 2008 Enterprise.
- You have a copy of Office Communicator (OC) 2007 R2 Group Chat. We will be installing our copy of Group Chat client on our Exchange CAS.
Computer Names
OCS R2 Group Chat Server – SHUD-OCSPG1
OCS R2 Compliance Server – SHUD-OCSPG2
Configuration of OCS 2007 R2 Group Chat Server
Processor: 4
Memory: 512MB
Network Type -External NIC
Configuration of OCS 2007 R2 Compliance Server
Processor: 4
Memory: 512MB
Network Type -External NIC
IP Addressing Scheme (Corporate Subnet)
IP Address – 192.168.1.x
Subnet Mask – 255.255.255.0
Default Gateway – 192.168.1.1
DNS Server – 192.168.1.150 (IP Address of the Domain Controller/DNS Server)
Group Chat SQL Database Creation
We will be using the same database for both Group Chat Server as well as the Compliance Server. It is possible to use a different database for both, but the Compliance Server can also use the Group Chat database. We will utilizing a single database for both servers. So let’s go ahead and create our database.
Load up the SQL Management Studio and logon to your instance with someone who has the following permissions (I’m using the Administrator account since it’s a lab):
- Create Database
- Create any Database
- Alter Any database
Right-Click Databases and create a new database. I called it PG.

We must also ensure the database collation is set toSQL_Latin1_General_CP1_CI_AS by Right-Clicking our database, choosing Properties, going to the Options page, and choosing SQL_Latin1_General_CP1_CI_AS.
 Group Chat Service Accounts
Group Chat requires several services which will then need to be manually added to the Local Administrators group. These accounts then need to be added as SQL Server accounts and be assigned permissions to the SQL Database.
We will be creating 2 services. You will want to ensure that the Lookup Service is named OCSChat. The other services can be named anything you want. Another thing to note, is that if you have multiple Group Chat Servers, OCSChat will be used on all Group Chat Servers as the same Lookup Service needs to be used on all Group Chat Servers. The Channel Service is unique per server.

OCSChat requires a SIP enabled account. Because we will need to have an OCS R2 Front End environment already up and running, go ahead and SIP enable the account. As you can see, I have SIP Enabled this account.

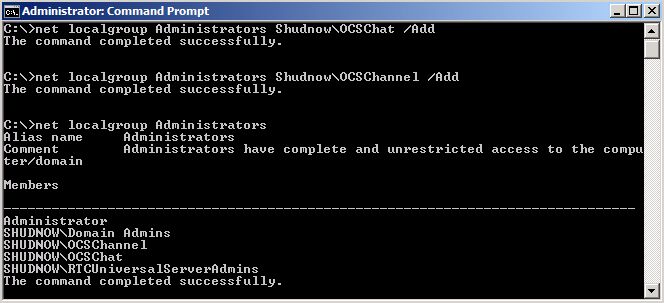
We need to add these two service accounts to our local Administrators group.
 SQL Server Accounts and Permissions
Let’s head back into SQL Server Management Studio. Under Security, we willRight-Clickand Create a new Login. Add both of our OCS Group Chat Service Accounts. As you can see, both OCSChat and OCSChannel have been added.

We will now need to Right-Click on each Service Account, choose Properties, and choose the User Mapping category. Select our PG database and assign the service account the role of db_owner. Do this for both service accounts; both OCSChannel and OCSChat.
 Summary
Well folks, that is all for Part 1 of this article. For Part 2, I will go through the OCS R2 Group Chat Server installation as well as the Administrative Tools.
Elan Shudnow

 1سپاس
1سپاس
 LinkBack URL
 About LinkBacks

