PART5
Welcome to Part 5 of this article series. So far in this article series, we have deployed an Enterprise Pool, configured our Pool, set up DNS, tested connectivity with Communicator 2007 R2, configured our ISA box, and prepared our Edge Servers.
In this Part, I will go through the part of the configuration of our Consolidated OCS Edge Server using a separate NIC for each Edge Role.
OCS 2007 R2 Edge Server Installation
When installing an OCS 2007 R2 Edge Server, you would perform the following steps:
Note: Edge Server should not be joined to your Corporate Active Directory.
- Install Files for Edge Server
- Activate Edge Server
- Configure Edge Server
- Configure Certificates for Edge Server
- Start Services
- Validate Edge Server
Install Files for Edge Server (Step 1)
To begin the Edge Server installation process, we can insert our OCS CD (Standard can be used for Edge). There are some prerequisites for installing OCS such as .Net Framework 3.5 SP1, but this is all taken care of during the installation.
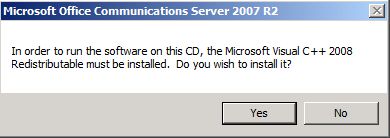
Insert the CD and let’s begin the installation process. You will be asked to install the Microsoft Visual C++ 2008 Redistributable. Click
Yes to
Continue.
You will then be asked to install the Microsoft .NET Framework 3.5 SP1. Click
Yes to
Continue.

Once Microsoft .NET Framework 3.5 SP1 is installed, you will be presented with the Deployment Wizard. We will want to deploy our Edge Server in a Consolidated fashion.. Click
Deploy Other Server Roles >
Deploy Edge Server to
Continue.
We are now on Step 1 which is to Install Files for Edge Server. Click
Install for
Install Files for Edge Server to
Continue after meeting the Prerequisites (being a local Administrator).

On the Welcome Screen, Click
Next to
Continue. After fully reading the License Agreement, if you agree, Select “
I accept the terms in the license agreement .” Click
Next to
Continue.
You will be asked for Customer Information such as Product Key, Name, and your Organization Name. Enter them appropriately. Click
Next to
Continue.
Enter the location you want your files to be installed. I chose the default location. Click
Next to
Continue.
You are now ready to start the Installation.
Once you completed the File Installation, you should see the Installation Interface update the Step 1 Status showing as Completed.
 Activate Edge Server (Step 2)
Click
Run for
Active Edge Serverto
Continue.

On the Welcome Screen, Click
Next to
Continue.
In OCS 2007 R1, you’d be prompted for what roles to install. In OCS 2007 R2, there are only Consolidated Edge Servers. Because of this, you will not be prompted for roles to install.
You will now be prompted to specify passwords for your Service Accounts. I recommend to use long secure passwords. You can view
this and
this site which assist in choosing strong passwords. You will have to do this for several Service Account: RTCProxyService
Once you have set a password, Click
Next to
Continue.

You are now ready to Activate your Edge Server. Review your Current Settings. After satisfied, Click
Next to
Continue.

When the Activation is finished, Click
Finish. You will be given the option to view the log which I advise you to do to ensure everything went OK.
Once you completed the Activation, you should see the Installation Interface update the Step 2 Status showing as Completed.
 Configure Edge Server (Step 3)
Click
Run for
Confingure Edge Server to
Continue.

On the Welcome Screen, you will be prompted with a warning recommending that you stop all OCS Services.

Go ahead and stop all services (mine were already stopped). Click
Next to
Continue.
The next screen asks us if we have a Configuration File to use. This file is great to use if we are deploying multiple Edge Servers that will be load balanced. For example, it would be useful if I was going to be deploying two Edge Servers behind a Hardware Load Balancer. I would configure my first Edge Server, and at the end of the configuration, it would ask me to export the configuration so I can import it on my second Edge Server. Nifty!
Because this is our first and only Edge Server, Click
Next to
Continue.

We must choose the Internal IP of our Edge Server as well as its’ FQDN. We are presented with the following options.

You may be wondering which IP to choose. Remember back in Part 4 we configured four NICs. One of these NICs was the Internal NIC which we configured as follows. We also configured a dedicated NIC and IP for each Edge Role. Here is a list of NIC Names, their associated Edge Role, and IPs associated with them

So in our Edge Configuration, we will want to choose 192.168.1.180 for our Internal NIC. We will also want to set the FQDN as shud-ocsedge01.shudnow.net (computername.domain.com). Because our server is not a domain member, we will need to manually add the DNS record in our Active Directory DNS due to the nature of Active Directory Secure DNS Zones only allowing domain members to add records to our zone. Click
Next to
Continue.

We now must configure the IPs and FQDNs for all three Edge Roles. You can refer to the Excel List above to determine what IPs are associated with which role.
When a client connects to the Access Edge Server, the Access Server will return the URLs needed for the client to successfully communicate with services in the OCS organization. For example, we will configure our Web Conferencing Edge Server to use webconf.exchange.shudnow.net. Exchange.shudnow.net is our Internet DNS Zone. So when a Live Meeting Client tries to connect to a web conference, our Access Edge will communicate with the client telling it the FQDN for the web conferencing edge. The same applies for the A/V Edge Server.
Enter in the IP Configuration and FQDN accordingly. Click
Next to
Continue.

We will want to use this Edge Server to allow anonymous users to join meetings as well as enable federation. If you plan on allowing your users to talk with public IM providers such as AOL, MSN, and Yahoo, select those features as you see fit.
Now let me explain why
Allow remote users to communicate with federated contacts is greyed out. It is possible to set up two Edge Servers and use one Access Edge for Remote User Access and another for Federation and Public IM connectivity. If you decide to do this, one one Access Edge you’ll disable Federation which will light up the currently greyed out option. On the second Access Edge, you’ll disable Remote User Access and enable Federation. Now keep in mind this is optional. Because we will be utilizing one Consolidated Edge Server, we can choose the options as follows which will enable Remote User Access, Federation, and Public IM Connectivity through our Consolidated Edge. Click
Next to
Continue.

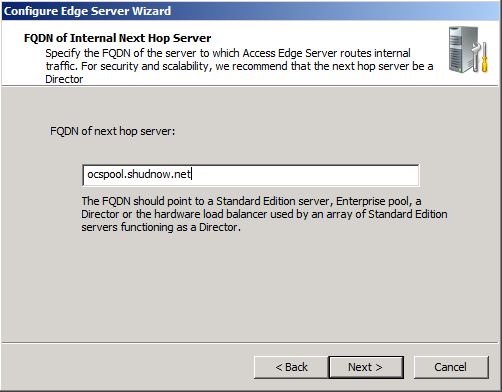
We want our Edge Server to be able to talk to the internal OCS Servers. We have a few options. If we are using a Standard Server as our next hop, we would enter the Standard Pool FQDN which would be the server’s FQDN. If we deployed a Director, we would enter the Director (or FQDN of hardware load balancer). Because we deployed an Enterprise Pool, we will use the FQDN of the Enterprise Pool. Enter the Enterprise Pool FQDN OCSPool.shudnow.net. Click
Next to
Continue.
Because our SIP Domain will be exchange.shudnow.net, that is what we will choose when specifying what our Authorized Internal SIP Domains are. Click
Next to
Continue.

We will then want to enter our internal OCS Pool Name for Authorized Internal Servers. If you have more than one Pool or Standard Edition Server, enter them here. Click
Next to
Continue.

You are now ready to Apply your Edge Server Configuration. Review your Current Settings. After satisfied, Click
Next to
Continue.

You are now ready to apply your configuration. Review your Current Settings. After satisfied, Click
Next to
Continue.
When the Configuration is finished, Click
Finish. You will be given the option to view the log which I advise you to do to ensure everything went OK. This is also where you’ll have the change to export your configuration if you’re deploying a second Edge Server for Hardware Load Balancing.
Once you completed the Configuration, you should see the Installation Interface update the Step 3 Status showing as Completed.
 Configure Certificates for Edge Server (Step 4)
Click
Run for
Configure Certificates for the Edge Serverto
Continue.

On the Welcome Screen, Click
Next to
Continue.
I’m going to skip through a lot of this section as it consists of how to obtian a Certificate which I already went through in Part 4 when we discussed configuring our ISA Server.
I will be obtaining three certificates. One is for our Internal NIC that consists of the FQDN of our Server (shud-ocsedge01.shudnow.net). The second certificate will consist of the names of our Access/Web external edge roles. The third certificate will be our A/V Authentication certificate.
Now you may be thinking, well, can’t I just use two certificates? One for internal and A/V edge. Well in our case, probably. If you have multiple servers, no. This is because each certificate for the internal interface will be unique due to the name of every server being different. The A/V Authentication name will be the same and exported/imported on multiple servers. Also, Microsoft considers it to be insecure by using the same certificate for both the Internal and A/V Authentication services.
Certificate One (Internal Interface):
CN = shud-ocsedge01.shudnow.net
Certificate Two (Access/Web Server Roles):
CN = sip.exchange.shudnow.net
SAN = sip.exchange.shudnow.net
SAN = webconf.exchange.shudnow.net
Note: Microsoft’s Official Support Policy requires you to have a separate certificate for each interface. A SAN certificate for both will work though.
Certificate Three (A/V Authentication)
CN = av.exchange.shudnow.net
Now keep in mind the reason the namespaces our different is because the internal NIC is connected to our internal infrastructure and will be utilized internally only. Because of that, we will be using our internal namespace that is also used as our default SIP routing domain. Our edge servers will be contacted using the external DNS namespace. If you are using split-DNS where your internal namespace is hosted on external DNS, you can use either namespace.
For purposes of this lab, I will obtain all certificates from our internal CA. Because our Edge Server is not a domain member, you have to ensure it contains the Root Certificate from our Internal CA. You will also have to submit the request, approve it, and submit the .cer file manually and import it manually due to our Edge server not being a domain member.
Note: In a production environment, you will be requesting your Access/Web Conferencing Certificates from a Third Party Vendor. Both your A/V Authentication and Internal Interface NICs will be provided by your Internal CA. The A/V Edge role doesn’t need an Internet Facing Certificate.
We will first choose to Create a new Certificate. One you have done this, you will want to make sure you select only your Edge Server Private Interface. Click
Next to
Continue.

You will want to go through the rest of the configuration which includes entering your Organization Name, Company Name, Etc… As I said, when you are at the screen which consists of what FQDN to use, you will use the CN of shud-ocsedge01.shudnow.net.

Once you are finished preparing the request, you will see the Step being partially finished. Click
Run again to
Continue.

You will now want to go through the motions of taking the .Cer file you obtained from your Certificate Authority and binding it to your request.
Follow this procedure with the remaining certificates. Refer to the certificate CN/SAN names above as to what entries should be on your certificate.
Your Access/Web Conferencing Edge Certificate request will look like:

Your A/V Certificate request will look like:

Once you completed the Certificate Configuration, you should see the Installation Interface update the Step 4 Status showing as Completed.
 Remaining Steps
I will not be going through the remaining steps. It consists of Starting Services and Validating your Configuration.
The only remaining steps are to enable users, configure federation, and enable your Front End Servers to talk with your Edge Servers. All this information is out of the scope of this article. If you are interested in doing this (and you will have to connect your Front End Servers to your Edge Servers), visit this site
here.
TIP: To adminster the Edge Server, type
Start >
Run >
Compmgmt.msc.
Summary
Well folks, that is all for not just Part 5, but the entire article series. Hopefully these articles have helped you understand more on how the deployment of OCS works. There is a lot more to the configuration of OCS and especially the deployment when you get into load balancing. Much more than what I went into. But hopefully the article gave you enough knowledge to know where to look and how the overall deployment process works.

 LinkBack URL
 About LinkBacks

