PART4
Welcome to Part 4 of this article series. In Part 1, we started off by discussing the goal of this lab. That goal is how to deploy a single Enterprise Edition OCS 2007 R2 Server which is connected to an x64 SQL Server 2008 Back-End Server. We first discussed what the lab setup is going to be using Hyper-V, and then proceeded to the configuration of our Enterprise Certificate Authority. In Part 2, we went over the Environmental Preparation for our OCS 2007 R2 environment. In Part 3, we went over the remaining steps required to deploying our Front End Server in an Enterprise Pool Deployment.
In this Part, I will go through the installation of our Office Communicator 2007 R2 client and get it connected through OCS by configuring DNS. I will then begin preparation of our Edge Servers followed by configuring our ISA 2006 Server.
Front End OCS 2007 Server Installation
When installing OCS in a consolidated Enterprise Edition deployment, you would perform the following steps:
- Prepare Environment (Completed in Part 2)
- Prepare Active Directory (Completed in Part 2)
- Create Enterprise Pool (Completed in Part 2)
- Deploy Hardware Load Balancer (Completed in Part 2)
- Configure Pool (Completed in Part 2)
- Add Enterprise Edition Server to Pool (Completed in Part 3)
- Add Server to Pool (Completed in Part 3)
- Configure Certificate (Completed in Part 3)
- Configure Web Components Server Certificate (Completed in Part 3)
- Verify Replication (Completed in Part 3)
- Start Services (Completed in Part 3)
- Validate Server and Pool Functionality (Completed in Part 3)
Microsoft Office Communicator (MOC) 2007 R2
Installing MOC
Installing MOC is a rather straightforward process. I won’t go over the installation steps as it is like installing any other application.
Logging onto MOC
In Part 3, we talked about holding off on DNS additions so when we install MOC, we can see what DNS is required to allow our client to log on. So let’s try logging on with one of the users we created in Part 3. The user we will log on as is
OCS User 1 that has a SIP Address of
ocsuser1@exchange.shudnow.net.
When we try to log on, we will get the following error message:

So let’s start adding DNS by entering our DNS MMC by going to
Start >
Administrative Tools >
DNS. We will then create a host record for our Pool (ocspool.shudnow.net).
Note: If you have multiple Front End Servers and are deploying behind a hardware load balancer, the IP Address in this host file will be pointing to your hardware load balancer.

After that host record has been created, we will need to create an SRV record so MOC clients can find DNS and automatically locate the OCS Front End Server. But because we are using a separate namespace of exchange.shudnow.net, we will need to create either a new Primary DNS Zone for exchange.shudnow.net or by creating a new domain called exchange within our shudnow.net zone. I elected to create an entire new zone.
Once your exchange.shudnow.net zone is created, we will then need to create a host record inside our new exchange.shudnow.net zone for sip.exchange.shudnow.net.

Create an SRV record within the exchange.shudnow.net zone that contains the following information.
 Note
Note: Internal clients can connect using either TLS or TCP while external clients can only connect to TLS. If you want to allow your clients to connect to TCP, change the above to _SipInternal and change the port to 5060.
So let me explain what is going on here. We created our DNS Pool record in our shudnow.net zone. OCSPool.shudnow.net points to 192.168.1.163 which is the IP Address of our Front End Server. Because our users are SIP Enabled for exchange.shudnow.net, we needed to create a new zone. Typically, if you would have SIP enabled them for shudnow.net, we would just create our OCSPool A Record, and then create the SRV record to point to OCSpool.shudnow.net.
If you recall, when we retreived our certificate, it had DNS names of OCSpool.shudnow.net and sip.exchange.shudnow.net. Because SRV records have to point to a DNS name within its own domain, we created our sip.exchange.shudnow.net A record within the exchange.shudnow.net zone. We then created the DNS SRV record for automatic client logon to point to the sip.exchange.shudnow.net name which is a name in our certificate request.
So essentially the following happens in order:
- Client logs on using automatic logon
- Client looks for an SRV record for _sipinternaltls._tcp.SIPDomain (in our case _sipinternaltls._tcp.exchange.shudnow.net)
- DNS Server successfully returns sip.exchange.shudnow.net as the service from the SRV record
- Client connects to sip.exchange.shudnow.net and resolves that to 192.168.1.163
- Client is successfully enable to start communications with the Front End Server
 Adding Distribution Groups to MOC
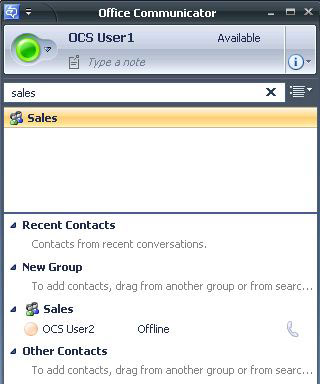
I have created a universal distribution group named Sales. Our Sales distribution group was created within Exchange. A user named Simo notified me that a distribution group doesn’t necessarily have to be created within Exchange. As long as the distribution group has the e-mail attribute filled in, OCS expansion will function.
Searching for Sales, we will see that it will display our Sales group. We can add this group to our contacts list and we can expand the group information.
Your Communicator client will refresh the membership information every so often to determine for distribution group modifications. After some messing around with this, I see this is separate from the Address Book syncing as I attempted to manually synchronize the Address Book service and even went as far as deleting the GalContacts.db file on our client to force a re-download of the Address Book files.
I did some research and found this post
here. Unfortunately others are seeing the same and no answer has really been provided on how the distribution group information gets updated or how to force it; if even possible.
For those that do not know, the Address Book files is what allow our clients to search for SIP enabled users and Distribution Groups. It also providers other functionality such as Phone Number Normalization when doing Remote Call Control. This information gets stored on our client as GalContacts.db in “%userprofile%\ Local Settings\Application Data\Microsoft\Communicator\.” The Address Book gets updated in OCS every 24 hours which can be expedited by navigating to the following directory and running the following commands:
 Preparation of OCS 2007 R2 Edge Node
Network Interface Card (NIC) Configuration
Preparation of OCS 2007 R2 Edge Node
Network Interface Card (NIC) Configuration
In Part 1, I put the Internal NIC on our VMNet8 which is our NAT Network. I stated that I would put all other NICs on VMNet7. When bringing up this server, I put all NICs on VMNet8 to ensure that there is IP Connectivity all around. The reason for this is I don’t have VMNet7 and VMNet8 routed with each other. In a production network, I would following the OCS Planning Guide to ensure your networks are configured properly. For example, your Internal NIC would be placed on your Internal Network while external adapters would be on a separate subnet such as a DMZ.
The first thing I always do is rename the NICs appropriately so you know what NIC you are working with.

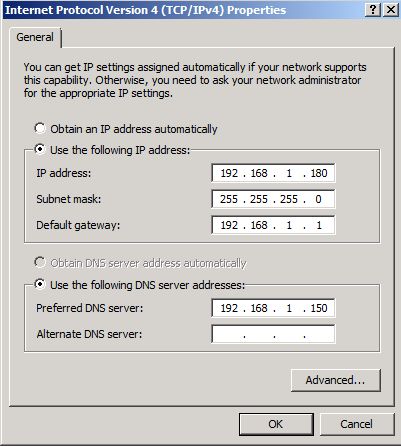
On our Internal Edge NIC, we want to configure the IP Configuration as follows. This NIC will contain the default gateway and DNS Settings. Becuase of this, we will later ensure that this NIC is at the top of the binding order.
Our Audio/Video Edge NIC will be configured as follows.

Our Access Edge NIC will be configured as follows.

Our Web Conferencing Edge NIC will be configured as follows.
 Binding Order
Set the Internal NIC to be at the top of the binding order. This is because this is our internal corporations communications NIC. It is the NIC that has DNS applied to it and will be talking to the rest of the internal servers.
 ISA 2006 Configuration
Root Certificate
ISA 2006 Configuration
Root Certificate
The first thing we will want to do is take the root certificate from our internal CA and place it into the Root Computer Certificate Store on ISA. If your ISA box is part of the domain, if your CA is an Enterprise Root CA, your ISA box will automatically retrieve this certificate upon rebooting. For any other type of CA configuration, you must manually obtain the Root Certificate. The reason we we need this Root Certificate is because when we Bridge our external connection to our internal connection via SSL, we will need to trust the internal FQDN which has a certificate requested from our internal CA.
To do this, go onto any domain joined server that has been rebooted since your CA was created. I am doing this on the SHUD-OCSFE1 server. Open the Certificates MMC by going to
Start >
Run >
MMC. Go to
File >
Add/Remove Snap-In >
Add >
Certificates >
Computer Account.
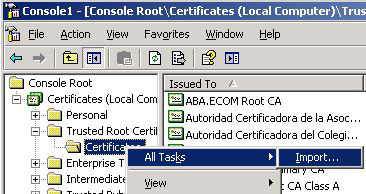
Go to our Trusted Root Certification Authorities and find our Root Certificate. Once you find it, Export the Certificate and transfer this exported certificate to ISA 2006.

Back on our ISA Box, open the Computer Certificates Snap-In just as we did on our CA. In the same location (Trusted Root Certification Authorities > Certificates), we will import the certificate that we exported on our CA. Once you choose Import, navigate to the location of the exported certificate and import it.
 External Web Farm Certificate
Now let’s go ahead and get a certificate that matches the external Web Farm FQDN that we specified when deploying our Pool. This name is ExtWebFarm.shudnow.net. To do this, I installed IIS on ISA to request the certificate.
In IIS, go onto your
Default Website >
Properties >
Directory Security Tab.
You will see a section entitled
Secure Communications. Click
Server Certificate to begin the process of requesting a certificate.
Choose
Create New Certificate. Click
Next to
Continue.

In a production environment, you will choose to
Prepare the request now, but send it later and submit the request to a 3rd party certificate authority such as Entrust. This is because you’ll want internet clients to be able to automatically trust this certificate. For purposes of this lab, I will just choose to Send the request imediately to an online certificate authority to expedite the process. Click
Next to
Continue.
Note: I left the
Prepare the request now, but send it later selected by default. If you are doing a lab scenario like I am, feel free to select the second option (like me) to expedite the process. The rest of the screenshots will be using the second expedited method.

By default, the Certificate Name will be set to your web site name. Change this to the FQDN of the External Web Farm FQDN. Click
Next to
Continue.
Note: The Certificate Name is not the Subject Name (SN) / Common Name (CN) of the certificate, but I always match the SN / CN of the certificate to the Certificate Name.

You will be asked for your Organization information. Enter it appropriately. Click
Next to
Continue.
You will now be asked for your SN / CN. Specify the name to be ExtWebFarm.shudnow.net Click
Next to
Continue.

You will be asked for your Geographical information. Enter it appropriately. Click
Next to
Continue.
Since we specified the OCS Certificate Request to send the request immediately to an online certificate authority, OCS will search for an Issuing CA. The name of our CA (not server name but the name of the CA) is OCS-ROOTCA, OCS will display this server as the CA to use. Choose OCS-DC1.shudnow.net\OCS-ROOTCA as our CA. Click
Next to
Continue.

Now in a production environment where you submitted your CSR to a vendor such as Entrust, they will provide you some text information back. You will take this text, place it into a text file, and save the file as a .cer file. You will then go back into IIS and Assign the .cer file to your request. What essentially happens is when you create your CSR, you create a private key on your IIS Server. The vendor will take some information appropriate to your private key and create a public key that associates itself with your private key. When you assign your certificate, you essentially bind your public/private key to form a certificate.
Once the certificate is properly assigned, you will see the View Certificate button light up.

If you click on View Certificate, you will see the certificate has a CN of ExtWebFarm.shudnow.net
If you performed these procedures on an IIS instance located on a server that is not your IIS Server, you must ensure you export the certificate with its private key and import it into the Local Computer Certificate Store on ISA. This will allow you to attach the certificate to the web listener we will be creating. The procedures for importing a certificate are listed above. The only difference is the store you import it into.
Once you are finished with your certificate request, if IIS is still enabled on ISA, make sure you turn it off (uninstall) otherwise ISA will fail to proxy due to a port conflict between IIS and the Web Listener.
ISA Configuration
We will need to configure ISA to proxy requests for the following three functions:
- To enable external users to download meeting content for your meetings
- To enable external users to expand distribution groups
- To enable remote users to download files from the Address Book Service
- To enable Communicator Phone Edition to connect to the Software Update Service (documentation says Software Update Service but it’s actually been renamed to Device Update Service) and update themselves
The Web Components Server will use the following directories to allow external clients to connect through using the External Web Farm FQDN.

To start creating the configuration for ISA, we will want to create a Web Site Publishing Rule. We will name it OCS External Web Farm.

Select
Allow. Click
Next to
Continue.

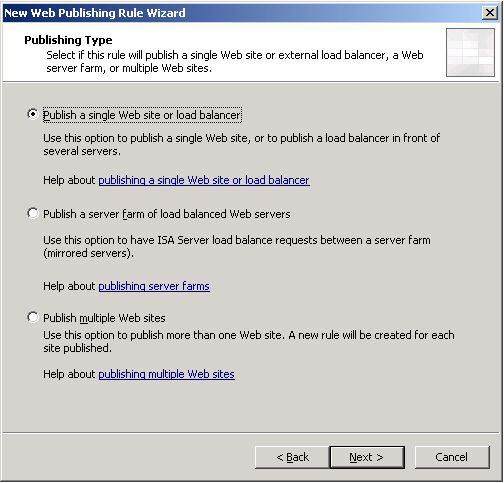
Select
Publish a single Web site or load balancer. The reason why we only publish a single website is because the server we connect to will be our pool name (Ocspool.shudnow.net). This will essentially load balance our ISA request to both of our Front End Servers. Click
Next to
Continue.
Select
Use SSL to connect to the published Web server or server farm. Click
Next to
Continue.

Enter our Internal Site name which is the Internal Farm FQDN we specified when we created our Enterprise Pool. This internal site name should match our pool name. Enter the IP Address for our Enterprise Pool. Since we only deployed one Front End Server, this IP Address is the address of our Front End. If we are deploying multiple Front End Servers behind a Hardware Load Balancer, this IP Address would be the Virtual IP (VIP) of our Hardware Load Balancer. Click
Next to
Continue.

We will want to use /* for our Path so we can create one rule to allow us to proxy all data destined to our External Web Farm FQDN to our Front End Server. Click
Next to
Continue.

We will want to enter our External Web Farm FQDN as our Public Name. Click
Next to
Continue.

We are now prompted to select a Web Listener. Because we haven’t created one, go ahead and select
New. Name this Web Listener OCS External Web Farm. Click
Next to
Continue.
We will definitely want to require SSL secured connections with clients. Click
Next to
Continue.

Select External since we will allowing Internet Clients to use this listener in which the DNS will be pointing to the Selected IP Address for our External connection. To select the IP Address for our External connection,
Click the
Select IP Addresses button.

Select the IP Address that we will be using for our External NIC. The reason why it doesn’t show the IP Address for our 192.x.x.x address is because our 192.168.1.x network is selected as our Internal Network. You select your internal subnets when installing ISA. Click
OK and then
Next to
Continue.

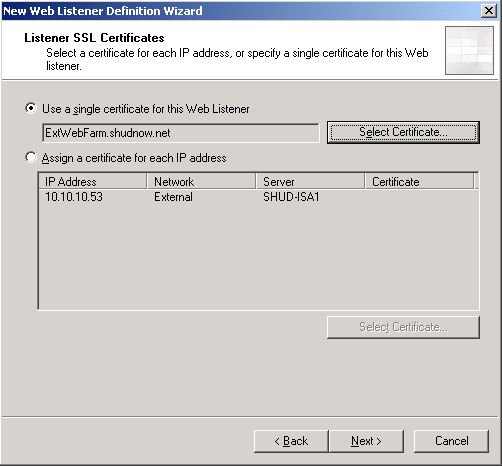
We must now choose our ExtWebFarm.shudnow.net certificate for this listener. Choose Select Certificate and choose our ExtWebFarm.shudnow.net Certificate. Click
OK and then
Next to
Continue.
No Authentication will be used. Click
Next to
Continue.

When back in the rule configuration, you will want to ensure that you select
No Delegation, but client may authenticate directly. Click
Next to
Continue.

All the remaining options should be left at default. All you need to do now is configure a HOST (A) record on your external DNS solution so ExtWebFarm.shudnow.net points to the IP Address of your ISA Server whether that is with a public IP Address directly on ISA or through a NAT’d Address.
The last modification we need to make is to go into the properties of our rule (not listener) and go to the From Tab. Remove Anywhere and add External. Click
OK to
Finish.
 Note
Note: Again, if IIS is still enabled on ISA, make sure you turn it off (uninstall) otherwise ISA will fail to proxy due to a port conflict between IIS and the Web Listener.
Summary
Well folks, that is all for Part 4 of this article. For Part 5, I will go through the installation and configuration of our Consolidated OCS 2007 Edge Server

 LinkBack URL
 About LinkBacks

