PART3
Welcome to Part 3 of this article series. In Part 1, we started off by discussing the goal of this lab. That goal is how to deploy a single Enterprise Edition OCS 2007 R2 Server which is connected to an x64 SQL Server 2008 Back-End Server. We first discussed what the lab setup is going to be using Hyper-V, and then proceeded to the configuration of our Enterprise Certificate Authority. In Part 2, we went over the Environmental Preparation for our OCS 2007 R2 environment.
In this Part, I will go over the remaining steps required to deploying our Front End Server in an Enterprise Pool Deployment. This includes going through the initial configuration of the pool, certificates, and adding our Front End Server to our newly created pool that uses a SIP namespace (exchange.shudnow.net) that is separate than our AD Namespace (shudnow.net). We will begin the steps needed to validate our configuration to make sure the Front End OCS Server is healthy.
Front End OCS 2007 R2 Server Installation
When installing OCS in a consolidated Enterprise Edition deployment, you would perform the following steps:
- Prepare Environment (Completed in Part 2)
- Prepare Active Directory (Completed in Part 2)
- Create Enterprise Pool (Completed in Part 2)
- Deploy Hardware Load Balancer (Completed in Part 2)
- Configure Pool (Completed in Part 2)
- Add Enterprise Edition Server to Pool
- Add Server to Pool
- Configure Certificate
- Configure Web Components Server Certificate
- Verify Replication
- Start Services
- Validate Server and Pool Functionality
Add Enterprise Edition Server to Pool
Add Server to Pool (Step 1)
Because we are using Server 2008, our IIS version will be 7. Kernel Mode Authentication runs under the context of a computer account. OCS runs its services under the context of a user account. With Kernel Mode Authentication enabled, Kerberos tickets will fail. Because of this OCS 2007 R2 disabled Kernel Mode Authentication on IIS during installation.
Instead of disabling kernel mode authentication in IIS, you can configure IIS to use the Web application pool’s identity for internal virtual directories used by OCS. We can do so by modifying Windows Authentication on the Default Website of the Web Components Server using the ApplicationHost.config File. Open the %windir%system32inetsrvconfigApplicationHost.confi g file in a text editor. For all folders under the
Default Web Site location path, set the value of the
WindowsAuthentication element and the
useAppPoolCredentials attribute to
true. For example:
<system.webServer>
<security>
<authentication>
<windowsAuthentication enabled=”true” useAppPoolCredentials=”true” />
</authentication>
</security>
</system.webServer>
When I went to look for the above (from the OCS R2 docs), I didn’t find any useAppPoolCredentials but I did see windowsAuthentication and set it to true which you can do via the IIS Manager.
We are now on Step 1 which is to Add Server to Pool. As a prerequisite, you’ll need to install IIS by following the instructions
here for Server 2003 and
here for Server 2008. For Server 2008, make sure you install Windows Authentication and all IIS 6 Management Compability Role Services. You may also need your SP2 binaries and CD1 of your Server 2003 Installation CD. Once IIS has been installed, you will have to restart Setup. Once back at the Deploy Pool in a Consolidated Topology, Click
Run to
Continue.

On the Welcome Screen and Licensing Information (after reading all the licensing information and choosing that you agree if you agree with the licensing terms), Click
Next to
Continue.
Specify where you want OCS to be installed. We will use the default location. Click
Next to
Continue.

We are ready to Add our Server to our Enterprise Pool. You can review your Current Settings. When satisfied, Click
Next to
Continue.
The configuration will now commence which will install all of the OCS roles onto this Front End Server due to it being Consolidated Front End.

Once the roles have been installed on your Front End Server, you will have to specify what Pool we want to join this server to. Considering we only have one pool, leave the selection (don’t have much of a choice) at OCSPool.shudnow.net. Click
Next to
Continue.

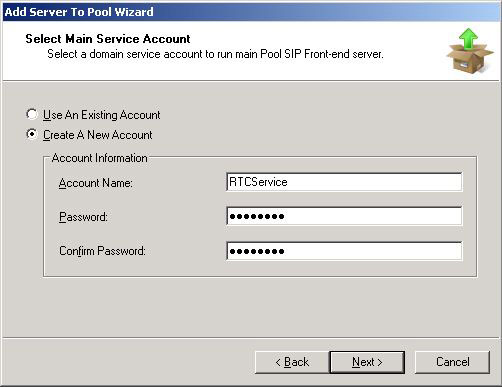
You will now be prompted to specify passwords for your Service Accounts. I recommend to use long secure passwords. You can view
this and
this site which assist in choosing strong passwords. You will have to do this for several Service Accounts:
- RTCService
- RTCComponentService
- RTCGuestAccessUser
Once you have set a password for all three accounts, Click
Next to
Continue.
We are ready to Activate our Components. You can review your Current Settings. When satisfied, Click
Next to
Continue.

The server will go through a procedure which activates each OCS Server role on our Front End Server. When the Activation is finished, Click
Finish. You will be given the option to view the log which I advise you to do to ensure everything went OK.
Configure Certificate (Step 2)
We are now on Step 2 which is to Configure our Certificate. Click
Run to
Continue.

On the Welcome Screen, Click
Next to
Continue.
The next screen will be familiar to many of you. It’s going through the process of creating a certificate request. Since we have not created a certificate for our Front End Server, we will want to Choose to
Create a new certificate. Click
Next to
Continue.

Because we have an internal CA installed, we can send the request immediately to an online certificate authority. Click
Next to
Continue.

By default, the Certificate Name will be set to your server name. Change this to the FQDN of the Enterprise Pool. Click
Next to
Continue.
Note: The Certificate Name is not the Subject Name (SN) / Common Name (CN) of the certificate, but I always match the SN / CN of the certificate to the Certificate Name. On a Standard Edition Server, this would be the FQDN of the server’s computer name. When deploying OCS in an Enterprise Pool, this would be the FQDN of the pool name, not the server name. You would then export this certificate after you have obtained the certificate and place the certificate on all other Front End Servers.

You will be asked for your Organization information. Enter it appropriately. Click
Next to
Continue.
You will now be asked for your SN / CN. As stated previously, because we created an Enterprise Pool, we want this name to be the FQDN of our Enterprise Pool. Because we will be using a second SIP domain (exchange.shudnow.net), we will need to add a Subject Alternative Name (SAN) for sip.exchange.shudnow.net (sip.SIPDomainName.TLD). The SAN should automatically be filled in for you due to Step 4 which is when we Configured our Pool. Click
Next to
Continue.

You will be asked for your Geographical information. Enter it appropriately. Click
Next to
Continue.
Since we specified the OCS Certificate Request to send the request immediately to an online certificate authority, OCS will search for an Issuing CA. The name of our CA (not server name but the name of the CA) is CA, OCS will display this server as the CA to use. Choose SHUD-DC2.shudnow.netCA as our CA. Click
Next to
Continue.

We are ready to Request our Certificate. You can review your Current Settings. When satisfied, Click
Next to
Continue.

We should now have our certificate. Choose
Assign certificate immediately. Click
Next to
Continue.

You can continue through the remaining prompts to finish the certificate request and assign it to your server
Configure Web Components Server Certificate (Step 3)
We are now on Step 3 which is a really straight forward manual step.

It consists of opening IIS (
Start >
Control Panel >
Administrative Tools >
Internet Information Services Manager).
Go to the
ServerName >
Sites >
Default Website >
IIS >
Authentication > Select Bindings from the Action Pane.

Choose
https and select our
Pool Certificate. Make sure IP address is set to
All Unassigned. Click
Ok then
Close to
Continue.
 Note
Note: The reason why you want to assign the certificate to IIS is because the Address Book is a part of the web components server. Remember setting up the share for this? Because clients access this Address Book via SSL and the ABS folder within IIS is set to use SSL, we need to make sure IIS uses a certificate to grant SSL access to ABS. If you don’t, clients won’t be able to access the ABS and will get an ABS error when using Communicator.
Verify Replication (Step 4)
We are now on Step 4 which is to Verify Replication. This is a manual step that I will not go over. Click
Help to see the LCSCMD commands used to verify replication.
 Start Services (Step 5)
We are now on Step 5 which is to Start Services. Click
Run to start the OCS Services. I will not provide screenshots of this process as it is extremely straightforward.

Note: I did notice an issue with the Monitoring Agent not being able to start. I then noticed in the Event Viewer that this service is for QOE and it can’t start because it can’t create an administrative message queue. Because we didn’t choose to deploy QOE, I have disabled this service. If QOE is needed in the future, you can set up QOE and re-enable this service.
IMPORTANT UPDATE: As I said, I disabled the service but do not do this. Make sure you install Message Queuing as an OCS April Update doesn’t work properly and will try to mess with this service and render your OCS Server in an unworkable state. Future patches such as ones after June state that they don’t have this problem. So if you plan on installing June update or later, you can safely disable this service and patch your servers without worry (hopefully.) You can read more about this issue
here.
 Validate Server and Pool Functionality (Step 6A)
We are now finally on our final Step, Step 6 which is to Validate Server and Pool Functionality. This step helps us ensure that our environment is working properly. I am dividing this step between 2 steps; Step 6a and Step 6b. Part of this, is to go through with the validation, DNS needs to be set up. But because, as I stated earlier, I want to not to DNS yet so we can go through the Communicator logon step by step without DNS and see how to get automatic client logon working, we will finish Step 6 in the next Part.

Server and Pool Validation requires you to have a SIP enabled user account. To do this, we must use Active Directory Users and Computers on our OCS server. To do this, go to
Start >
Control Panel > Administrative Tools >
Active Directory Users and Computers.
So now that ADUC is open, go ahead and create a couple accounts. For these user’s, I also mailbox enabled them after creating a new Accepted Domain for exchange.shudnow.net and setting up a new e-mail address policy so they obtain a primary e-mail address domain of exchange.shudnow.net.
I created the following two users:
- OCS User 1 (username of ocsuser1)
- OCS User 2 (username of ocsuser2)
Once these users are created,
Right-Click the
User and choose
Enable users for Communications Server.
Tip: One of these options is to Move a User from one pool to another. If you do this while the source server is up, the user will retain all user configuration/settings that are stored on the server. For some reason if you have a catastrophic failure on one server, you can move the user to another pool without the source server being up, but that user will lose all of its server stored configuration/settings.

On the Welcome Screen, Click
Next to
Continue.
We now must choose what Pool we want to assign this user to. Considering we only have one pool, leave the selection (don’t have much of a choice) at OCSPool.shudnow.net. Click
Next to
Continue.

Here is where we can assign the user as either shudnow.net or exchange.shudnow.net. We only specified exchange.shudnow.net to allow for automatic sign-on so we will want to make sure we assign our users as exchange.shudnow.net. You can use the shudnow.net name as long as you set those users to manually log on and you configure DNS appropriately. You can allow shudnow.net to allow for automatic logon by re-running the previous wizards.
For purposes of this lab, I will use the user’s e-mail address since they are mailbox enabled and I don’t want users to have to know more than two sets of login usernames (one for Exchange/AD and a different one for OCS). Click
Next which will begin the OCS-Enable process. Once this is complete, click
Finish to
Finish.

But let’s say you wanted some users to have a different OCS SIP Address than their Exchange address. Or even if you wanted to use the shudnow.net domain for SIP. You could choose the following option although you can e ither choose only firstname.lastname@SIPDomain or sAMAccountName@SIPDomain.

I would now go ahead and OCS enable your second user. Once finished, you can refresh ADUC and verify these users have a Communications Server address.
 Summary
Well folks, that is all for Part 3 of this article. For Part 4, I will go through the installation of our Office Communicator 2007 client and get it connected through OCS by configuring DNS. I will then begin preparation of our Edge Servers followed by configuring our ISA 2006 Server.

 LinkBack URL
 About LinkBacks

