نمایش نتایج: از شماره 1 تا 7 از مجموع 7

موضوع: How to Securely Deploy iPhones with Exchange ActiveSync in the Enterprise

  
  1. #1
    نام حقيقي: 1234

    مدیر بازنشسته
    تاریخ عضویت
    Jul 2009
    محل سکونت
    5678
    نوشته
    5,634
    سپاسگزاری شده
    2513
    سپاسگزاری کرده
    272

    How to Securely Deploy iPhones with Exchange ActiveSync in the Enterprise

    کد:
    http://www.expta.com/2010/02/how-to-securely-deploy-iphones-with.html

    I've been working on a solution for quite a while to securely deploy iPhones in the enterprise.

    This solution should work exactly the same way on the Apple iPad and should port over fairly easy to the Droid and other non-Microsoft ActiveSync-enabled phones, with with some minor changes.

    I'll be writing a 7 part series of articles that document all the steps. I'm sure there are other ways to do this, but I can assure you, none of them are documented. (Hint to Apple: This is not documentation, and neither is the iPhone Enterprise Deployment Guide.)

    In the scenario I'll be documenting, the customer wants to configure Exchange ActiveSync to provide mobile access to email, calendars and contacts for iPhone users. To make it more challenging (and slightly more complicated), the customer has Exchange 2003 mailbox servers with Exchange 2007 or 2010 Client Access Servers.

    The requirements for deployment are such:

    • Only authorized ActiveSync users can access their Exchange email, contacts and calendars
    • Only authorized devices (iPhone 3GS) are allowed to use Exchange ActiveSync
    • Ability for users to configure/reconfigure Activesync for their iPhones over the air
    • Information stored on the iPhone must be encrypted
    • Capability to remotely wipe iPhones in the event of a security breach (wipes performed by end user or authorized administrator)
    • Easy roles-based administration

    Summary of the Solution
    ActiveSync will be configured to use Basic Authentication over SSL and require client certificates. An iPhone configuration profile will be created and "married" to each iPhone, preventing it from being used on any other iPhone than the one it is configured for. The profile will include the user certificate and its private key. ActiveSync policies will be used to configure the iPhone to comply with corporate security policies.

    The next step is to publish the same user certificate to each ActiveSync user in Active Directory. This will be used to enable certificate-based authentication for ActiveSync. I'll list a few ways that this can be done programmatically via scripts.

    Finally, the user needs a way to install the profile. This will be done using a website that the user will open using Safari from the iPhone.


    The solution requires a certificate of authority (CA) server that can generate a single user certificate. The CA can be an internal stand-alone or ADCS CA server. I prefer Windows Server 2008 R2 ADCS for the CA, but any CA will do.

    More to Come...
    I'll break each of these steps down in separate phases. There's a fair amount of detail in each step and I'll include troubleshooting and gotchas as I go through it, but this has worked out be a secure and easy to manage solution.

    Articles in this series:

    • Phase 1 - Building the ADCS server and Generating Certificates
    • Phase 2 - Configuring ActiveSync and Active Directory
    • Phase 3 - Publishing User Certificates to Active Directory
    • Phase 4 - Creating the iPhone Configuration Profile
    • Phase 5 - Creating the Web Site for iPhone Profile Deployment
    • Phase 6 - End-User Deployment of the ActiveSync Profile


    موضوعات مشابه:

  2. #2
    نام حقيقي: 1234

    مدیر بازنشسته
    تاریخ عضویت
    Jul 2009
    محل سکونت
    5678
    نوشته
    5,634
    سپاسگزاری شده
    2513
    سپاسگزاری کرده
    272
    کد:
    http://www.expta.com/2010/02/how-to-securely-deploy-iphones-with_23.html

    Phase 1 - Building the CA

    This is the second post in my series, How to Securely Deploy iPhones with Exchange ActiveSync in the Enterprise. To read an overview of the solution click here. In this phase, we will create a new certificate server and generate the user certificate that will be used for ActiveSync authentication. This single certificate will be installed on iPhones and published in Active Directory.

    If your organization already has a certificate server, you can use it to create a user certificate, as specified later in this article. In this soup-to-nuts series I will explain how to create a new stand-alone Windows Server 2008 R2 CA (Certification Authority) for this purpose.


    Build a Windows 2008 R2 Certificate Server
    Begin configuring the Windows Server 2008 R2 server by installing the Active Directory Certificate Services role. This can be a new, single-purpose server or one already deployed in your organization. Contrary to the role name, this is the role to install even if the server is not a member of an Active Directory domain (a workgroup server). Select the following Role Services when installing the ADCS role:

    • Certification Authority
    • Certification Authority Web Enrollment (this will also install Web Server (IIS) and all necessary components)

    If the server is a member of a domain, you can choose whether to install the CA as an Enterprise or Standalone (non-domain based) CA. For our purposes, it really doesn't matter which one you choose. However, if you're planning out a full PKI (which I highly recommend) you should select the CA type that's appropriate for your organization. For this article, we'll make it a standalone Root CA.

    Create a new private key and use the default cryptographic service provider (CSP) and key length (2048). Supply a common name for the CA, such as W2K8R2-CA. Note that the default validity period for certificates generated by a Windows Server 2008 R2 CA is 5 years. Set this value for as long as you'd like. Consider the fact that the certificate will have to be replaced on the iPhone and in AD when it expires. I set my validity to 10 years.


    Continue through the Add Roles Wizard, accepting all the default settings. Note that the name and domain settings of the server cannot be changed after Certification Authority has been installed. Click Install to complete the installation. No reboot is required, but it is recommended that you run a Windows Update to ensure that the binaries are up to date.

    Configure the Certification Authority to Use SSL
    In order to request certificates using the web interface, you must enable SSL on the CA's web server. Open Internet Information Services (IIS) Manager in Administrative Tools. Select the server name and open the Server Certificates feature. Select Create Self-Signed Certificate in the Actions pane and supply a friendly name for the certificate, such as "CA Server".

    Next, expand Sites and select the Default Web Site. Click Bindings in the Actions pane and add HTTPS, using the new self-signed certificate, as shown below.


    Now select the CertSrv virtual directory under Default Web Site and open the SSL Settings feature. Select Require SSL and click Apply.


    A Word About Certificate Revocation
    Certificates can be revoked by the CA Administrator. When the certificate is revoked, it can no longer be used for its intended purpose. A revoked certificate is added to the Certificate Revocation List (CRL) which is usually hosted on the CA server.

    Important - When ActiveSync uses client certificates, Exchange ActiveSync 2007/2010 requires confirmation from the CA that the user certificate has not been revoked. This happens before Basic authentication is attempted. If the CRL is not available, ActiveSync will assume that the the certificate has been revoked and the user will not be able to use ActiveSync. You must ensure the CRL (typically, the CA server) is always online and available. For this reason, I recommend virtualizing the CA to provide greater flexibility.

    Unless you configure the Online Responder role service which uses the Online Certificate Status Protocol (OCSP), the CA will use a Certificate Revocation List (CRL) to obtain the revocation status of the X.509 user certificate.

    OCSP has replaced the traditional CRL file used in the past. It performs much better and has a lower network cost. Complete details about OCSP can be read here. For the purposes of this article (and brevity), we'll be using a CRL, which requires no further configuration.

    Generate a User Certificate
    Now we are ready to generate a user certificate from the certificate server. This is a two step process where a request is submitted and then approved, creating the certificate and its private key.

    Requesting the User Certificate
    You make the certificate request using Internet Explorer directly from the CA. Go to https://servername/certsrv and click Request a certificate.

    Click Advanced certificate request and then Create and submit a request to this CA. Click Yes to the Web Access Confirmation warning to allow the website to perform a digital certificate operation on your behalf. Complete the certificate request as shown, using your organization's information.

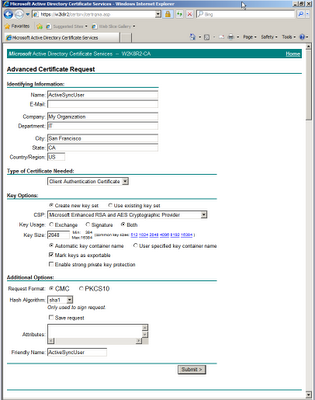
    Note: Some reverse proxy servers and firewalls do not allow spaces or special characters in the certificate name or friendly name. For this reason, I recommend using a simple short name for the user certificate to prevent problems.


    Once you submit the certificate request, it must be issued by the CA administrator (probably you). To issue the certificate, expand the Active Directory Certificate Services role in Server Manager > CA server name > Pending Requests. Right-click the pending request ID and select All Tasks > Issue to issue the certificate.


    Now you need to install the new user certificate using the ADCS website. Click View the status of a pending certificate request from the Home page and then click the certificate request you generated earlier, as shown below.

    Click Yes to the Web Access Confirmation warning to allow the website to perform a digital certificate operation on your behalf and then click Install this certificate.

    The user certificate and private key will be installed in the user's (your) Personal certificates store. It now needs to be exported, both with and without the private key. The certificate with the private key will be imported into the iPhone and the other will be published to the user account in Active Directory.

    Exporting the Certificates
    In Internet Explorer, click Tools > Internet Options > Content > Certificates. You will see the new user certificate in your Personal certificate store. Select the certificate and click Export. Follow the default settings in the Certificate Export Wizard, but make sure you select Yes, export the private key and Include all certificates in the certification path if possible. Supply a password for the certificate. You will need this password to import the certificate for other Mobile Messaging Administrators in the future. Browse to the folder of your choice and name the file ActiveSyncUser.pfx.


    Now export the user certificate again, this time choosing No, do not export the private key. Browse to the folder of your choice and name the file ActiveSyncUser.cer. This certificate will be published later to the ActiveSync user accounts in Active Directory.


    Lastly, we need to export the CA's root certificate. This will be imported into the Trusted Root Certification Authorities certificate store on the Exchange CAS servers so they can trust the user certificate, since it's self-signed. Click the Intermediate Certification Authorities tab and select the CA's certificate, as shown below.

    Click Export and follow the Certificate Export Wizard, selecting all the defaults. Browse to the folder of your choice and name the file RootCA.cer.


    We now have a working CA server, a user certificate with and without the private key, and the Root CA certificate.

    This concludes Phase 1 of my series, How to Securely Deploy iPhones with Exchange ActiveSync in the Enterprise - Phase 1 - Building the CA. The next phase will cover how to configure the Exchange Client Access Servers for ActiveSync using client certificates


  3. #3
    نام حقيقي: 1234

    مدیر بازنشسته
    تاریخ عضویت
    Jul 2009
    محل سکونت
    5678
    نوشته
    5,634
    سپاسگزاری شده
    2513
    سپاسگزاری کرده
    272
    کد:
    http://www.expta.com/2010/02/how-to-securely-deploy-iphones-with_25.html

    Phase 2 - Configuring ActiveSync and Active Directory

    This is the third post in my series, How to Securely Deploy iPhones with Exchange ActiveSync in the Enterprise. To read an overview of the solution click here. In this phase, we will configure ActiveSync on the Exchange CAS and Mailbox servers and make the necessary changes in Active Directory.

    Securing Exchange ActiveSync
    Exchange ActiveSync is enabled by default for all Exchange users in a normal installation. It can be disabled for select users using Active Directory Users and Computers (ADUC) for Exchange 2003 users or the Exchange 2007/2010 management tools for those mailbox users.

    Since our solution requires that ActiveSync be available for only specific users, we could use a script that disables Activesync for all users who are not a member of an ActiveSync Users security group. While this would work, it would be clumbsy and new users could access ActiveSync until the script runs again. It also wouldn't solve the requirement that only authorized devices can access ActiveSync.

    In order to fulfill the requirements that only authorized users can access ActiveSync using authorized devices, we will configure ActiveSync to require user certificates. The iPhones will receive a unique iPhone Configuration Profile that includes the user certificate we generated in Phase 1. That profile can be loaded on one, and only one, iPhone. More on that in a later phase.

    Configuring Exchange ActiveSync
    As mentioned earlier, ActiveSync is enabled by default in a normal Exchange installation. It is configured by default to use only Basic authentication. We need to configure the CAS servers to require user certificates. This is only configured on the CAS servers, not the Mailbox servers.

    To do this using the Exchange Management Console (EMC), expand Microsoft Exchange > Server Configuration > Client Access. Select the Client Access Server to configure and click the Exchange ActiveSync tab in the work pane. Double-click Microsoft-Server-ActiveSync to view its properties. Click the Authentication tab and select Require client certificates, as shown below.

    Repeat these steps for each CAS server.


    To do the same thing using the Exchange Management Shell (EMS), use the following cmdlet to require client certificates for each CAS server:
    Set-ActiveSyncVirtualDirectory -identity "CASservername\Microsoft-Server-ActiveSync (Default Web Site)" -ClientCertAuth Required
    Finally, we need to make an adjustment to the uploadReadAheadSize value in the IIS metabase. This is required when you use certificate-based authentication. Run the following commands from a CMD prompt on the CAS server, replacing the value in quotes with the maximum message size (in bytes) allowed by your organization.
    C:\Windows\System32\inetsrv\appcmd.exe set config -section:system.webServer/serverRuntime /uploadReadAheadSize:"10485760" /commit:apphost

    C:\Windows\System32\inetsrv\appcmd.exe set config "Default Web Site" -section:system.webServer/serverRuntime /uploadReadAheadSize:"10485760" /commit:apphost
    The commands above set uploadReadAheadSize to 10MB (the default is 48KB). 1024 * 1024 * 10 = 10MB. You then need to restart the IISAdmin service to get the change.

    That's all there is to it. You may also want to configure Remote File Servers at this time, but I won't be covering that in this series.

    A Note About Exchange 2003 Mailbox Servers
    I mentioned in the introduction that this scenario has some Exchange 2003 mailbox servers, just to spice things up. If you use Exchange 2007 or 2010 CAS servers to front-end ActiveSync for Exchange 2003 mailboxes, you need to configure ActiveSync on the Exchange 2003 mailbox servers to allow Integrated Windows Authentication. This is because the Exchange 2007/2010 CAS servers use Kerberos pass-through authentication to the E2K3 mailbox servers.

    The trouble is, you can't configure this using Exchange ESM and if you try to modify the Microsoft-Server-ActiveSync virtual directory in IIS Manager, the Exchange DS2MB process will overwrite your changes in a few minutes. this is detailed on the Exchange Team blog here.

    To overcome this, download and install Microsoft KB 937031. The hotfix normally does not require a reboot, but will prompt for one if a scheduled reboot has been deferred. This hotfix will enable the Authentication button on the Access tab of the Microsoft-Server-ActiveSync object. This object is found in ESM under Servers > servername > Protocols > HTTP > Exchange Virtual Server > Microsoft-Server-ActiveSync. Simply enable Basic authentication and Integrated Windows Authentication, as shown.

    Configuring Active Directory
    Now we need to configure Active Directory for the solution by creating the necessary user groups and publishing the self-signed CA Root certificate.
    Create Security Groups
    Create two universal security groups, ActiveSync Users and ActiveSync Admins. Populate the groups with the appropriate users. By using security groups, we can easily manage the solution using roles based security.
    Configure Group Policy
    Since our root CA is is not trusted by an external trusted CA like Verisign or Entrust, we need to install the root certificate in the Trusted Root Certification Authorities certificate store on the Exchange CAS servers. While we can do this manually using the Certificates MMC, I'm going to show you how to publish it to all computers in AD using Group Policy, which is my best practice.
    Using appropriate credentials (usually Domain Admin), open the Group Policy Management Console (GPMC). Edit the Default Domain Policy and navigate to Computer Configuration > Policies > Windows Settings > Security Settings > Public Key Policies > Trusted Root Certification Authorities, as show below.

    Right-click Trusted Root Certification Authorities and select Import. Run through the Certificate Import Wizard to import the RootCA.cer certificate file we exported at the end of Phase 1. Be sure to place the certificate in the Trusted Root Certification Authorities store. You should now see the certificate in the Default Domain Policy.
    After AD replication completes, logon to a CAS server and run GPUpdate to refresh Group Policy and import the root certificate. Confirm that the certificate is installed using Internet Explorer. Click Tools > Internet Options > Content > Certificates. The root certificate should show under the Trusted Root Certification Authorities tab, as shown.


    We have completed securing and configuring Exchange ActiveSync, and configured Active Directory by creating the necessary groups and importing the root certificate into the Default Domain Group Policy.

    This concludes Phase 2 of my series, How to Securely Deploy iPhones with Exchange ActiveSync in the Enterprise. The next phase will cover how to publish the user certificates to user accounts who are members of the ActiveSync Users security group


  4. #4
    نام حقيقي: 1234

    مدیر بازنشسته
    تاریخ عضویت
    Jul 2009
    محل سکونت
    5678
    نوشته
    5,634
    سپاسگزاری شده
    2513
    سپاسگزاری کرده
    272
    کد:
    http://www.expta.com/2010/03/how-to-securely-deploy-iphones-with.html
    Phase 3 - Publishing User Certificates to Active Directory

    This is the fourth post in my series, How to Securely Deploy iPhones with Exchange ActiveSync in the Enterprise. To read an overview of the solution click here. In this phase, we will publish the same user certificate to each user object in Active Directory that is a member of the ActiveSync Users security group.

    As mentioned earlier, ActiveSync will be configured to require user certificates for authentication. This means that the user needs a user certificate with the private key and ActiveSync will check this certificate for a matching certificate in Active Directory. We need to publish the user accounts in Active Directory, as shown below.


    When you view the properties of the published certificate, you see that it was issued by the CA (W2K8R2-CA) and that the certification path is valid, since we published the root CA certificate to all machines in the domain using Group Policy in Phase 2.


    While this is a fairly simple process to do, I wrestled with different ways of doing it programmatically. I finally decided to use VBScript to publish the certificate to AD. I chose VBScript instead of PowerShell because I could not be certain that the ActiveSync Administrator(s) would have PowerShell installed.

    The script uses CAPICOM, which is a security technology from Microsoft that allows Microsoft Visual Basic, Visual Basic Script, ASP, and C++ programmers to easily incorporate digital signing and encryption into their application. To use CAPICOM, you must download and register the CAPICOM.DLL on the computer that runs the script. The script automatically registers the DLL, as long as it resides in the same network share where the ActiveSync user certificate resides.

    First, download CAPICOM and extract the contents to get the CAPICOM.DLL file (we have no need for any of the other files or examples). Then create a network share that the mobile administrators have access to (for example \\fileserver\iPhone). Copy the CAPICOM.DLL, the ActiveSyncUser.cer user certificate (exported in Phase 1), and the vbscript below to the share. You will need to edit the script to reflect the name you used for your ActiveSync Users group in AD, the path to CAPICOM.DLL and the user certificate, and the name of the user certificate if necessary.

    Here's the Publish Mobile Cert.vbs script:
    کد:
    '======================================================================================================================================
    'Publish  Mobile Cert.vbs - The admin running the script must have rights to modify the  user accounts that are members of the ActiveSync Users group in AD.
    'Jeff  Guillet
    '02/10/2010
    '
    'This  script publishes the mobile user certificate into Active Directory for  all members of the ActiveSync Users security group
    '
    'Micosoft  link for CAPICOM:  http://www.microsoft.com/downloads/details.aspx?displaylang=en&FamilyID=860EE43A-A843-462F-ABB5-FF88EA5896F6
    '=======================================================================================================================================
    
    
    On Error  Resume Next
    
    
    'Configure  constants
    Const  ADS_PROPERTY_UPDATE = 2
    Const  ADS_PROPERTY_APPEND = 3
    
    
    '--------------------------------------------------------------------------
    'Modify  the three variables below, as required
    '--------------------------------------------------------------------------
    eASUsersGroup  = "ActiveSync Users"
    pathToFiles  = "\\fileserver\iPhone\"
    certFile  = "ActiveSyncUser.cer"
    '--------------------------------------------------------------------------
    
    
    msg =  "This script publishes the '" & certFile & "' certificate to all  members of" & vbCRLF
    msg =  msg & "the '" & eASUsersGroup & "' security group. Do you  want to continue?"
    r =  MsgBox(msg, vbYesNo + vbQuestion, "Publish Mobile Cert")
    If r =  vbNo then Wscript.Quit
    
    
    'Create  log file
    Set fso =  CreateObject("Scripting.FileSystemObject")
    Set  FullLog = fso.OpenTextFile(pathToFiles & "Publish Mobile Cert.log",  8, True)
    
    
    'Check  for and set dependencies
    '--Check  for CAPICOM.DLL
    Set FSO =  CreateObject("Scripting.FileSystemObject")
    If NOT  FSO.FileExists ("C:\Windows\System32\capicom.dll") Then
    If NOT  FSO.FileExists (pathToFiles & "capicom.dll") Then
    MsgBox  pathToFiles & "capicom.dll is missing. Cannot continue.",  vbCritical, "Missing File"
    Wscript.Quit
    Else
    FSO.CopyFile  pathToFiles & "capicom.dll", "C:\Windows\System32\"
    End if
    End if
    '--Check  for certificate
    If NOT  FSO.FileExists (pathToFiles & certFile) Then
    MsgBox  pathToFiles & certFile & " is missing. Cannot continue.",  vbCritical, "Missing File"
    Wscript.Quit
    End If
    '--Register  CAPICOM.DLL
    Set  WshShell = WScript.CreateObject("WScript.Shell")
    Return =  WshShell.Run("regsvr32 C:\Windows\System32\capicom.dll /s", 0, true)
    
    'Load  the certificate file and convert it to Base-64
    Set  Certificate = CreateObject("CAPICOM.Certificate")
    Certificate.Load  pathToFiles & certFile
    BinaryEncodedCertificate  = Certificate.Export(CAPICOM_ENCODE_BINARY)
    Set  Utilities = CreateObject("CAPICOM.Utilities")
    ArrayEncodedCertificate  = Utilities.BinaryStringToByteArray(BinaryEncodedCertificate)
    
    'Configure  connection to Active Directory
    Set con =  CreateObject("ADODB.Connection")
    con.Provider  = "ADsDSOObject"
    con.Open  "DS Query"
    Set  command = CreateObject("ADODB.Command")
    Set  command.ActiveConnection = con
    command.Properties("searchscope")  = 2
    command.Properties("Page  Size") = 20000
    command.Properties("Timeout")  = 180
    
    'Get  default domain
    Set  oRoot = GetObject("LDAP://rootDSE")
    oDomain =  "LDAP://" & oRoot.Get("defaultNamingContext")
    
    'Construct  and execute query to get the eASUsersGroup
    command.CommandText  = "SELECT AdsPath FROM '" & oDomain & "' WHERE name = '" &  eASUsersGroup & "' AND objectClass = 'Group'"
    Set rs =  Command.Execute
    
    'Append  to the log file
    FullLog.writeline  String(75, "=")
    FullLog.writeline  "Publish Mobile Cert.vbs"
    FullLog.writeline  Now
    FullLog.Writeline  "Adding the mobile user certificate to the following users:"
    FullLog.writeline  String(75, "-")
    
    'Loop  through the result set
    Do While  NOT rs.EOF
    Set  oGroup = GetObject(rs.fields(0))
    groupDN =  oGroup.distinguishedName
    'Publish  the certificate to each member of the group
    For Each  Member In oGroup.Members
    userCount  = userCount + 1
    'Append  the certificate to the user's certificate store in Active Directory
    Set  UserObj = GetObject("LDAP://" & member.distinguishedName)
    UserObj.PutEx  ADS_PROPERTY_APPEND, "userCertificate", Array(ArrayEncodedCertificate)
    UserObj.SetInfo
    If  Err.Number = 0 Then
    FullLog.writeline  member.distinguishedName
    Else
    FullLog.writeline  "Unable to update user: " & member.distinguishedName
    errorCount  = errorCount + 1
    End If
    Next
    Exit Do
    Loop
    
    FullLog.writeline  String(75, "=") & vbCRLF & vbCRLF
    
    msg =  "Successfully published the certificate to " & userCount -  errorCount & " user accounts." & vbCRLF
    msg =  msg & "Review the Publish Mobile Cert.log for details."
    If  errorCount > 0 Then 
    msg =  msg & vbCRLF & vbCRLF & errorCount & " error(s) were  encountered."
    MsgBox  msg, vbExclamation, "Publish Mobile Cert"
    Else
    MsgBox  msg, vbInformation, "Publish Mobile Cert"
    End If
    Here's a link to the script for those of you averse to copying and pasting.

    To run the script you must have rights to modify the user accounts that are members of the ActiveSync Users security group. Simply double-click the script to run it. The script will register CAPICOM.DLL, connect to Active Directory and search for the ActiveSync Users group, enumerate all the members of the group, and publish the ActiveSync user certificate to each user. A log file is generated in the folder path specified in the script each time it is run.

    We have now completed publishing the ActiveSync user certificate to the user accounts in Active Directory that are members of the ActiveSync Users group.


    This concludes Phase 3 of my series, How to Securely Deploy iPhones with Exchange ActiveSync in the Enterprise. The next phase will cover how to create the iPhone Configuration Profile using Apple's iPhone Configuration Utility


  5. #5
    نام حقيقي: 1234

    مدیر بازنشسته
    تاریخ عضویت
    Jul 2009
    محل سکونت
    5678
    نوشته
    5,634
    سپاسگزاری شده
    2513
    سپاسگزاری کرده
    272
    کد:
    http://www.expta.com/2010/03/how-to-securely-deploy-iphones-with_01.html

    Phase 4 - Creating the iPhone Configuration Profile

    This is the fifth post in my series, How to Securely Deploy iPhones with Exchange ActiveSync in the Enterprise. To read an overview of the solution click here. In this phase, we will create iPhone Configuration Profiles using Apple's iPhone Configuration Utility. I will also show you how to embed the user certificate and private key into the profile and how to marry the profile to a specific iPhone.

    Let's get started.

    First, you will need to download and install the Apple iPhone Configuration Utility (iCU). The latest version as of this writing is version 2.1.0.163 and is the one I will use here. The iCU only installs on Windows XP SP3 or Windows Vista SP1 or greater. It will not install on Windows Server. It also requires NET 3.5 SP1.

    Note: The iCU is not an enterprise class software program. All the configurations, hardware profiles and configuration profiles are stored locally on the workstation in %USERPROFILE%\Local Settings\Application Data\Apple Computer\MobileDevice folder. For this reason, I recommend using a single workstation for iPhone management and to backup this folder and child folders to a network location periodically.

    Begin the configuration process by logging into the workstation with the credentials used to request and install the user certificate created in Phase 1. This user has the ActiveSyncUser user certificate stored in his/her personal certificate store. It will be needed later in this process.

    Before the iPhone can be configured it must be activated on the AT&T network. This is performed using iTunes. Simply launch iTunes, connect the new iPhone to the computer using the USB cable, and follow the iTunes Setup Assistant. Once the iPhone is activated you can close iTunes.

    Now launch the iPhone Configuration Utility. The iPhone will automatically be added to the Devices Library in the iCU, as shown below:


    In the Devices library, click the iPhone and enter the user's name and email address to identify the device profile. Note that most iPhones will have the helpful name "iPhone", so the Contact info you enter here will help you out later.


    Now click the Configuration Profiles library and click the New icon to create a new base configuration profile. The base configuration profile can be used for configuration settings that cannot be made using the Exchange ActiveSync Policy, such as iPhone Restrictions or VPN settings. Apple calls these configurations "payloads".


    To create a new base configuration, select the General (Mandatory) setting and enter a Name, Identifier, Organization, and Description, as shown.


    Choose whether the base configuration profile can be removed. Choices are Always, With Authentication (using a password), or Never. For base configurations, I recommend With Authentication to prevent end-users from easily removing company restrictions. You must then supply the Authorization password. Notice there is no "Save" button anywhere. Whatever you configure is written immediately to the configuration profile(s).


    You can now configure your base configuration settings and restrictions, as shown. Refer to the iCU help for configuration settings. If you want to delete a payload from a profile, click the minus sign in the top right corner of the configuration item.


    I recommend using Exchange 2007 / 2010 ActiveSync over-the-air policies for any configuration that can be configured using them (for example, device locking duration and passcode complexity). This will give you the greatest amount of flexibility and will allow you to make changes on the fly.


    Now deploy the iPhone Base Profile to the iPhone by clicking the iPhone name under DEVICES on the left pane. Select the iPhone Base Profile and click Install.


    The iPhone will prompt you to install the iPhone Base Profile, as shown below. Tap Install and the Install Now. After the profile installs, tap Done.


    Back in the iCU, click the Configuration Profiles library. Click the New icon again to create the ActiveSync Profile. Configure the General (Mandatory) section as shown:


    I recommend setting Security so that the ActiveSync Profile can Always be removed. This will allow users to remove the EAS profile, which will help later if you ever need to re-deploy the EAS profile.


    Now click the Exchange ActiveSync section and configure your ActiveSync settings for the iPhone. Enter the Account Name, Exchange ActiveSync Host, Domain, User, and Email Address, as shown:


    Do not enter the user's password. The iPhone will prompt the user for any field you leave blank when it installs the profile. Going forward, the only items you will need to configure for subsequent ActiveSync profiles are the User and Email Address.


    Click the + sign under Authentication Credential Name. The Personal Certificate Store will open for you to add the ActiveSyncUser user certificate to the Exchange ActiveSync profile, as shown:


    Enter the password you entered for the certificate's private key in Phase 1. The certificate and private key will be added to the Exchange ActiveSync configuration. Check Include Authentication Credential Passphrase to include it in the profile, otherwise the device will prompt the user for the passphrase (not good).


    You now have a fully configured iPhone ActiveSync Configuration Profile. All that's left is to export the ActiveSync Profile so that the user can install it. You need the user to do this because the profile will prompt for the user's Active Directory password (something I hope you don't know).


    Ensure that the ActiveSync Profile is selected and click the Export button. The Export Configuration Profile window will open. Select Create and sign encrytped configuration profile for each selected device from the dropdown box and select the correct device, as shown below. Then click Export. This will "marry" the ActiveSync configuration profile to the selected device, preventing it from being installed on any other iPhone. This is how we meet the requirement that "only authorized devices can access Activesync".


    Now I need to jump forward a bit. In the next phase, I will explain how to create the deployment website. For now, let's assume that the website already exists and that the UNC path to the share for that website is \\EXCAS1\eas. Save the configuration profile to that share, naming the profile with the AD user's logon name (for example, jqsmith.mobileconfig).


    Congratulations! You have now created a unique ActiveSync configuration profile with the embedded ActiveSyncUser user certificate, and encypted and married the profile to a specific iPhone.


    This concludes Phase 4 of my series, How to Securely Deploy iPhones with Exchange ActiveSync in the Enterprise. The next phase will cover how to create the website for end-user iPhone profile deployment


  6. #6
    نام حقيقي: 1234

    مدیر بازنشسته
    تاریخ عضویت
    Jul 2009
    محل سکونت
    5678
    نوشته
    5,634
    سپاسگزاری شده
    2513
    سپاسگزاری کرده
    272
    کد:
    http://www.expta.com/2010/03/how-to-securely-deploy-iphones-with_02.html

    Phase 5 - Creating the Website for iPhone Profile Deployment

    This is the sixth post in my series, How to Securely Deploy iPhones with Exchange ActiveSync in the Enterprise. To read an overview of the solution click here. In this phase, we will create the deployment website that end-users will use to download the appropriate iPhone Configuration Profile created in Phase 4.

    Since you're most likely using Outlook Web Access served up by the CAS servers, these make a natural choice for hosting the website. I'll cover how to do this using a single CAS server and then follow up with guidance and best practices for environments with multiple CAS servers.

    Add the ASP Role Service to the Web Server
    Begin by logging into the CAS server with administrator credentials and opening Server Manager. Expand Roles and select Web Server (IIS). Right-click Web Server (IIS) and select Add Role Services. Under Application Development add the ASP role service, as shown.


    Click Next and Install to complete the installation. No restart is required.

    Create the EAS Virtual Directory
    Open Internet Information Services (IIS) Manager. Expand the CAS server name > Sites > Default Web Site. Right-click Default Web Site and choose Add Virtual Directory. Enter EAS for the Alias and click the (...) button to browse for the Physical Path. Navigate to C:\inetpub\wwwroot and click the Make New Folder button. Name the new folder EAS and click OK twice.


    Configure the EAS WebSite Permissions
    Right-click the new EAS virtual directory and choose Edit Permissions. Click the Sharing tab and configure the EAS share with the following share permissions: Add ActiveSync Users (Read) and ActiveSync Admins (Full Control). Remove Everyone from the share permissions.

    On the Security tab click Advanced and Change Permissions. Uncheck Include inheritable permissions from this object's parent, click Add (for Windows Server 2008, click Copy), and click OK twice. Click Edit and remove the Users (CASname\Users) group. Add ActiveSync Users (Read & Execute, List Folder Contents, Read) and ActiveSync Admins (Full Control), and click OK twice.

    Configure the EAS WebSite Authentication
    Select the EAS website and double-click Authentication. Disable Anonymous Authentication and enable Basic Authentication. Select Basic Authentication and click Edit in the Actions pane. Enter the domain name for the Default Domain and click OK.

    Configure MIME Handling
    MIME handling tells the web server how to handle different file extensions and associates file extensions with applications.

    Select the EAS website and double-click MIME Types. Click Add in the Actions pane. Enter mobileconfig for the File name extension and application/iphone-configuration for the MIME type, as shown, then click OK.


    Create the Default Document for the EAS Website
    We now need to create a default ASP document for the folder. This ASP page will be used to cause the iPhone to automatically download the correct iPhone Configuration Profile.

    Download the default.asp page here. Edit default.asp to replace webmail.companyabc.com in the second to last line with the FQDN of your publicly available CAS server. Save the file in the EAS folder. You can now close Internet Information Services (IIS) Manager.

    Putting It All Together
    Now that we have the EAS share and website configured, it's simply a matter of exporting the iPhone configuration profiles to the EAS share (as described in Phase 4), using the ActiveSync user's logon name as the name of the file (for example, jqsmith.mobileconfig).

    You then instruct the user to enter https://webmail.companyabc.com/eas in Safari from the iPhone. The user will be prompted for authentication to access the website. After the user enters his/her AD username and password, the iPhone Configuration Profile that matches the logon name will be downloaded to install on the iPhone. I'll cover those steps in detail in the final phase.

    Special Configuration for Multiple CAS Servers
    If your environment has more than one CAS server in a load-balancing solution used for OWA, you need to perform the procedures above for each of those CAS servers.

    You will also need to make sure that you copy the encrypted and signed iPhone Configuration Profiles to each CAS server's EAS share when you export it. If this pertains to your environment, I recommend using DFS to replicate and distribute the profiles amongst the participating CAS servers. With DFS you can save the iPhone Configuration Profiles to \\domain\EAS and it will replicate to all the CAS servers automatically.

    This completes the configuration of the EAS deployment website.


    This concludes Phase 5 of my series, How to Securely Deploy iPhones with Exchange ActiveSync in the Enterprise. In the last phase I will provide the end-user instructions and procedures


  7. #7
    نام حقيقي: 1234

    مدیر بازنشسته
    تاریخ عضویت
    Jul 2009
    محل سکونت
    5678
    نوشته
    5,634
    سپاسگزاری شده
    2513
    سپاسگزاری کرده
    272
    کد:
    http://www.expta.com/2010/03/how-to-securely-deploy-iphones-with_03.html

    Phase 6 - End-User Deployment of the ActiveSync Profile

    This is the seventh and last post in my series, How to Securely Deploy iPhones with Exchange ActiveSync in the Enterprise. To read an overview of the solution click here. In this phase I will demonstrate the steps and procedures that the end-user will perform to configure their iPhone for ActiveSync. I will also cover some advanced reverse proxy configurations, such as using Microsoft Threat Management Gateway (TMG), ISA, Tivoli Access Manager (TAM), etc.

    As a review, the infrastructure has been built and the necessary software and certificates have been installed and configured. Members of the ActiveSync Administrators group configure iPhone Configuration Profiles, one per iPhone, which includes the user's ActiveSync configuration settings and the ActiveSyncUser user certificate. Each iPhone Configuration Profile (iCP) is married to the iPhone and exported to the EAS share, which is also a website virtual directory on the CAS server. The iCP is named for the user for which it is intended (i.e., jqsmith.mobileconfig).

    In this final phase, the user authenticates to the EAS website using Safari from the iPhone. The iPhone automatically downloads the iCP that matches the username.

    Here are the steps in detail:

    The user is instructed to tap Safari on the iPhone and navigate to https://webmail.companyabc.com/eas (where webmail.companyabc.com is the public FQDN for the CAS server). The user logs into the Secure Website using the user's AD logon name and password, as shown:


    After successfully logging in, the iPhone will download the user-specific ActiveSync Configuration Profile, as shown.


    The green Verified indication signifies that the profile was encrypted and signed for this device.

    If the user taps More Details on the profile, the details of the configuration profile are displayed showing the ActiveSync server and the email address used in the configuration profile, as shown. Note that the user cannot tell that a user certificate is embedded in the configuration profile.


    Back on the Install Profile screen, tap Install and Install Now to begin installing the profile.


    Note that the iPhone only supports one Exchange ActiveSync profile at a time (I sincerely hope this changes in the near future). If the user already has Exchange ActiveSync configured, the iPhone will display the warning, "Can't install Profile. Only one Exchange account can be set up at a given time." Remove the existing ActiveSync settings and begin the process again.


    If the iPhone already has a passcode configured, the user will need to enter it at this time to begin installing the profile.


    During installation of the profile the user is prompted for his/her AD password to connect to their mailbox, as shown:


    Enter the AD password, tap Return, and then tap Next to complete installation of the profile. When the profile has been successfully installed, tap Done. The user can now close Safari.


    If a device lock passcode has been configured in the Exchange ActiveSync Policy, the iPhone will display a message that the user must accept the new policy. It will then prompt the user for a passcode using the complexity requirements specified in the EAS policy.


    It may take a few minutes to complete synchronizing the user's email, calendar, contacts and tasks for the first time.


    If at any time in the future the user needs to re-install the ActiveSync Profile on the iPhone (for example, after a hardware reset or software restore), simply follow these steps again.

    Removing the ActiveSync Profile
    If the user wants to remove the ActiveSync Profile, follow these steps. Removing the ActiveSync profile also removes the user certificate from the iPhone.

    Tap Settings on the iPhone home screen and then tap General. Scroll to the bottom and tap Profiles. Tap the profile to remove and then tap Remove. If the iPhone has a passcode configured, it must be entered to remove the profile.


    Reverse Proxy Scenarios
    Some environments secure their Client Access Servers from direct Internet communication using Microsoft ISA, Threat Management Gateway (TMG) server, or another reverse proxy solution.

    In these scenarios, the public ActiveSync connection and authentication is made at the reverse proxy. The reverse proxy then proxies the authentication to the internal CAS server(s). The CAS servers, themselves, act as reverse proxies to the mailbox servers.

    With an environment such as this, you need to install the certificate and private key on the reverse proxy server(s). The reverse proxies need to be configured to require client certificates and use Basic Authentication. They must then pass the certificate, username, password to the CAS servers to complete the connection. This diagram should help.


    I hope this series helps you with the deployment of iPhones in your Exchange ActiveSync environment. I welcome your comments.

    This concludes my series, How to Securely Deploy iPhones with Exchange ActiveSync in the Enterprise


کلمات کلیدی در جستجوها:

1

2

318topologi diagram proxy server dengan active directorymobileconfig device attributes20How to Securely Deploy iPhones With Exchange ActiveSync in the EnterpriseactivesyncPKI windows 2008 r2 OCSPdeploying exchange activesync basic authentication enable sslremove iphone activesync security policydeploy secure iphone windows cacant put exchange profile both on ipad and iphone cant install profilePublish This Share In Active Directoryconvert certificate into mobileconfigiPhone Configuration Utility not friendly name errorauthentication form in iPhone diagramactivesync security feature diagram648exch2007 activesync authorized device IMEIiphone configuration utility imeitmg Forms-based authentication with password and passphrase activesync

برچسب برای این موضوع

مجوز های ارسال و ویرایش

  • شما نمی توانید موضوع جدید ارسال کنید
  • شما نمی توانید به پست ها پاسخ دهید
  • شما نمی توانید فایل پیوست ضمیمه کنید
  • شما نمی توانید پست های خود را ویرایش کنید
  •