نمایش نتایج: از شماره 1 تا 4 از مجموع 4
سپاس ها 3سپاس
  • 1 توسط patris1
  • 1 توسط patris1
  • 1 توسط patris1

موضوع: Exchange 2010 RTM DAG using Server 2008 R2

  
  1. #1
    نام حقيقي: 1234

    مدیر بازنشسته
    تاریخ عضویت
    Jul 2009
    محل سکونت
    5678
    نوشته
    5,634
    سپاسگزاری شده
    2513
    سپاسگزاری کرده
    272

    Exchange 2010 RTM DAG using Server 2008 R2

    کد:
    http://www.shudnow.net/2009/10/29/exchange-2010-rtm-dag-using-server-2008-r2-%E2%80%93-part-1/
    Now that Exchange Server 2010 is RTM and Server 2008 R2 is RTM, I thought it would be nice to create a multi-part article on how to use create a Database Availability Group (DAG) on two Exchange Server 2010 RTM nodes utilizing Server 2008 R2 as their Operating System. This article is to guide you through the entire process from preparing Server 2008 R2 for Exchange 2010 RTM, installing Exchange 2010 RTM, creating databases, creating a DAG, adding our nodes to the DAG, and then replicating our databases between both servers.

    Lab Setup

    Guest Virtual Machines

    One Server 2008 R2 Enterprise (Standard can be used) RTM x64 Domain Controller.
    Two Server 2008 R2 Enterprise (Enterprise Required) RTM x64 (x64 required) Member Servers where Exchange 2010 RTM will be installed with the Mailbox, Client Access Server, and Hub Transport Server roles.
    One Server 2008 Enterprise (Standard can be used) RTM x64 server that will be our File Share Witness (FSW) Server. This box will not serve any other purpose in this lab other than FSW.
    Assumptions


    • You have a domain that contains at least one Server 2003 SP2 Domain Controller (DC).
    • You have configured the IP settings accordingly for all servers to be on the same subnet which includes the public NICs for both Failover Cluster nodes. I have provided the IP scheme of my lab below, but this will vary depending on your needs and VMware configuration.

    Computer Names

    DAG Node 1 – SHUD-EXC01
    DAG Node 2 – SHUD-EXC02
    Domain Controller – SHUD-DC01
    FSW Server – SHUD-OCSFE01
    Configuration of Exchange 2010 DAG Nodes


    Processor: 4
    Memory: 1024MB
    Network Type - MAPI NIC (MAPI Network)
    Network Type - Replication NIC (Replication Network)
    Virtual Disk Type – System Volume(C:\): 50GB Dynamic
    Storage Note: In a real-world environment, depending on the needs of the business and environment, it is best practice to install your database and logs on separate disks/spindles; both of which are separate from the spindles that the C:\ partition utilize. We will be installing Exchange 2010 RTM databases/logs on the same disks/spindles for simplicity sakes for this lab. While Exchange 2010 databases move a lot of the IO for databases to sequential IO, there’s still quite a bit of Random IO occurring and is still recommended to place the database and logs on separate spindles.
    Network Note: A single NIC DAG is supported. It is still recommended to have at least one dedicated replication network. If using only a single NIC, it is recommended for this network to be redundant as well as gigabit.
    Configuration of Domain Controller


    Processor: 4
    Memory: 512MB
    Network Type - External NIC
    Virtual Disk Type – System Volume(C:\): 50GB Dynamic
    IP Addressing Scheme (Corporate Subnet otherwise known as a MAPI Network to Exchange 2010 DAGs)


    IP Address – 192.168.1.x
    Subnet Mask – 255.255.255.0
    Default Gateway – 192.168.1.1
    DNS Server – 192.168.1.150 (IP Address of the Domain Controller/DNS Server)
    IP Addressing Scheme (Heartbeat Subnet otherwise known as a Replication Network to Exchange 2010 DAGs)


    IP Address – 10.10.10.x
    Default Gateway – 10.10.10.x
    Subnet Mask – 255.255.255.0
    LAB Architecture


    Some notes about this architecture:

    • Exchange 2010 DAGs remove the limitation of requiring Mailbox Only Role Servers as existed with Exchange 2007 Clustered Servers
    • Exchange 2010 is no longer Cluster Aware and only utilizes very few pieces of the Failover Cluster Services such as Cluster Heartbeat and Cluster Networks. More on this in an upcoming part.
    • UM is supported on these two DAG nodes but is recommended to be installed on separate servers
    • For HTTP publishing, ISA can be utilized. For RPC Client Access Server publishing (which ISA cannot due as it publishes HTTP traffic only) with CAS Servers on the DAG nodes, you must use a hardware load balancer due to a Windows limitation preventing you from using Windows NLB and Clustering Services on the same Windows box. Alternatively, you can deploy two dedicated CAS Servers and utilize Windows NLB to load balance your RPC Client Access Server traffic.
    • Two node DAG requires a witness that is not on a server within the DAG. Unlike Exchange 2007, Exchange 2010 automatically takes care of FSW creation; though you do have to specify the location of the FSW. It is recommended to specify the FSW to be created on a Hub Transport Server. Alternatively, you can put the witness on a non-Exchange Server after some prerequisites have been completed. I will be deploying the FSW on a member server (which happens to be my OCS Server in my lab) and will display the prerequisite process for achieving this.

    Preparation of Exchange 2010 RTM DAG Nodes


    Network Interface Card (NIC) Configuration

    First thing we will want to do is configure the IP Configuration of both the MAPI NIC and the Replication NIC.
    We will want to rename our MAPI NIC connection to MAPI and our Replication NIC connection to Replication. To do so, go to Start > Right-Click Network > Properties.

    Once in the Control Panel, Choose Change Adapter Settings.
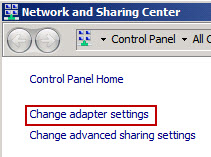
    Now you will be presented with the Network Connections window. This is where you can modify the network properties for each NIC in your server. For your Internal Corporate Connection which is also your MAPI Network, rename your Local Area Connection to Internal. Likewise, for your Private Heartbeat Connection which is also your Replication Network, rename your Local Area Connection to Replication. After you have done this, it will look something similar to the following:

    Network Interface Card (NIC) Configuration

    First thing we will want to do is configure the IP Configuration of both the MAPI and Replication NIC.
    Part of the assumptions earlier in this article as that you have a properly configured TCP/IP Network where all nodes are properly connected to the TCP/IP Network. Because of this, I will skip the Public TCP/IP Configuration and proceed to configuring the Private Heartbeat NIC.
    Important: When configuring the MAPI NIC, you can leave IPv6 enabled if you are using Server 2008 R2. There is an issue with Server 2008 (still exists in SP2) that prevents IPv6 from listening on port 6004 that prevents Outlook Anywhere from working. You can read more about that here. Again, Server 2008 R2 does not have this issue. So if you happen to be installing Exchange 2010 on Server 2008, disable IPv6 as discussed below. If using Server 2008 R2, feel free to leave IPv6 enabled.

    Note: You can, if you’d like, disable File and Printer Sharing for Microsoft Networks. In Exchange 2007 SP1, Microsoft provided the ability to allow for continuous replication to occur over the private network. Because Exchange 2007 utilizes SMB for log shipping, it is required to have the File and Printer Sharing enabled. Exchange 2010 no longer utilizes SMB and now utilizes TCP. More on this later in an upcoming Part.
    In addition to disabling IPv6 from the NIC Properties, I would follow these instructions here to fully disable IPv6 on your Exchange 2010 system as disabling it on the NIC itself doesn’t fully disable IPv6. While the article is based on Exchange 2007, it’s a Windows based modification and will apply to a system running Exchange 2010 as well.
    Double-Click or Right-Click > Properties on the Replication NIC to begin configuration.
    Uncheck the following:

    • Internet Protocol Version 6 (TCP /IPv6) – Disable IPv6 in the registry as well as noted above.

    Select Internet-Protocol Version 4 (TCP /IPv4) and press the Properties button. For NodeA, the only TCP/IP configuration we will need, is the IP Address and Subnet Mask. NodeA’s IP configuration will be 10.10.10.152/24 while NodeB’s IP configuration will be 10.10.10.153/24.

    Go into the Advanced NIC configuration settings by clicking the Advanced button. From there, you will navigate to DNS tab and de-select “Register this connection’s addresses in DNS.”

    Select the WINS tab and de-select “Enable LMHOSTS lookup” and configure the NetBIOS setting to “Disable NetBIOS over TCP/IP.”

    Once you are done configuring the Advanced settings, press OK three times and you will be back at the Network Connections screen. From here, choose Advanced and select Advanced Settings

    You will be presented with the Binding Order for your current NICs. Ensure that the MAPI NIC is on top by selecting MAPI and pressing the green up arrow key on the right-hand side of the dialog.
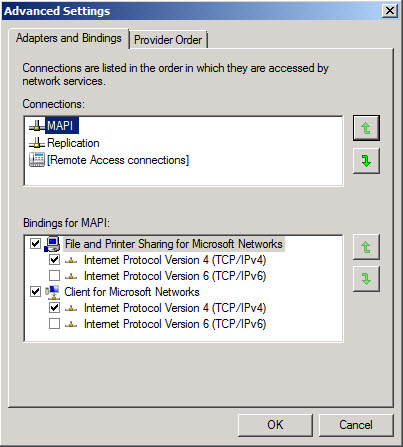
    Exchange 2010 Operating System Prerequisites

    Server 2008 SP2 and Server 2008 R2 prerequisites are quite different. Because our servers are going to be deployed on Server 2008 R2, we will follow the guidance for deploying on Server 2008 R2. You can see the prerequisite requirements here.
    We will be doing our prerequsite installations via PowerShell. You can open PowerShell by going to Start > Run > PowerShell.

    You will first have to import the module for ServerManager. Afterwards, depending on the roles that are installed, different prerequisites are required. Because we are going to be installing HUB/CAS/MBX, the command we would run is the following:

    کد:
    Add-WindowsFeature
    NET-Framework,RSAT-ADDS,Web-Server,Web-Basic-Auth,Web-Windows-Auth,Web-Metabase,Web-Net-Ext,Web-Lgcy-Mgmt-Console,WAS-Process-Model,RSAT-Web-Server,Web-ISAPI-Ext,Web-Digest-Auth,Web-Dyn-Compression,NET-HTTP-Activation,RPC-Over-HTTP-Proxy,Failover-Clustering
    -Restart

    Note: The installation documentation does not have you include Failover-Clustering in the above command. I add it anyways since we’ll be using it for the DAG. I you don’t add it in the above command, you can just add it below when you enable the NetTcpPortSharing. If you don’t add it below, when you add the first node to the DAG, Failover Clustering will be installed anyways. I like to install it beforehand though.
    Finally, we’ll want to modify the NetTcpPortSharing service to start automatically.

    Summary

    Well folks, that is all for Part 1 of this article. For Part 2, I will go through the installation process of one our DAG nodes that will contain the Client Access Server, Hub Transport Server, as well as Mailbox Server roles.
    Elan Shudnow


    موضوعات مشابه:
    exxtreme سپاسگزاری کرده است.

  2. #2
    نام حقيقي: 1234

    مدیر بازنشسته
    تاریخ عضویت
    Jul 2009
    محل سکونت
    5678
    نوشته
    5,634
    سپاسگزاری شده
    2513
    سپاسگزاری کرده
    272
    کد:
    http://www.shudnow.net/2009/11/03/exchange-2010-rtm-dag-using-server-2008-r2-%E2%80%93-part-2/
    Welcome to Part 2 of this article series. In Part 1, we started off by discussing the goal of this lab. That goal is how to deploy a two-node Exchange 2010 RTM Database Availability Group (DAG) on Windows Server 2008 R2. We then prepared our Operating System with the Exchange 2010 Prerequisites which includes software prerequisites as well as modification to hardware configuration such as our Network Interface Cards (NIC)s.
    In this Part, I will go over the installation of one of our Exchange 2010 Servers which will include the Mailbox, Client Access, as well as Hub Transport Server Roles.


    Installation

    With Exchange 2010, we still have the setup.com for unattended mode installations using the Command Line Interface (CLI) as well as setup.exe for attended mode installations using the Graphical User Interface (GUI). We’ll be using the GUI for purposes of this lab.

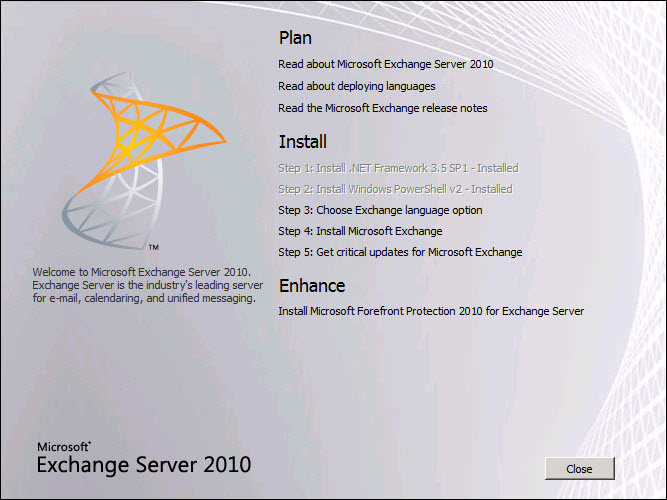
    After running setup.exe, we’ll be presented with the following screen:

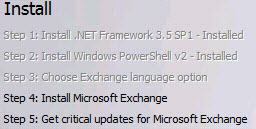
    We can see that the first two steps are already taken care of. If you recall from Part 1, we used PowerShell to take care of the prerequisite installations. So, let’s proceed to Step 2 and choose our language. For me, it will be English.
    When clicking on the language option, we get a couple choices.

    If you choose the first option, Install all languages from the language bundle, you will be provided with an option to download the language pack or use an already downloaded language pack. For purposes of this lab, we’ll choose the second option as we’ll only be using English.
    It’s finally time to choose Step 4 and Install Exchange!

    So let’s go ahead and choose Step 4 and let’s begin installing Exchange.
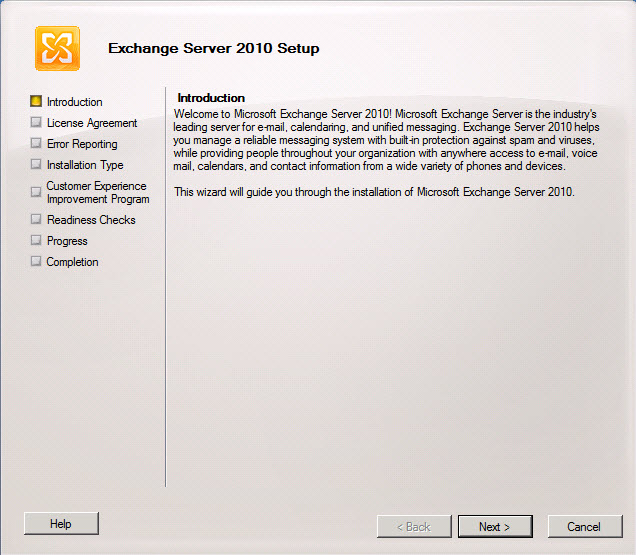
    After some initializing, we’re provided with the Installer GUI. The first page, as you guessed it, an Introduction Page. Read the Introduce Page and Click Next to Continue.

    You are now provided with the License Agreement. After reading the agreement, select “I accept the terms in the license agreement.” Click Next to Continue.

    You are now provided with the Error Reporting page. I like to choose Yes for this option. The reason why is when you call into Premiere Support Services (PSS), they will have some error reporting information from your servers that may assist with the troubleshooting/fixing of your server. Choose whichever option best fits your needs. Click Next to Continue.

    You are now provided with the Installation Type. Previously, in Exchange 2007 CCR/SCC, you could only install the Mailbox Server role. Now, with DAGs, you can have HUB/CAS/MBX/UM all on the same server. We’ll be choosing the Typical Exchange Server Installation for this lab which includes HUB/CAS/MBX as well as the Exchange Management Tools. A nice tip to note is that you can have both the Exchange 2007 Management Tools as well as the Exchange 2010 Management Tools installed on the same box. Click Next to Continue.

    You are now provided with Client Settings. If you have Outlook 2003 or Microsoft Entourage, click Yes. This creates a Public Folder Database and modifies some Exchange options such as OAB Distribution for Public Folders to provide support for these clients. As a side note, there was an msexchangeteam.com blog post that stated that Entourage is getting updated to support Exchange Web Services (EWS) so in the future, you may only have to do this for Outlook 2003 clients and not Entourage. For purposes of this lab, we will not be using Entourage or Outlook 2003. Click Next to Continue.

    Your first server is most likely going to be an internet facing CAS server. Because of this, I specified our Internet-facing FQDN. This will modify your -ExternalURL parameters for this Exchange 2010 CAS. Pretty nifty and an installation option I very much welcome. Click Next to Continue.

    You are now provided with the Customer Experience Improvement Program. I always like to join these things to provide information to Microsoft to help make the product better. Click Next to Continue.

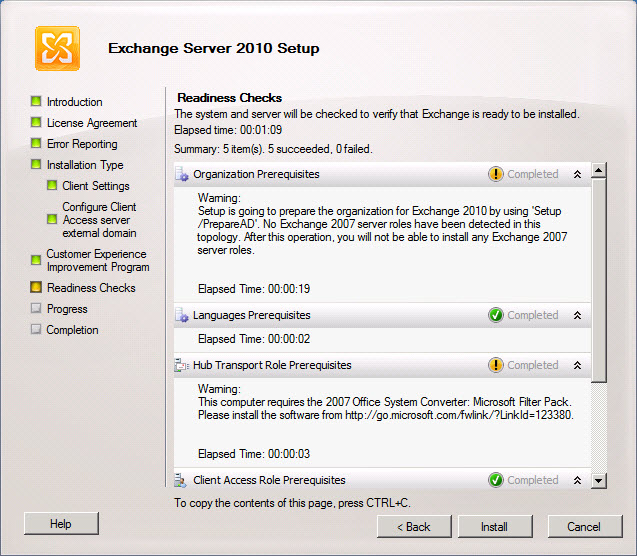
    Finally, it’s time for some Readiness Checks. We can see that the organization will need to be prepared with a /PrepareAD which will prepare the schema, forest, and domain. Make sure the person running this installation is a part of the Enterprise Admins and Schema Admins in order to update the schema.
    We also see that we need the Filter Pack. I didn’t include this in Part 1 as Microsoft updates their Setup Prerequisite files and this (links/files/requirement) may change in the future. So go to the link here to download the filter pack. Make sure you download and install the x64 version. You can install the Filterpack while the Exchange setup is still running. Once the Filterpack is finished installing, Click Install in the Exchange Setup.

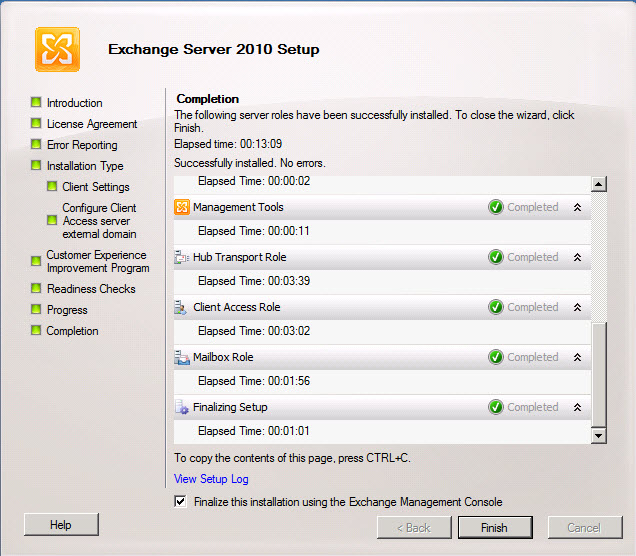
    So now you’re presented with the installation. It only took 10-15 minutes for the install to complete. Pretty fast! Click Finish to Finish.

    Summary

    Well folks, that is all for Part 2 of this article. For Part 3, I will go through the DAG creation process (including File Share Witness on a non-Exchange Server) as well as add our first node to the DAG


    exxtreme سپاسگزاری کرده است.

  3. #3
    نام حقيقي: 1234

    مدیر بازنشسته
    تاریخ عضویت
    Jul 2009
    محل سکونت
    5678
    نوشته
    5,634
    سپاسگزاری شده
    2513
    سپاسگزاری کرده
    272
    کد:
    http://www.shudnow.net/2009/11/10/exchange-2010-rtm-dag-using-server-2008-r2-%E2%80%93-part-3/
    Welcome to Part 3 of this article series. In Part 1, we started off by discussing the goal of this lab. That goal is how to deploy a two-node Exchange 2010 RTM Database Availability Group (DAG) on Windows Server 2008 R2. We then prepared our Operating System with the Exchange 2010 Prerequisites which includes software prerequisites as well as modification to hardware configuration such as our Network Interface Cards (NIC)s. In Part 2, we went over the installation of one of our Exchange 2010 Servers which included the Mailbox, Client Access, as well as Hub Transport Server Roles.
    In this Part, I will go over the creation and configuration of our Database Availability Group (DAG). We will then add our first Node to our DAG.

    File Share Witness


    We will be using a File Share Witness (FSW) on a non-Exchange Server. This will go on our member server, SHUD-OCSFE01.
    We will need to go onto our Member Server and add the “Exchange Trusted Subsystem” group to our Local Administrators Group. If you do not do this, you will get an Access Denied error message. Unlike Exchange 2007, we do not have to pre-create the FSW. We tell Exchange 2010 where the FSW will be located, and because the Exchange Trusted Subsystem is added to the non-Exchange box, it will have the permissions necessary to create, modify, and maintain the FSW.
    It is still recommended to place the FSW on a Hub Transport Server. In fact, if you don’t specify the FSW location (Witness Server and Witness Directory), Exchange 2010 will automatically go out and look for a Hub Transport Server and choose a location on its own. Alternatively, you can specify the Witness Directory and not the Server; in which case Exchange 2010 will automatically choose an Exchange 2010 Server (non-DAG Hub Transport Server preferred) on its own but use the Directory you specified.
    Creating the DAG using the EMC and assigning a Static IP


    Open the Exchange Management Console (EMC) and go into Organization Management > Mailbox. Click on Database Availability Group. As you can see, it’s currently empty.

    Right-Click on the empty space and choose ” New Database Availability Group.”

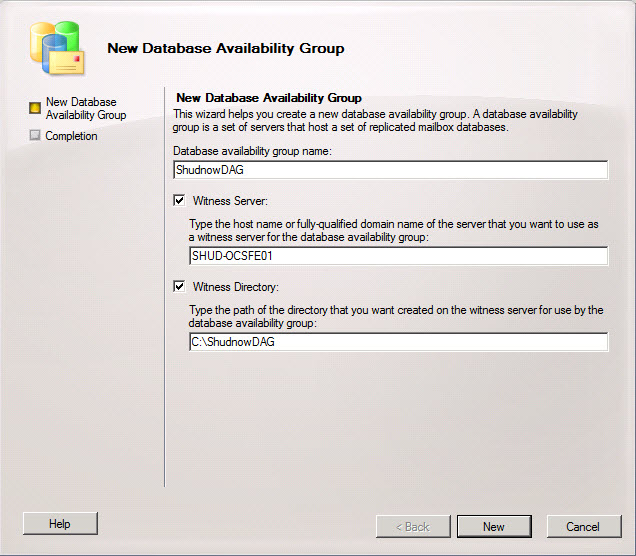
    Let’s give our DAG a name. For purposes of this lab, I used the name ShudnowDAG. As stated, we want SHUD-OCSFE01 to be our witness server and our directory will be C:\ShudnowDAG. Click New to Create our DAG.

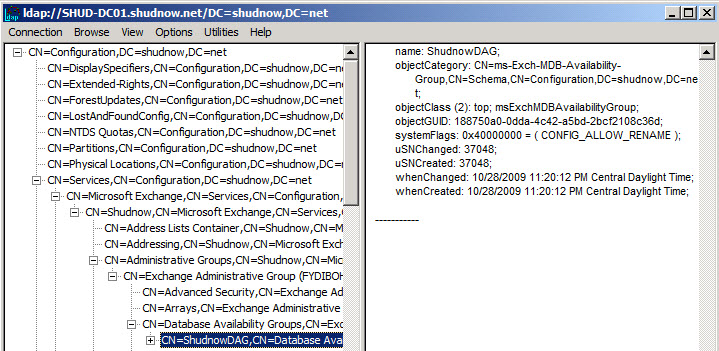
    The DAG is successfully created. At this time, an empty objecting representing the DAG with the name you specified and an object class of msExchMDBAvailabilityGroup is created in Active Directory. You can see the object in either ADSIEdit or LDP. The DN for this object is:
    CN=ShudnowDAG,CN=Database Availability Groups,CN=Exchange Administrative Group (FYDIBOHF23SPDLT),CN=Administrative Groups,CN=Shudnow,CN=Microsoft Exchange,CN=Services,CN=Configuration,DC=shudnow,D C=net


    The completion page will show a warning informing you that the server that contains the FSW is not an Exchange Server. We know this already as it was our intention to do this all along.

    When the GUI is used to create a DAG, it uses DHCP for the Network Name cluster resource. If we want to specify a static IP for our DAG, we need to use the Set-DatabaseAvailabilityGroup cmdlet. The Set-DatabaseAvailabilityGroup cmdlet has a switch called -DatabaseAvailabilityGroupIpAddresseses. This switch will and should never contain IP Addresses for your replication network. This -DatabaseAvailabilityGroupIPAddresses switch is ONLY for your MAPI Network subnets so the Network Name resource can come online due to a dependency in the Failover Clustering Services among some other Exchange related functions.
    Among some other Exchange related functions eh? I knew you would ask! Read on…
    The Network Name resource is what is used to update the password for the Cluster Name Object (CNO) which is the DAG$ computer account. The Network Name resource does not have to necessarily be online for Exchange to operate properly, but if it’s not, the DAG$ computer account will expire. Obviously this would not be a good thing and will cause bad things to happen.
    There are also parts of the code that will attempt to connect to the Network Name resource (such as DAG member modifications), but if that fails, those pieces of code will fall back to the servername once the network timeout occurs.
    Exchange also utilizes the Possible Owners of the Network Name resource for moving the Primary Active Manager (PAM) which is the server that has control of the default Cluster Group which essentially monitors database status and makes the decisions on what server mounts which database. For more information about the Active Manager, click here.
    So moving on… as you can see, our DAG is using DHCP which is denoted by the <> characters.

    So taking a look at our first node, we see our MAPI Network is on the 192.168.1.0 subnet due to the IP Address being 192.168.1.152/24. Our second node is on the same subnet.

    We currently have 192.168.1.154 free so we will use that static IP for our DAG. It’s not absolutely necessary to use a static IP, but if you feel the need to use a static, feel free.
    Now that we have our static IP chosen, let’s run the following command:
    Set-DatabaseAvailabilityGroup -Identity ShudnowDAG -DatabaseAvailabilityGroupIPAddresses 192.168.1.154

    We now see that our DAG has the following static IP configured.

    Creating the DAG using the EMS and assigning a Static IP

    Using the EMS is much faster. Instead of doing all the above, all you need to do is run the following command:
    New-DatabaseAvailabilityGroup
    -Name ShudnowDAG -WitnessServer SHUD-OCSFE01 -WitnessDirectory
    C:\ShudnowDAG -DatabaseAvailabilityGroupIPAddresses 192.168.1.154


    See? Much faster than using the EMC. This will definitely be the method I am going to be using in the future to create a DAG when using a static IP instead of DHCP.
    Adding the first Node to our DAG

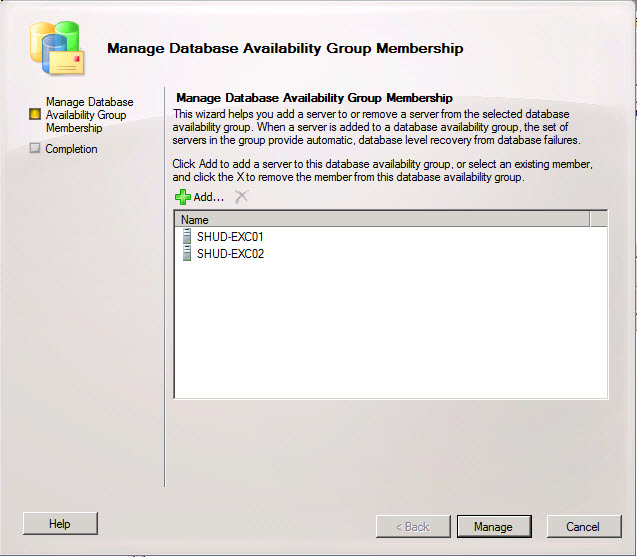
    Well, let’s go ahead and add our first node to the DAG. Go into the EMC > Organization Configuration > Mailbox > Database Availability Group > Right-Click our DAG > Manage Database availability Group Membership.

    Add the first Node. Click Manage to Continue.

    Our first node has successfully been added.

    But… what exactly was done during this behind the scenes when this first node was added to the DAG? The following occurs (from Technet documentation):

    • The Windows Failover Clustering component is installed, if it is not already installed.
    • A failover cluster is created using the name of the DAG.
    • A cluster network object (CNO) is created in default computers container.
    • The name and IP address of the DAG is registered as a Host (A) record in DNS.
    • The server is added to DAG object in Active Directory.
    • The cluster database is updated with information on the databases that are mounted on the added server.

    First of all,we can see the DAG has been registered in DNS.

    Second of all, we can see the DAG’s Cluster Network Object (CNO) has been created in AD.

    Third of all, we can see the cluster has been formed. As you can see, there’s no CMS/Virtual Server in the Services and applications. This is because Exchange 2010 is not a cluster aware application. Exchange 2010 only utilizes Windows Failover Clustering Services for heartbeat information and cluster networks.

    Finally, we can see that the cluster is currently set to Node Majority. When we add our second node, the cluster will be switched to Node Majority with File Share Witness since we’ll have an even number of Exchange Nodes and will need a 3rd node/share to act as our witness. Because of this, we won’t see any FSW data inside of FSW share until our second node is added to the DAG.

    Summary

    Well folks, that is all for Part 3 of this article. For Part 4, I will be adding the second node to the DAG and then create a database which will then be synchronized to the second DAG node


  4. #4
    نام حقيقي: 1234

    مدیر بازنشسته
    تاریخ عضویت
    Jul 2009
    محل سکونت
    5678
    نوشته
    5,634
    سپاسگزاری شده
    2513
    سپاسگزاری کرده
    272
    کد:
    http://www.shudnow.net/2009/11/18/exchange-2010-rtm-dag-using-server-2008-r2-%E2%80%93-part-4/
    Welcome to Part 4 of this article series. In Part 1, we started off by discussing the goal of this lab. That goal is how to deploy a two-node Exchange 2010 RTM Database Availability Group (DAG) on Windows Server 2008 R2. We then prepared our Operating System with the Exchange 2010 Prerequisites which includes software prerequisites as well as modification to hardware configuration such as our Network Interface Cards (NIC)s. In Part 2, we went over the installation of one of our Exchange 2010 Servers which will include the Mailbox, Client Access, as well as Hub Transport Server Roles. In Part 3, we went over the creation and configuration of our Database Availability Group (DAG). We then added our first Node to our DAG.
    In this Part, I will be adding the second node to the DAG and then create a database which will then be synchronized to the second DAG node.

    Adding the second Node to our DAG

    Well, let’s go ahead and add our first node to the DAG. Go into the EMC > Organization Configuration > Mailbox > Database Availability Group > Right-Click our DAG > Manage Database availability Group Membership.

    Add the second Node. Click Manage to Continue.

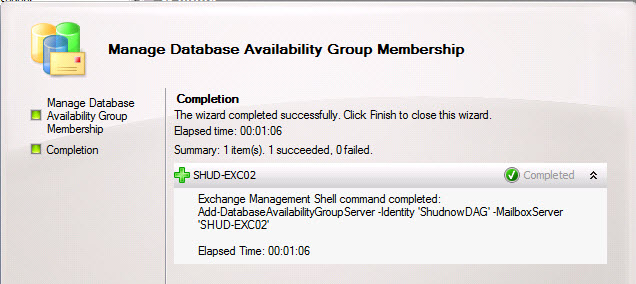
    Our second node has successfully been added.

    But… what exactly was done during this behind the scenes when this second node was added to the DAG? The following occurs (from Technet documentation):

    • The server is joined to Windows Failover Cluster for the DAG.
    • The quorum model is automatically adjusted:
    • A Node Majority quorum model is used for DAGs with an odd number of members.
    • A Node and File Share Majority quorum is used for DAGs with an even number of members.
    • The witness directory and share are automatically created by Exchange when needed.
    • The server is added to DAG object in Active Directory.
    • The cluster database is updated with info on mounted databases.

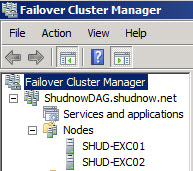
    First of all,we can see the DAG has been joined to the Windows Failover Cluster.

    Second of all,we can see the Quorum Model has been adjusted to Node Majority and File Share Witness because we have an even number of nodes.

    We can also see the FSW is set to the location we specified when creating our DAG (SHUD-OCSFE01 with a path of C:\ShudnowDAG) and that there is Quorum data in this location.

    Adding Database Replicas

    Well, let’s go ahead and create a new database and replicate it. Go into the EMC > Organization Configuration > Mailbox > Database Management.
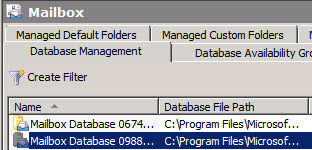
    We can see there’s currently two databases that were created during the installation on our Exchange Mailbox Servers; one for the first node and one for the second node.

    We can’t delete these databases because they contain some arbitration mailboxes. Arbitration mailboxes are special mailboxes that are used to manage approval workflows. For example, moderated e-mails. We can see these arbitration mailboxes and what mailbox databases they belong to by running the following command:
    Get-Mailbox -Arbitration | FL Name,Database


    Create a new Database. I will create a new mailbox database with the name, LABDatabase01. I will then also mount the database The two commands I will use to do this are:
    New-MailboxDatabase -Name LABDatabase01 -Server SHUD-EXC01
    Mount-Database -Identity LABDatabase01


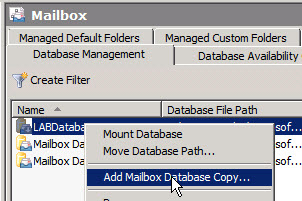
    Let’s add a Mailbox Database Copy to our second DAG node so we have redundant databases. Database Management > Select the new Database > Right-Click and Choose Add Mailbox Database Copy.”

    Choose the second server for the server that will obtain our Database Copy. Click Add to Continue.

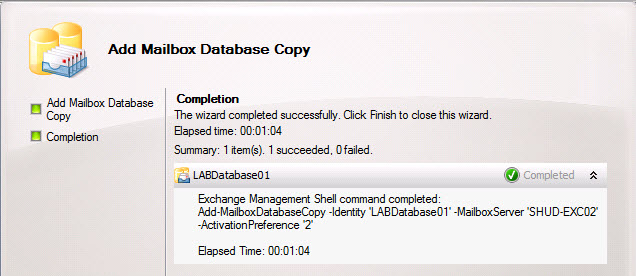
    We should then see a successful copy being added to our second DAG Node.

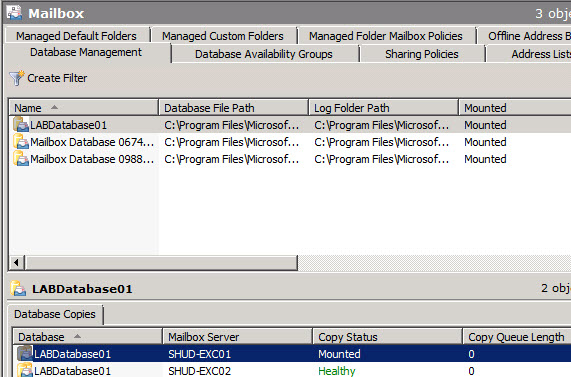
    To verify, in the EMC, click on the LABDatabase01 and we should see a Mounted copy and a Healthy copy below.

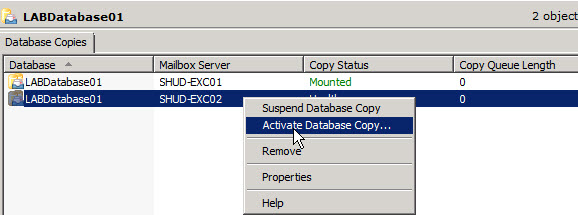
    To do a switchover, you can right-click on the copied database and choose Activate Database Copy.

    DAGs Networks


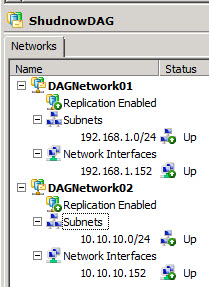
    Go into the EMC > Organization Configuration > Mailbox > Database Availability Group. At the bottom, you will see the Networks. You can see both are enabled for Replication. Exchange 2010 always uses the last recently used replication network. You can leave both enabled to Replication or you can disable the MAPI Network from having Replication enabled. This will force all replication to go over your dedicated replication network. Keep in mind, when you do this, your MAPI Network can still do replication. It will only do replication when there are no dedicated replication networks available. For example, if the dedicated replicated network were to go down due to some switch but your MAPI network was available, replication would begin to utilize the MAPI network.

    If you were in a situation where you were adding a 3rd node to the DAG and it was in a different subnet, you will need to add an IP Address for that subnet so the Network Name resource can come online for that subnet. So let’s say we now added a 3rd DAG node that was on the 172.16.0.0/12 subnet. Remember our Set-DatabaseAvailabilityGroup cmdlet with the -DatabaseAvailabilityGroupIpAddresseses switch? In this case, let’s say 172.16.2.154 was going to be our DAG IP for that subnet. We would have to add that IP to the switch above. But that switch is not additive, so we would have to run the following command:
    Set-DatabaseAvailabilityGroup -Identity ShudnowDAG -DatabaseAvailabilityGroupIPAddresses 192.168.1.154,172.16.2.154


    As you can see, I specified both 192.168.1.154 in addition to 172.16.2.154.
    What happens is if the DAG fails over to the second DAG node, the DAG will keep the 192.168.1.154 address. But if it fails over to the 3rd node, it will use the 172.16.2.154. Again, this command has nothing to do with the replication networks, only the MAPI Networks. And again, it’s only so the Network Name resource can come online which is a cluster dependency. No clients will connect to this Network Name resource and Exchange has multiple mechanisms to connect to Exchange.
    Summary

    Well folks, that is all for Part 4 of this article as well as the article series. Thanks for reading


    exxtreme سپاسگزاری کرده است.

کلمات کلیدی در جستجوها:

1

Exchange 2010 DAG

3

Exchange 2010 DAG IPV6 disable

The Exchange Trusted Subsystem is not a member of the local Administrators group on specified witness server

exchange dag

exchange

2

dag replication

summary of cluster exchange 2010

dag naming conventions

dedicated nic for dagexchange dag naming conventionsexchange 2010 dag 2 virtual network cardscan i disable ipv6 on exchange 2010 dagnaming convention for exchange 2010 server roles mbxerror add second node 2010 dagisapi vmware exchange 2010 dag failoverhow to recreate dag computer network nameexchange dag ipv6alternative witness directory is emptyExchange 2010 DAG WINSexchange 2010 server 2008 standard DAG early adoptersexchange 2010 DAG modeexchange 2010 change dns server to ipv6

برچسب برای این موضوع

مجوز های ارسال و ویرایش

  • شما نمی توانید موضوع جدید ارسال کنید
  • شما نمی توانید به پست ها پاسخ دهید
  • شما نمی توانید فایل پیوست ضمیمه کنید
  • شما نمی توانید پست های خود را ویرایش کنید
  •