کد:
http://exchangeinbox.com/article.aspx?i=102&t=4
For many years ExMerge provided for importing and exporting of mailboxes to/from PSTs. The Exchange 2007 SP1 cmdlets are now ready to take over the job bringing some improvements, but also disappointing in some areas.
Last month Exchange 2007 SP1 reached its final release stage. This is packed with new functionality, including the highly awaited ExMerge replacement for PST imports and exports.
As discussed in
Using ExMerge with Exchange 2007, this functionality was already available through ExMerge. Indeed following that article I received tens of emails confirming that ExMerge was working great with Exchange 2007. However the ExMerge solution is not supported by Microsoft.
Exchange 2007 SP1 now fills this gap through the Import-Mailbox and Export-Mailbox cmdlets. These provide a powerful solution consistent with the Exchange 2007 administration interface that Microsoft is happy to support. Just like ExMerge, the cmdlets allow for advanced operations such as merges and email filtering based on various criteria. Furthermore the cmdlets address one of the most problematic ExMerge issues, the 2GB PST limit.
As soon as we fire export-mailbox to produce our first PST, we are greeted with some bad news:
"You are running on a 64-bit computer. To export to or import from a .pst file, you must be running a 32-bit computer that has Outlook 2003 SP2 or later installed.
At line:1 char:1
+ e <<<< xport-mailbox -identity administrator -pstfolderpath C:\PSTs"
The cmdlets certainly provide advancements over ExMerge. However similar to ExMerge these still suffer from long-winded, trouble prone setup requirements. In fact today we won't discuss the cmdlets usage in depth. Instead we focus on setting-up and satisfying the requirements for the cmdlets to run.
Preparing the Machine
From the introductory error, we already know these cmdlets won't run on the 64-bit Exchange 2007 server. Instead we must setup a 32-bit machine with the Exchange 2007 Management Tools. Many will remember that Exchange 2007 is not supported on 32-bit. However here we won't install a full server. Only the Management Tools are required, a setup that MS does support on 32-bit as well.
So it is time for us to start downloading the 32-bit
Exchange 2007 SP1 build. This build includes the complete Exchange install i.e. we don't have to install the RTM version first.
While the download is in progress we will prepare a typical 32-bit XP SP2 machine with all the Exchange 2007 prerequisites:
Next we also need to install the Microsoft Internet Information Services Common Files from the Control Panel Add/Remove Programs applet.
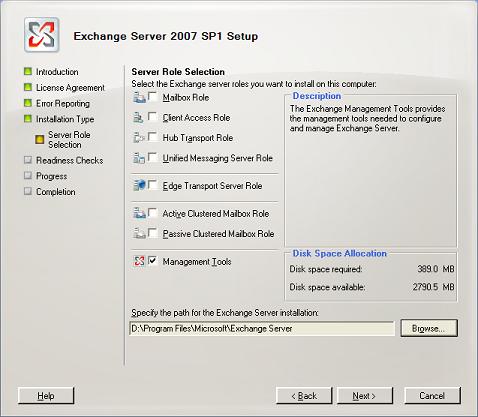
We should now be set to run the Exchange 2007 installation. Here we follow the wizard until reaching the Installation Type selection. At this point we go for a Custom Exchange Server Installation. This allows us to select the exact component to install from which we just select the 'Management Tools' option.
Finally we have to install Outlook 2003 SP2 or Outlook 2007. This is probably the most disappointing requirement. If Outlook happens to be in use for other administrative tasks this should be no problem, otherwise smaller shops won't be happy to consume a license in this manner. In return we get the latest Personal Folders Store provider that allows us to beat the 2GB PST limit.
Account Rights
Just like in case of ExMerge it is easy to predict that access rights will be causing most headaches. The account used to run the cmdlets must be assigned:
- Local Administrator on the XP machine.
- Exchange Server Administrator Role on the target Exchange 2007 mailbox server.
- Full access to the mailboxes against which the import/export operation is run.
For this article I created a new user named PSTAdmin. We can normally work with existing user accounts. However if we run into access rights problems, creating a new account helps starting afresh.
Assign the Exchange Server Administrator Role
- Open the Management Console, right-click the Organization Configuration and select Add Exchange Administrator.
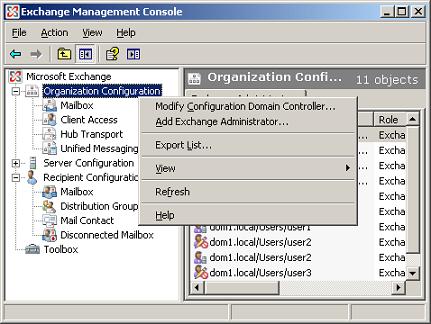
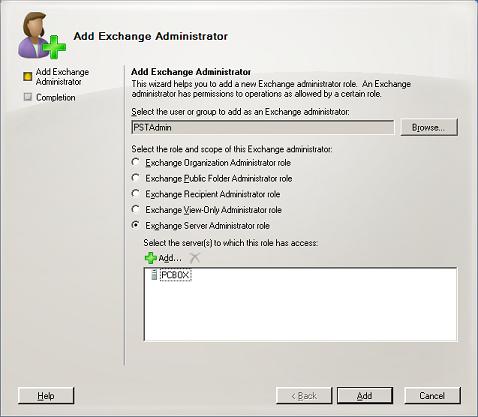
- Click on browse to select the PSTAdmin account.
- Select 'Exchange Server Administrator role'
- Click on Add and select the Exchange mailbox server. Here my virtual machine was unimaginatively named 'PCBOX'.
- Complete the wizard. This will return a warning saying:
"To fully administer exchange server, you need to manually add the user or group 'dom1.local/Users/ PSTAdmin' to the built-in local administrators group on server 'PCBOX'."
From my experience this was not necessary for these cmdlets. If your experience is different please post a comment!
Allowing Mailbox Access
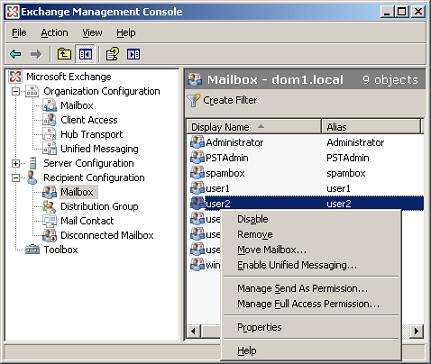
When running the cmdlets against a few mailboxes, we could assign the Full Access permission on a mailbox using the Management Console. This is another Exchange 2007 SP1 addition. To do this, just select the mailbox and select Manage Full Access Permission.
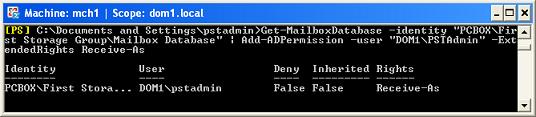
Editing the permissions of individual mailboxes quickly becomes unpractical. If performing brick-level backups we will want rights over all mailboxes within the database. Furthermore we don't want to modify the rights for each newly created mailbox. This is when the command shell becomes the best option. These cmdlets will run happily if we assign the RecieveAs right over the mailbox database of interest. In this manner new mailboxes will also be covered.
Get-MailboxDatabase -identity "PCBOX\First Storage Group\Mailbox Database" | Add-ADPermission -user "DOM1\PSTAdmin" -ExtendedRights Receive-As
Here we are piping the results of Get-MailboxDatabase to Add-ADPermission. Add-ADPermission is fed with the account (DOM1\PSTAdmin) for which the extended right Receive-As is to be set.
 Running the Cmdlets
We are ready to start running the cmdlets. Here are some simple examples.
Export the mailbox for user1 to d:\temp\user1.pst:
export-mailbox -identity user1 -pstfolderpath d:\temp
Export all mailboxes from the selected mailbox database:
Get-Mailbox -Database "PCBOX\First Storage Group\Mailbox Database" | Export-Mailbox -PSTFolderPath d:\temp\export
Import winfo.pst to the
winfo@dom1.local mailbox:
import-mailbox -identity winfo@dom1.local -PSTFolderPath d:\temp\psts\winfo.pst
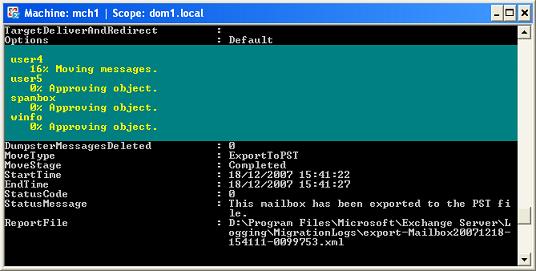
When running these commands take note of the returned report. The Status Message value will show any error information. The Report File value will return a path to an XML report. This is especially useful when multiple mailboxes are processed. The following image shows a snippet of what export-mailbox returns:
Check the References section for more details and practical examples on using these cmdlets.
Troubleshooting Tips
To conclude this discussion I researched some of the errors that may be returned when running these cmdlets.
Server Administrator Role Not Assigned
Without the Server Administrator Role, a user won't even be able to export his own mailbox. Here is what export-mailbox returns in that case:
"The specified mailbox database "PCBOX\First Storage Group\Mailbox Database" does not exist."
Missing Mailbox Access Rights
Once the Server Administrator Role is assigned the user will be able to export and import against his own mailbox. But on trying any other mailbox the command will fail unless the necessary access rights are assigned. The following error is returned in that case:
"Error occurred in the step: Moving messages.
Failed to copy messages to the destination mailbox store with error:
MAPI or an unspecified service provider.
ID no: 00000000-0000-00000000"
Final Tips
The SP1 Import-Mailbox and Export-Mailbox cmdlets filled a gap that for some administrator was wide enough for them to delay the deployment of Exchange 2007. The cmdlets provide improved functionality over ExMerge. However the setup is still as complex as that for using ExMerge with Exchange 2007. This is an area where the Exchange team could certainly do better.
References
Using ExMerge with Exchange 2007
Export-Mailbox
Import-Mailbox
How to Export Mailbox Data
Exchange 2007 SP1

 LinkBack URL
 About LinkBacks

