PART4
Welcome to Part 4 of this article series. In Part 1, we started off by discussing the goal of this lab. That goal is to showcase Server 2008’s built in iSCSI Initiator software to connect to an iSCSI Target and deploy a Single Copy Cluster (SCC) for Exchange 2007 SP1 Failover Clustering. We first discussed what the lab setup is going to be using VMware Workstation, and then proceeded to the configuration of RocketDivision’s StarWind iSCSI Target software. We then went into Exchange 2007 and did the initial iSCSI Initiator connection to our iSCSI Target.
In Part 2, we prepared our Cluster Nodes by installing any prerequisites needed prior to the cluster formation and Exchange 2007 SP1 installation. When that was complete, we continued with our iSCSI configuration by adding our LUNs to the Cluster Nodes, partitioned these LUNs, formatted these LUNs, and ensuring that shared disk storage was working as intended.
In Part 3, we formed our cluster beginning with Node A followed by Node B. Once our cluster was formed, we will proceed with configuring the cluster to ensure optimal operating for our Exchange server. This consisted of cluster network configuration, quorum configuration, etc. Once configuration was completed, we validated cluster operations. This included testing failover.
In this final Part, we will install Exchange into our Cluster. The first step will be to install the Active Clustered Mailbox Role followed by our Passive Clustered Mailbox Role. We will then proceed with how to manage our new Exchange Cluster.
Active Node Exchange 2007 Cluster Installation (NodeA)
Final Preparation
We have finally reached the point where we will install Exchange 2007. Don’t forget that one of the prerequisites is to already have a Client Access Server and Hub Transport Server deployed. If you have not done this yet, I suggest you go do this before proceeding.
Insert your Exchange 2007 SP1 media (SP1 media required) and insert it into our Active Node. In the case of this lab, we are using VMware, so I will be mounting an ISO image to our Active Node (NodeA).
Please ensure that NodeA is currently the Active Node before proceeding. Go to
Start >
Administrative Tools >
Failover Cluster Management >
Expand our Cluster >
Nodes. Once here, we can view both Nodes and see what disks they currently own.

If NodeA does not currently have ownership of our Database and Disk Quorum disk, run the following commands:
Cluster group “Available Storage” /move:<ActiveNodeName>
Cluster group “Cluster Group” /move:<ActiveNodeName>
Note: There are two Cluster Groups. The first is Available Storage which contains our Database Disk. The second is the Cluster Group which contains our Quorum Disk. It is only essential that NodeA owns the Database disk for installation. For safe measures, I still like to make sure the node we are working on owns both the Database and Quorum Disk.
Installation
Run
Setup.exe and choose to
Install Exchange Server 2007 SP1. This will bring you to several Pages in which you should review, accept, and continue. These pages include the
Introduction Page, License Agreement, and
Error Reporting, . Review this information and click
Next to
Continue.
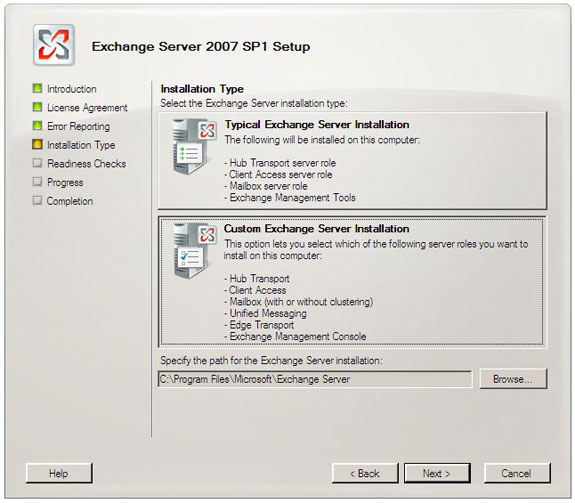
Once you have reached the
Installation Type page, select
Custom Exchange Server Installation. We will want to use this option because the Typical Exchange Server Installation installs the Hub Transport Server Role, Client Access Server Role, and Mailbox Server Role. Because we are installing the Mailbox Server Role on a Cluster, we are limited to installing only the Mailbox Server Role. This is the reason why we have installed a Hub Transport Server and Client Access Server on another server prior to installing the Mailbox Server Roles on our Cluster Nodes. Click
Next to
Continue.
At the
Server Role Selection page, choose
Active Clustered Mailbox Role. As you can see, all other options have been greyed out and you are forced to install the
Management Tools. Click
Next to
Continue.

At the
Cluster Settings page, choose
Single Copy Cluster. Then specify the name of the
Clustered Mailbox Server Name. This is the name your users will see when specifying what server their mailbox is housed on. Finally, choose the path your database files will be installed. You cannot choose the root path and will be forced to create a subfolder. Click
Next to
Continue.

Select the
IP Address that the Cluster Mailbox Server (CMS) EXServer01 will listen on. In the case of this lab, NodeA uses 192.168.119.160, NodeB uses 192.168.119.161, so we will use
192.168.119.162. We do not need to specify a Second Subnet as we are not deploying our Cluster across multiple subnets. Click
Next to
Continue.

Choose your Client Settings. If you have computers running Outlook 2003 or earlier or Entourage, choose Yes. Otherwise, choose No. If the wrong option is chosen, don’t worry, you can always add public folders once Exchange is installed. Click
Next to
Continue.

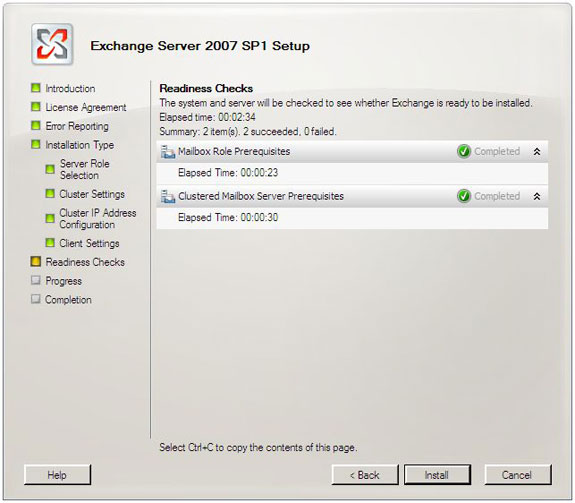
You will begin to see Readiness Checks being run for both the Mailbox Role as well as the Clustered Mailbox Server. Once this is completes successfully, click
Install to
Continue. If you have any failures, those failures will need to be remedied prior to continuing with the cluster installation.
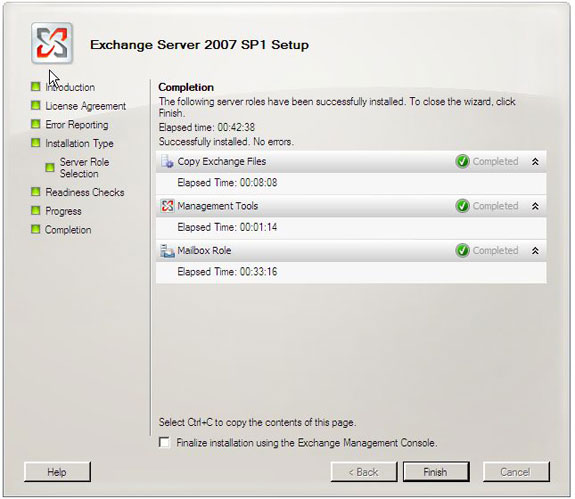
Installation will commence. Upon a sucessful instatllation completeion, you will see status of all installation steps shown as Completed. If cluster installation has been unsuccessful, troubleshooting will need to ensue to ensure you can get Exchange installed on the cluster successfully. Clear the check box, “
Finalize installation using the Exchange Management Console.” Click
Finish to continue.

You will be prompted to reboot, but do not reboot. There is one step you will want to do prior to a reboot. Open the Exchange Management Shell (
Start >
All Programs > Microsoft Exchange Server 2007 > Exchange Management Shell).

We will now stop the CMS by running the following command:
Stop-ClusteredMailboxServer <CMSName> -StopReason Setup -Confirm:$false

You may now proceed to reboot NodeA. One thing to note, is that when you reboot NodeA, the disks will be moved over to NodeB which does not have Exchange installed. Because of this, once NodeA is back up, you will want to move the CMS group, Available Storage group, and Cluster Group group back to NodeA.
To get a list of the existing Cluster Groups that are installed, type the following command in the Command Prompt:
Cluster Group

As we can see, the Cluster Groups successfully moved over to NodeB. The reason why we wanted to turn off the CMS prior to shutting down, is because NodeB does not have Exchange installed and we don’t want the CMS try attempt to come online.
Run the following three commands to move all three groups back over to NodeA:
Cluster group “Available Storage” /move:NodeA
Cluster group “EXServer01″ /move:NodeA
Cluster group “Cluster Group” /move:NodeA

We will now want to move the storage that is currently in the Available Storage group over to the CMS group, EXServer01. The Database disk, named database, is the only disk currently in the Available Storage group. To do this, we will run the following command:
Cluster res “Database” /move:”EXServer01″

Continue by making the Database disk a dependency of our Exchange Database. To find out how you will want to format the Database name for the dependency, open up the Failover Cluster Management MMC. Expand our
Cluster > S
ervices and Applications >
CMS (EXServer01).
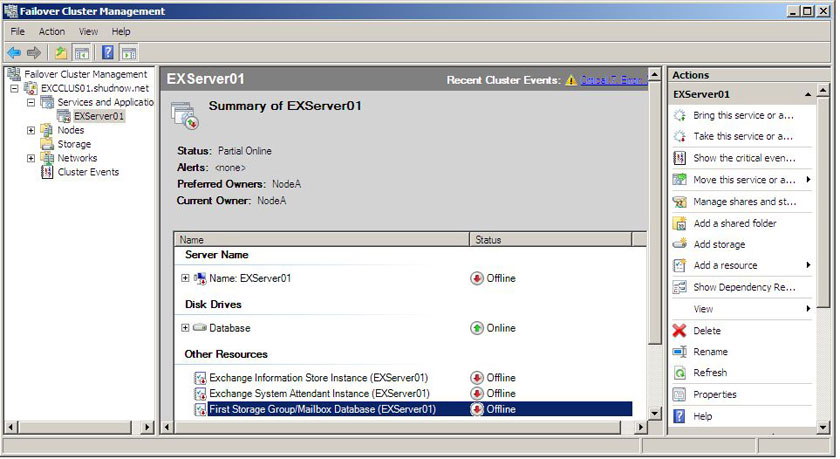
Take a look at the highlighted text. That is the name of our Database we will use in our Cluster dependency command. We will now want to make the Database disk a dependency of our Mailbox Database by running the following command:
Cluster EXCCLUS01 res “First Storage Group/Mailbox Database (EXServer01)” /AddDep:”Database”

The final configuration of NodeA is to configure the physical disk resource policies so that a failure of a disk resource does not cause failover of the CMS to another node by running the following command:
Cluster EXCCLUS01 res “Database” /prop RestartAction=1
Passive Node Exchange 2007 Cluster Installation (NodeB)
Final Preparation
Insert your Exchange 2007 SP1 media (SP1 media required) and insert it into our Passive Node. In the case of this lab, we are using VMware, so I will be mounting an ISO image to our Passive Node (NodeB).
Please ensure that NodeA is currently the Active Node before proceeding. Open a Command Prompt and type the following command:
Cluster group

We should see NodeA as the owner of all three Cluster Groups. If NodeA does not currently have ownership of all the Cluster Groups, run the following commands:
Cluster group “Available Storage” /move:NodeA
Cluster group “EXServer01″ /move:NodeA
Cluster group “Cluster Group” /move:NodeA
Installation
Run
Setup.exe and choose to
Install Exchange Server 2007 SP1. This will bring you to several Pages in which you should review, accept, and continue. These pages include the
Introduction Page, License Agreement, and
Error Reporting, . Review this information and click
Next to
Continue.
Once you have reached the
Installation Type page, select
Custom Exchange Server Installation. We will want to use this option because the Typical Exchange Server Installation installs the Hub Transport Server Role, Client Access Server Role, and Mailbox Server Role. Because we are installing the Mailbox Server Role on a Cluster, we are limited to installing only the Mailbox Server Role. This is the reason why we have installed a Hub Transport Server and Client Access Server on another server prior to installing the Mailbox Server Roles on our Cluster Nodes. Click
Next to
Continue.
At the
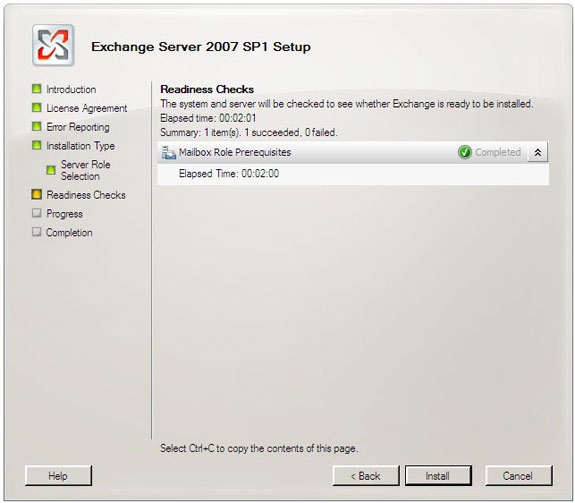
Server Role Selection page, choose
Passive Clustered Mailbox Role. As you can see, all other options have been greyed out and you are forced to install the
Management Tools. Click
Next to
Continue.

You will begin to see Readiness Checks being run for both the Mailbox Role as well as the Clustered Mailbox Server. Once this is completes successfully, click
Install to
Continue. If you have any failures, those failures will need to be remedied prior to continuing with the cluster installation.
Installation will commence. Upon a sucessful instatllation completeion, you will see status of all installation steps shown as Completed. If cluster installation has been unsuccessful, troubleshooting will need to ensue to ensure you can get Exchange installed on the cluster successfully. Clear the check box, “
Finalize installation using the Exchange Management Console.” Click
Finish to continue.
Once you have reached this step, congratulations, your Exchange Cluster has finally been fully deployed. You will be prompted to reboot. Go ahead and do so.
All there is really now is to start the CMS back up, and you’re done; besides general configuration. To start the Exchange CMS, open the Exchange Management Shell (
Start >
All Programs > Microsoft Exchange Server 2007 > Exchange Management Shell).
We will now start the CMS by going on NodeA and running following command:
Start-ClusteredMailboxServer <CMSName> -Confirm:$false

Just to ensure that all Cluster Groups are online, run the following command:
Cluster Group
 Post Installation
Generally, now would be the time to go do your general configuration. This includes licensing, configuring the Autodiscover Service, set Quotas, etc…
Before we do any of that, let’s make sure that the CMS will fail over to to NodeB. You can use the Cluster Group /move command, but it is best practice to use the Exchange Management Shell (EMS) command, Move-ClusteredMailboxServer. This is required in CCR Clusters due to the Cluster command not being Microsoft Cluster Service Aware which can ultimately break the log shipping mechanism. You can read more about using Cluster Group /move vs Move-ClusteredMailboxServer
here.
Let’s move our CMS over to NodeB by running the following command in the EMS:
Move-ClusteredMailboxServer EXServer01 -MoveComment “Failover to NodeB” -TargetMachine:NodeB -Confirm:$False
After running this command, go into the Failover Cluster Management MMC. Expand our
Cluster > S
ervices and Applications >
CMS (EXServer01). There are a few things to take note of here. There are two preferred owners of this CMS, NodeA and NodeB. This means, if NodeA is the current owner of the resources of this CMS and it goes down, NodeB will take over. The same goes in a vice versa scenario.
As we can see, the current owner is NodeB which means the Move-ClusteredMailboxServer command was successful. All the “Other Resources” which are the Exchange Resources are also currently online. We have a successful verified Exchange Cluster failover.

Moving the CMS via the EMS is not the only way to move a CMS. Ever since Exchange Server 2007 SP1 was released, the ability to move a CMS to another node was added into the Exchange Management Console (EMC). So let’s go check out this command and move the CMS back over to NodeA, but this time, by using the EMC (
Start >
All Programs > Microsoft Exchange Server 2007 > Exchange Management Console). Then Expand
Server Configuration >
Mailbox > Choose
Managed Clustered Mailbox Server from the Action Pane.

Select the option “Move the clustered mailbox server to another node.” Select
Next to
Continue.

Select NodeA as your Target Machine and set the Move comment to whatever you like. Select
Next to
Continue.

Review the
Configuration Summary. Once satisfied, Choose
Move to
Continue.

Once again, after executing this move, go into the Failover Cluster Management MMC. Expand our
Cluster > S
ervices and Applications >
CMS (EXServer01). As we can see, the current owner is NodeA which means the move via the EMC was successful. All the “Other Resources” which are the Exchange Resources are also currently online. We have a successful verified Exchange Cluster failover.
Summary
Well folks, that is all for Part 4 of this article and concludes this article series. To recap on what was included in Part 4 of this article series, we first started off recapping what was included in Part 1, Part 2, and Part 3 of this article and what the goal of this lab is for. It is to showcase Server 2008’s built in iSCSI Initiator software to connect to an iSCSI Target and deploy a Single Copy Cluster (SCC) for Exchange 2007 Failover Clustering. In Part 2, we left off at the final stages of disk preparation. All of the shared disks were successfully portioned, formatted, and named. In Part 3, we formed the cluster, beginning with Node A followed by Node B. We then proceeded with configuring the cluster networks, quorum, and validated our failover cluster worked.
In Part 4, we installed the Exchange 2007 Active Clustered Mailbox role and the Passive Clustered Mailbox role. We then performed management on our Clustered Mailbox Server (CMS) by showing how we can move the CMS via the Exchange Management Shell (EMS) as well as using the Exchange Management Console (EMC).
I hope these articles will help you out on your endeavor to installing Exchange 2007 on Windows Server 2008. Thank you for viewing.
Elan Shudnow

 1سپاس
1سپاس
 LinkBack URL
 About LinkBacks

